


South Mountain Loop Trail in Berlin, CT: Reservoir Views and a Hidden Ridgeline
South Mountain Trail, Berlin CT: Complete Hiking Guide
Hike the South Mountain Loop from Chamberlain Highway in Berlin, Connecticut, for views of Merimere Reservoir, Mine Island, East Peak, and downtown Meriden.
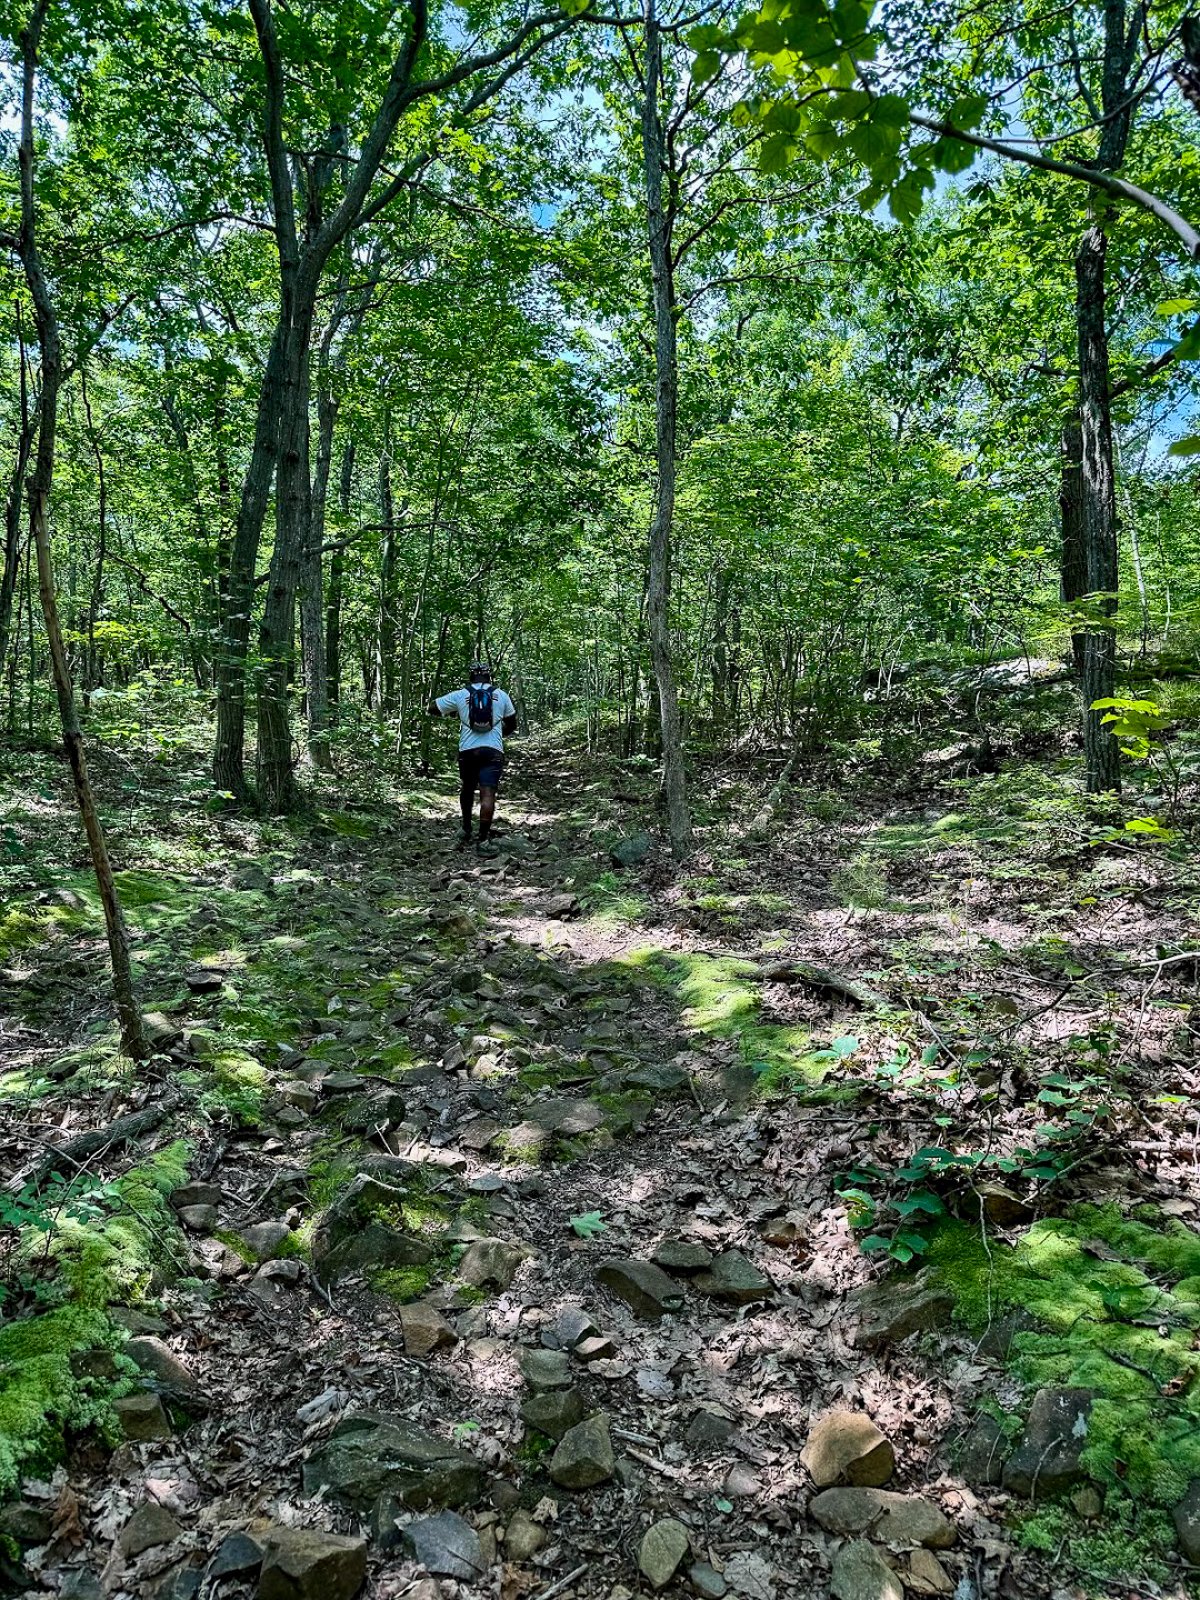
South Mountain is a hidden gem to me. I don’t see this mentioned too often online so exposing it I am conflicted. However, I also want my fellow hikers and followers to know this awesome hike resides in CT! With that said, hikers etiquette as always and leave not trace behind please. I would have never thought a hike like this existed off the side of a road. This trails begins aside Chamberlain Highway that initially feels more like a walk through the woods than a scenic mountain hike.
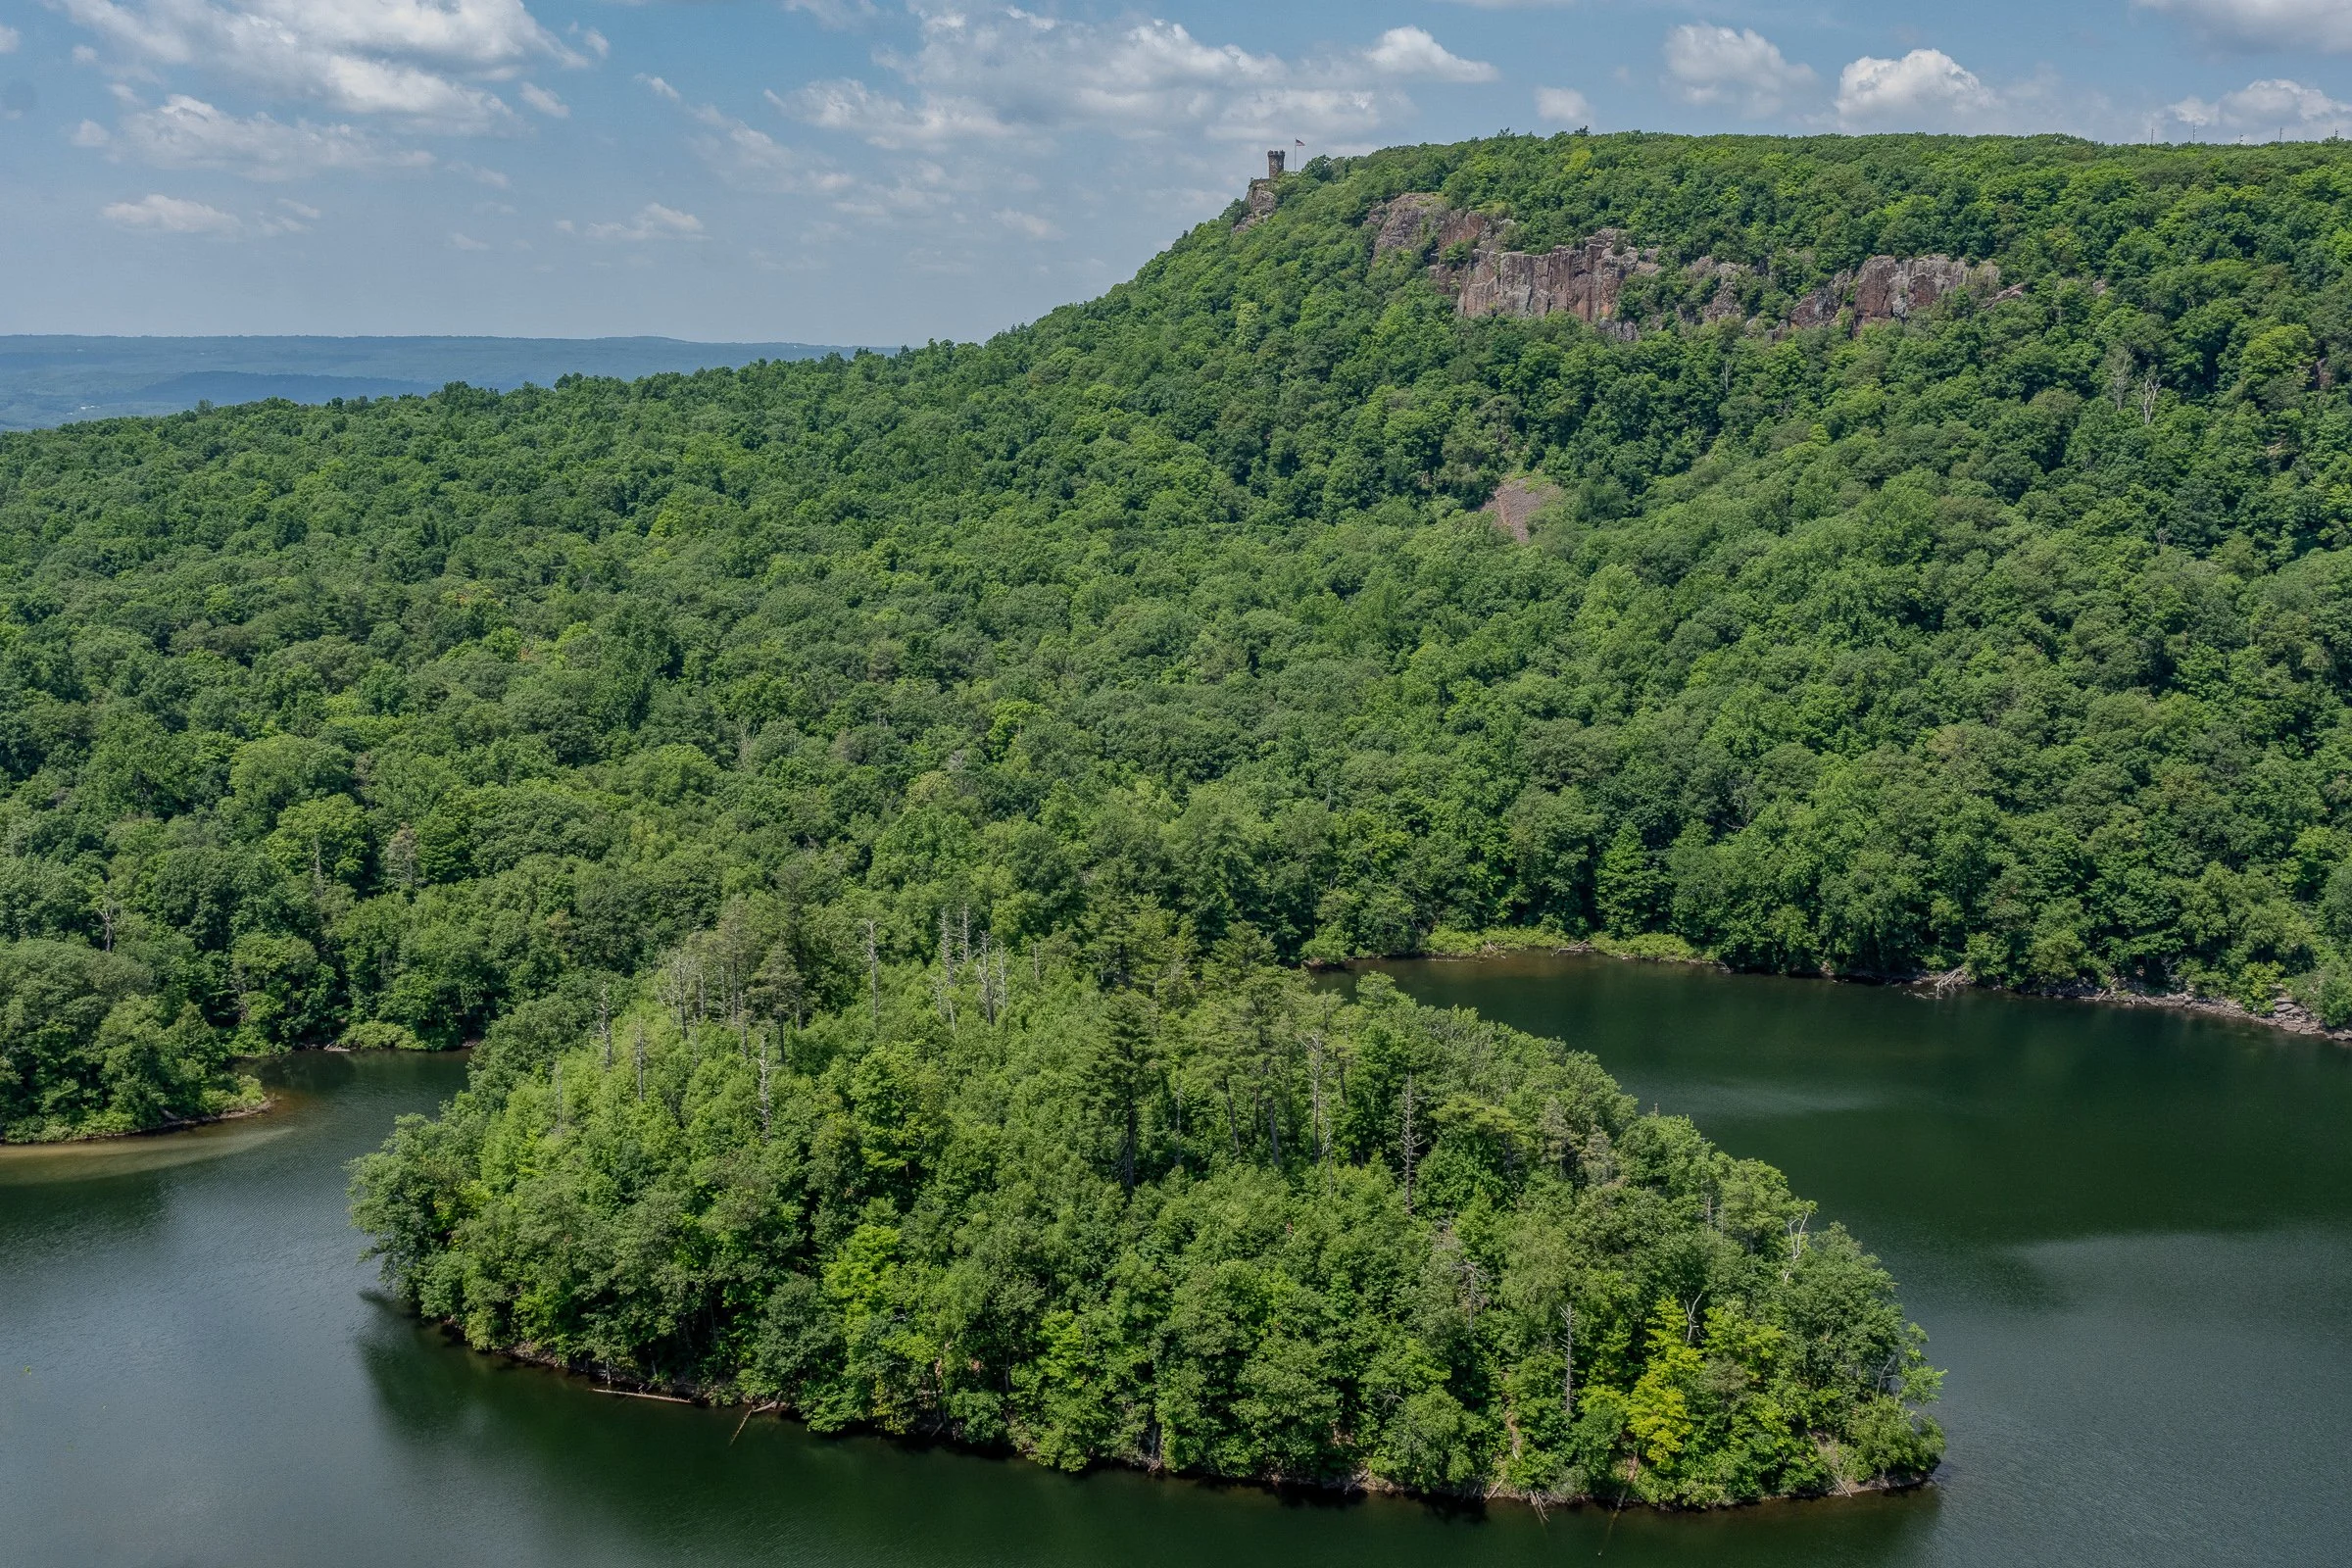
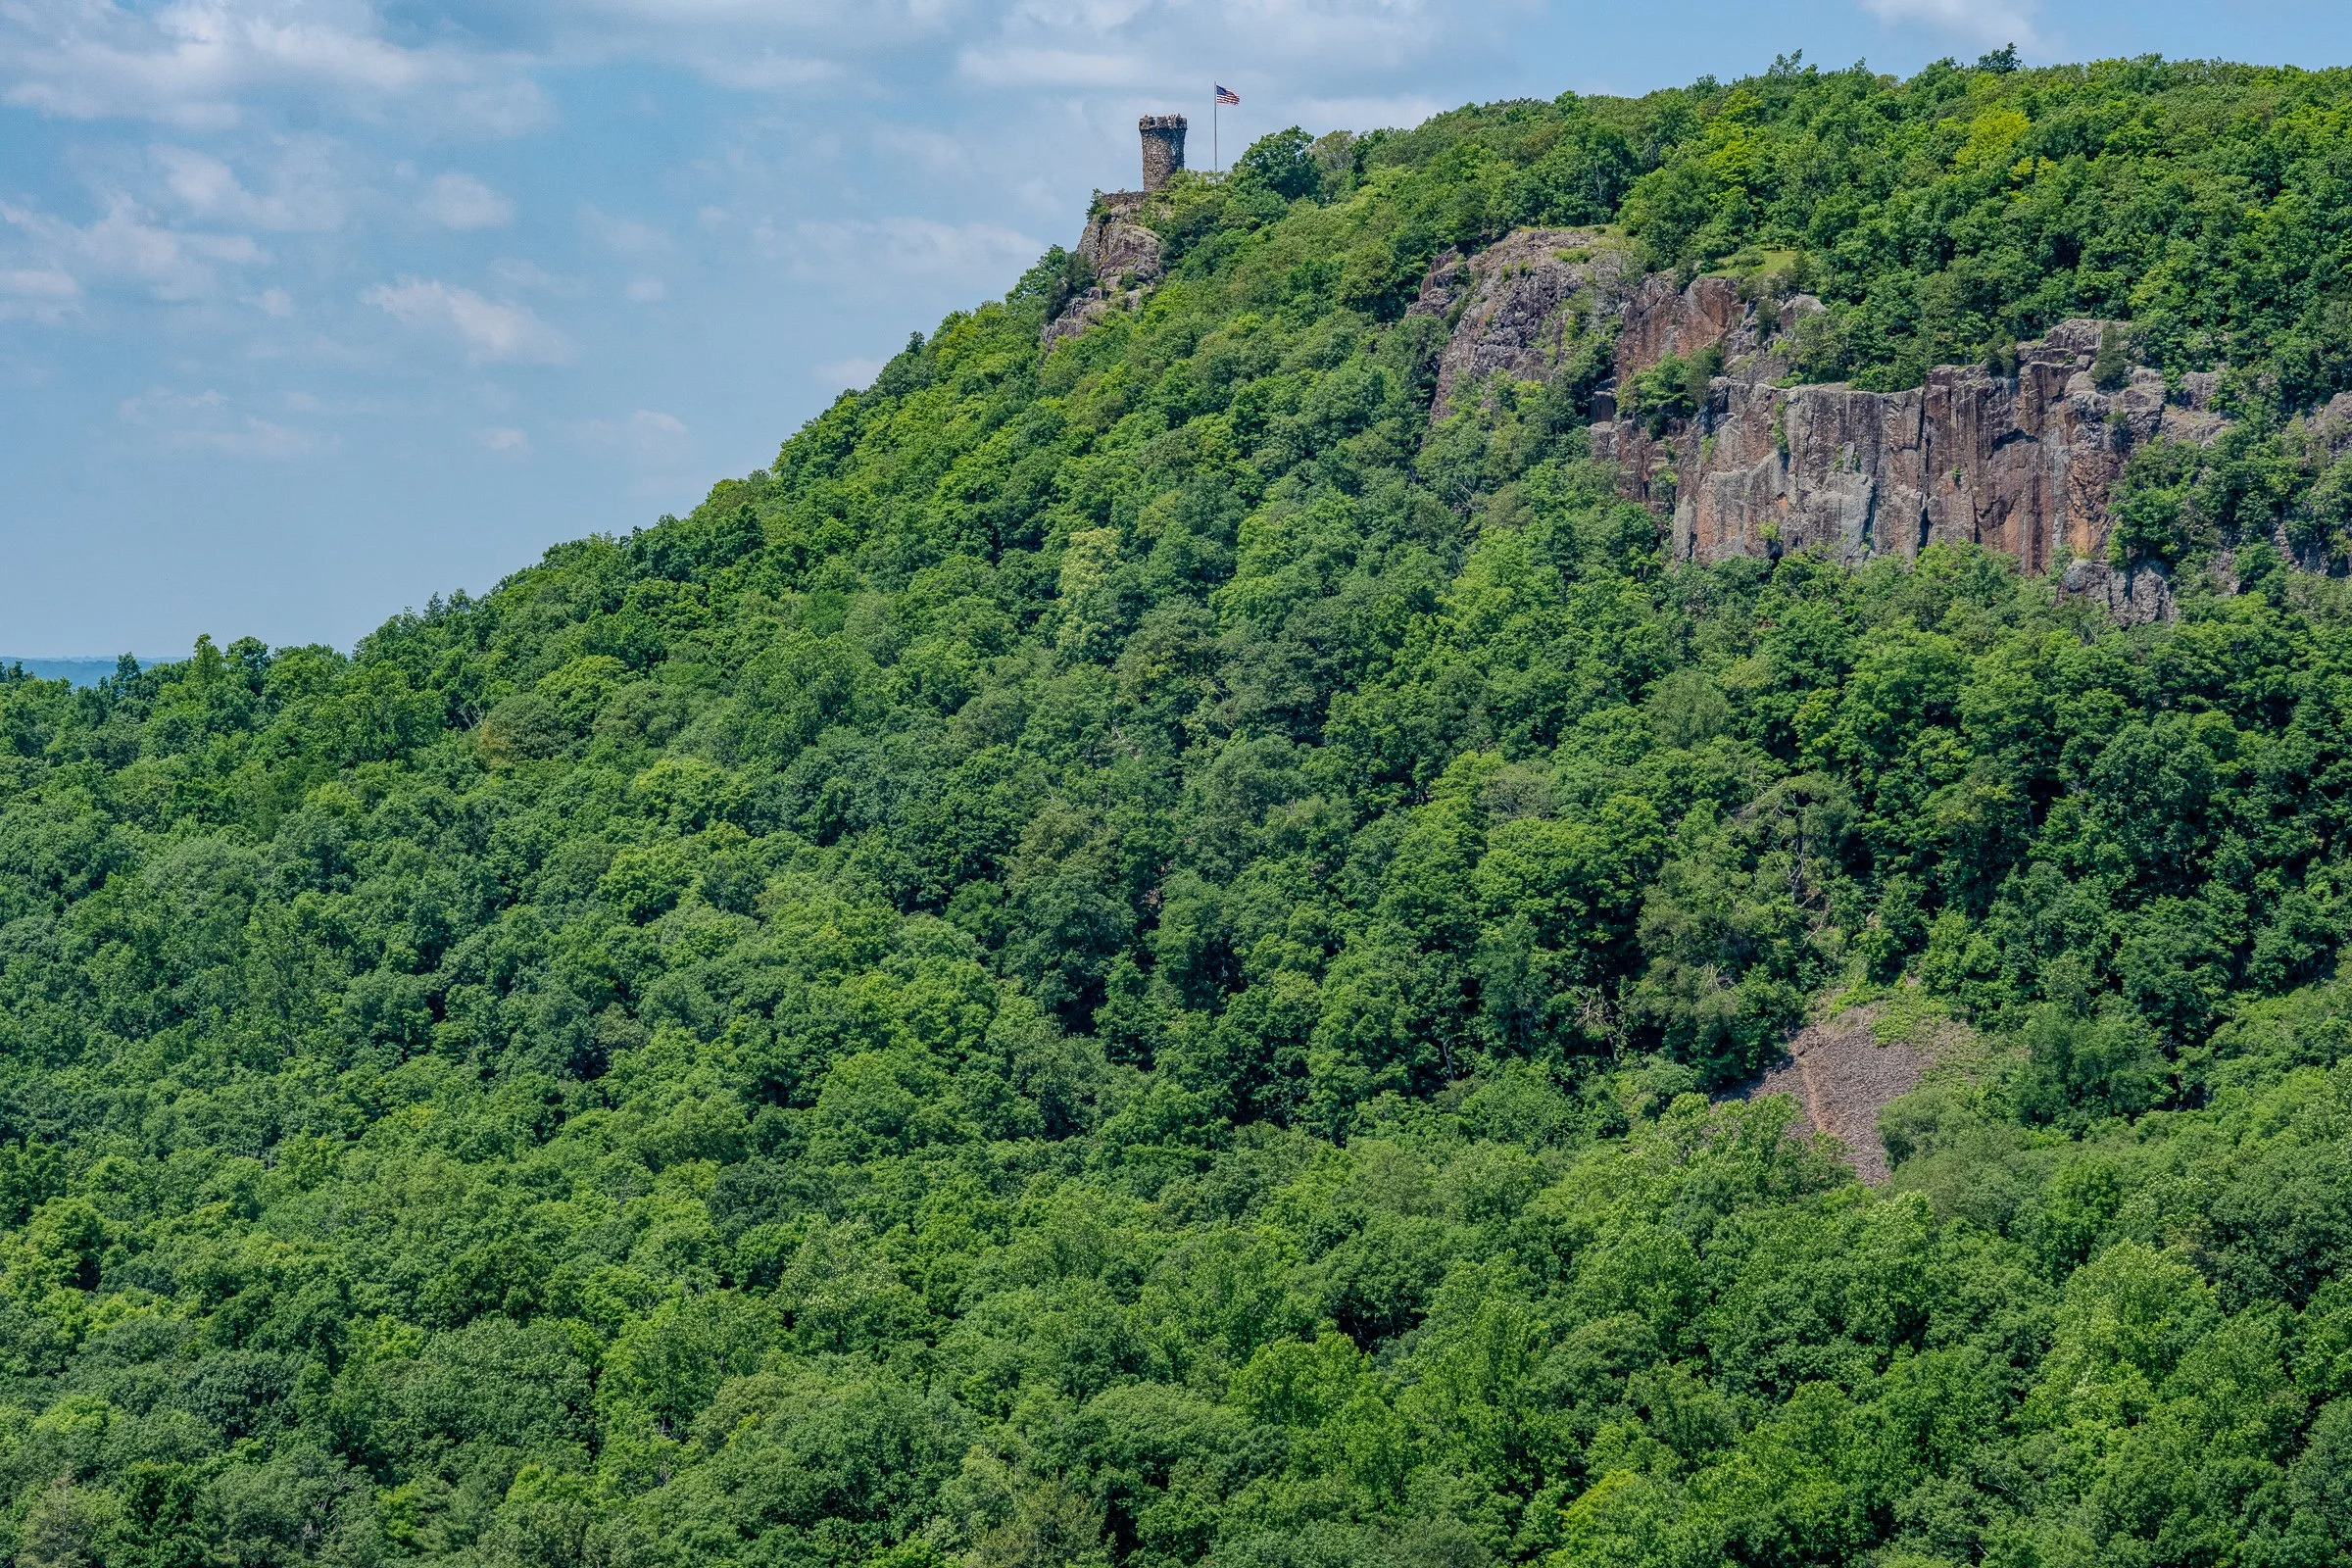
Once you reach the ridgeline, South Mountain delivers some seriously impressive views. The highlights include Merimere Reservoir, Mine Island, East Peak, Castle Craig, downtown Meriden, and the surrounding traprock hills.
This loop also feels much quieter than the more popular trails inside Hubbard Park. The parking area can be difficult to spot and parts of the route are poorly marked, but the views make the extra navigation effort worth it.
South Mountain connects with the blue-blazed Metacomet Trail, a 62-mile trail that follows Connecticut’s traprock ridges from the Hanging Hills north to the Massachusetts border. The Metacomet is also part of the larger New England National Scenic Trail.
Trail Description: The South Mountain Loop is a moderate hike that passes Elmere Reservoir before gradually climbing South Mountain. Several overlooks along the ridgeline provide views of Merimere Reservoir, Mine Island, East Peak, Castle Craig, downtown Meriden, and the commercial area near Interstate 691.
Trail Info:
Location: Berlin, CT (See link below)
Distance: Approximately 3.6 miles
Difficulty: Moderate
Trail Type: Loop
Highlights: Reservoir views, traprock cliffs, Mine Island, Castle Craig, and downtown Meriden
Dog Friendly: Yes
How to get there:
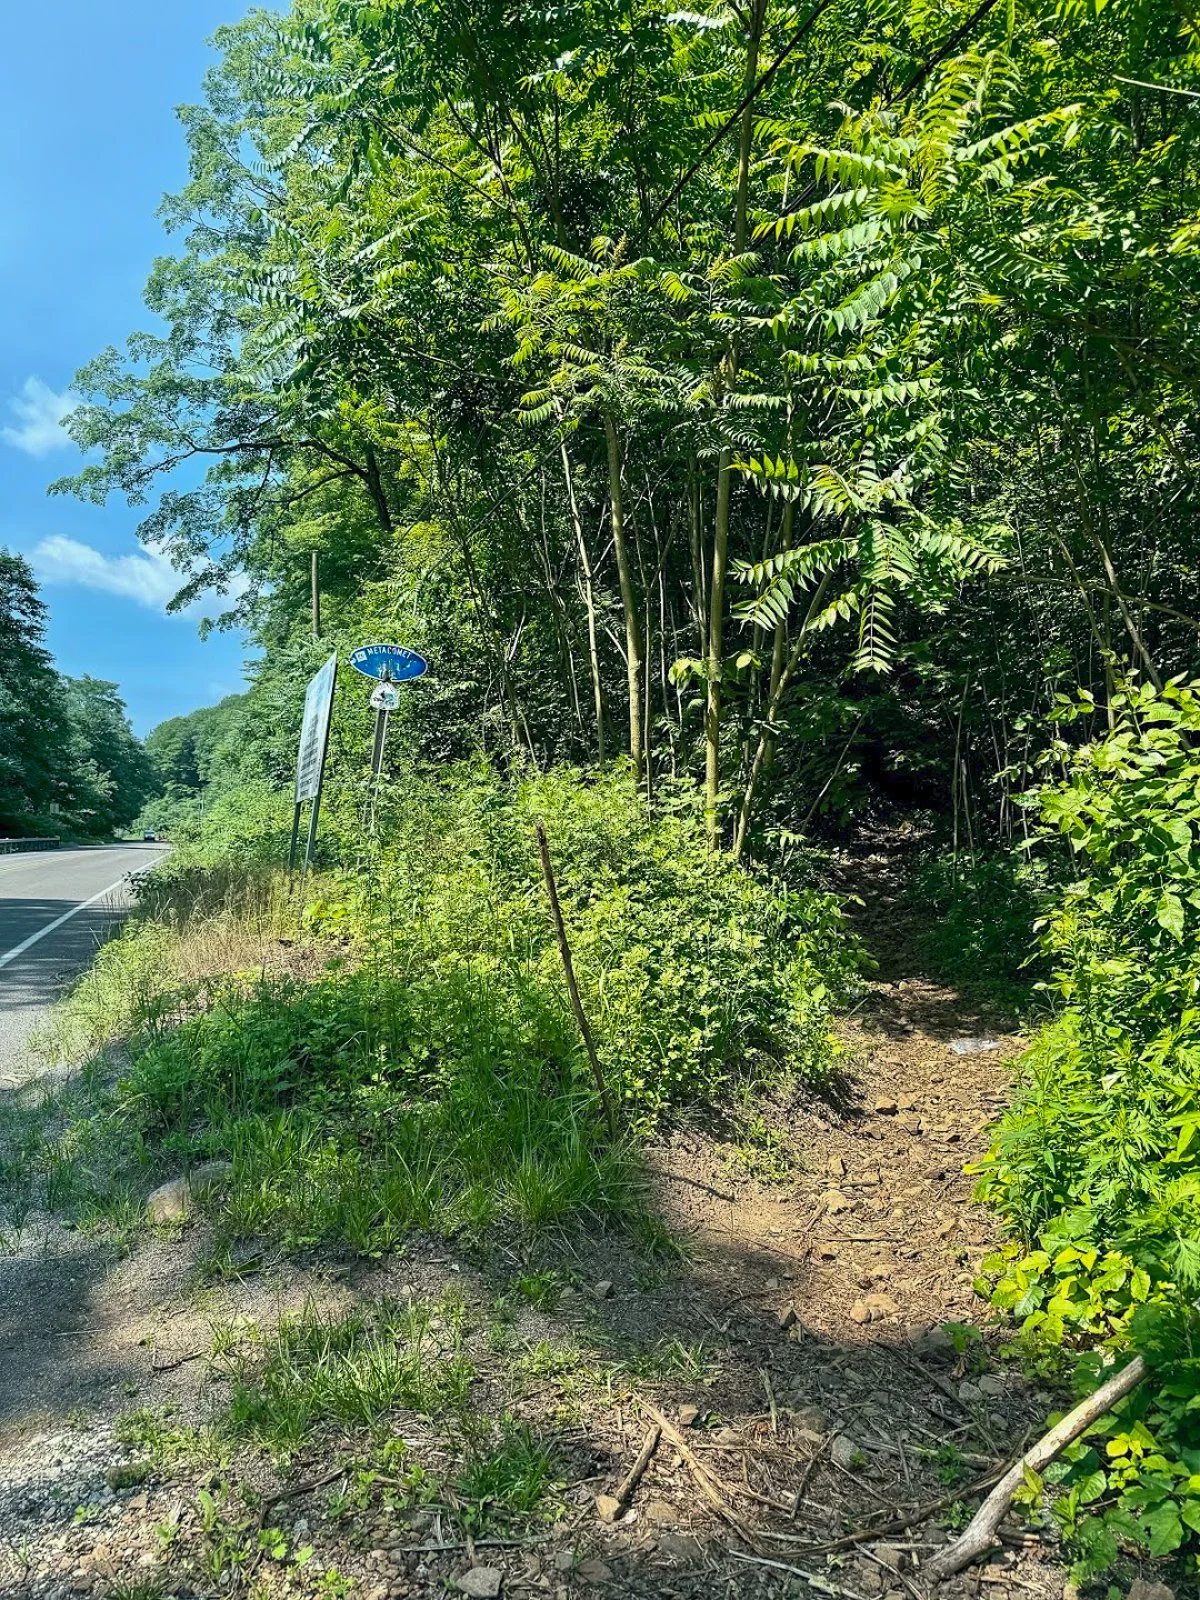
The trail begins where the blue-blazed Metacomet Trail crosses Chamberlain Highway, also known as Route 71, in Berlin.
Parking coordinates: 41.562803, -72.809665
This is not a traditional trailhead parking lot. There are only a few roadside spaces near the trail crossing, and the entrance can be easy to miss while driving along Route 71. Slow down as you approach and look for blue trail blazes on both sides of the road.
Do not block the roadway or park in the travel lane. When the closest spaces are occupied, additional roadside parking may be available a short distance south of the trail crossing.
Hiking Tips
Download park map, click here.
Parking is extremely limited, so an early start is a good idea on weekends.
Pay close attention at every major intersection. There are several unofficial or unblazed trails in the area, including routes toward Anderson Pond.
Nearby Things to Do:
Downtown Berlin for pre or post hike eats.
Donuts of course!
Post Hike Brews: Coles Roads Brewing

Panoramic Views
Parking Information
Drive slow as approaching this area as the parking area is small and can be missed.
South Mountain Trailhead
The Hike
From Chamberlain Highway, enter the woods and begin following the blue blazes of the Metacomet Trail.
The opening section is relatively easy. You will soon pass a large water tank before arriving at Elmere Reservoir. It is not the dramatic mountain scenery you came for, but the reservoir provides a peaceful start to the hike.
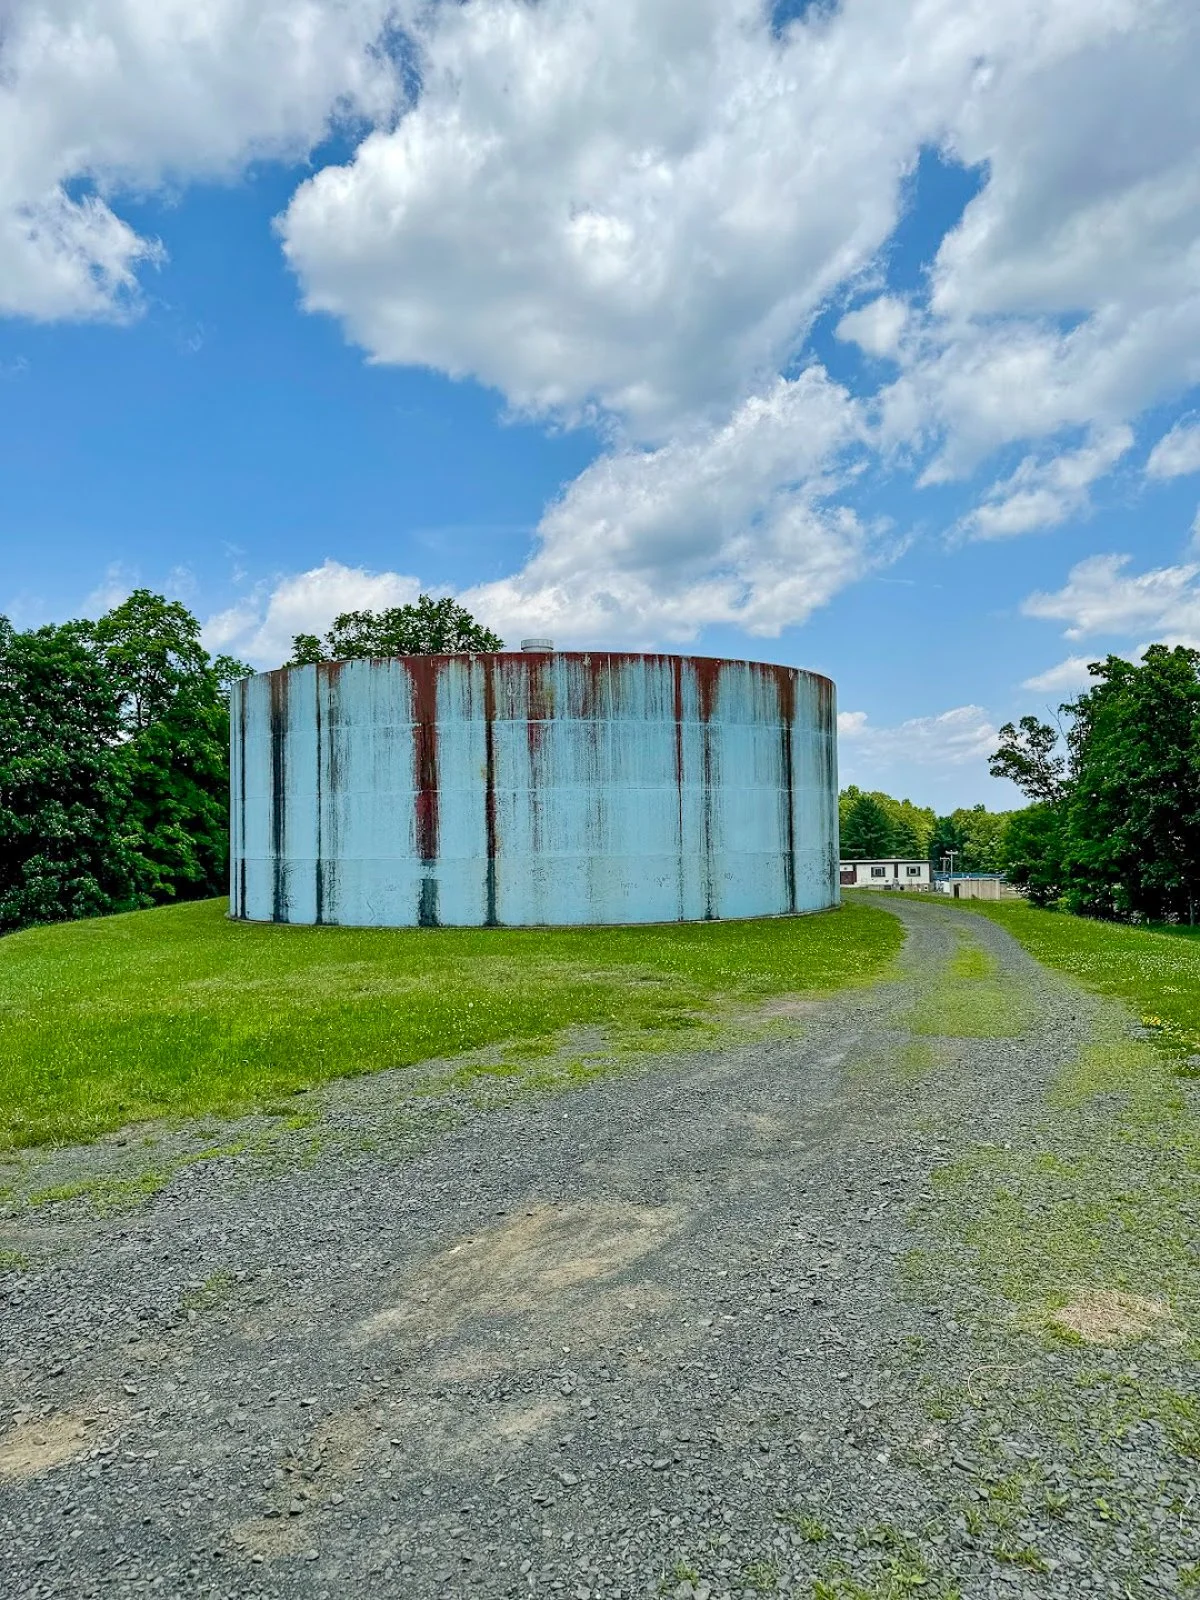
Water tank at start of hike
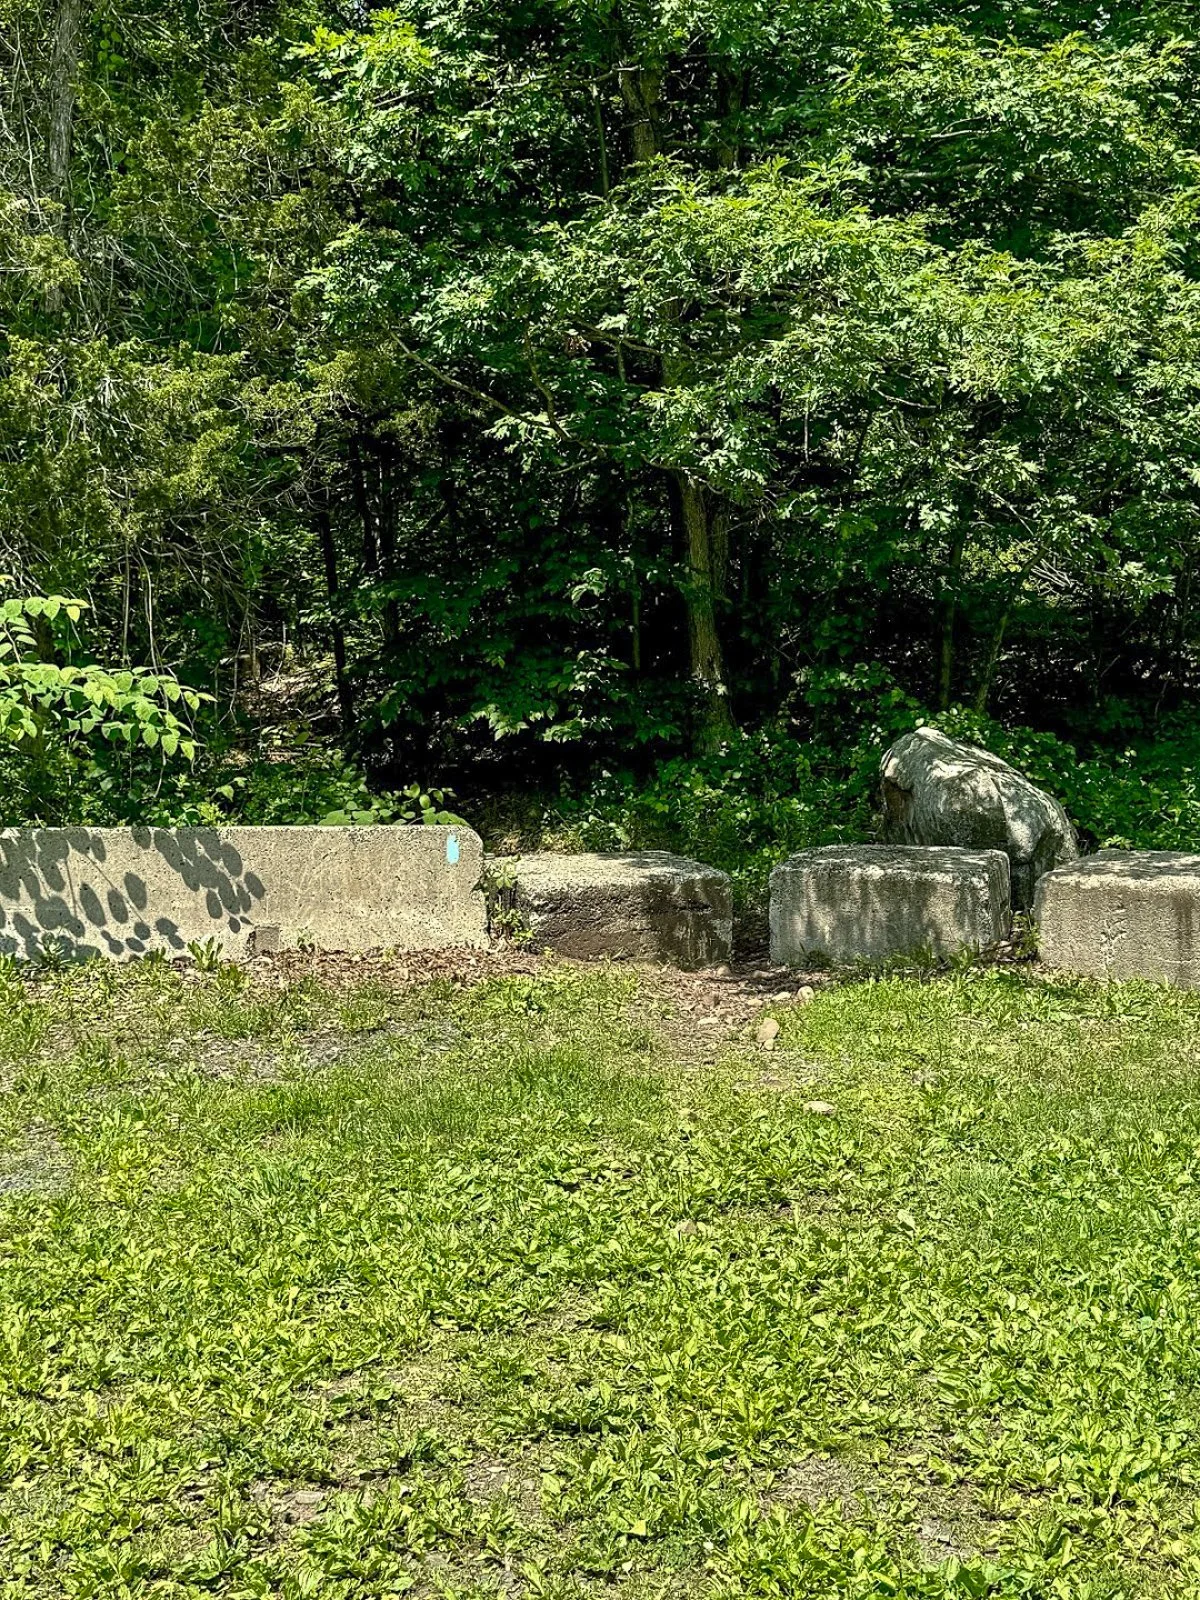
Continue beyond the reservoir and climb a small embankment near several concrete blocks. You will reach an intersection with an unblazed woods road. One direction leads toward Anderson Pond, while the other will eventually become your return route from the South Mountain cliffs.
For this route, remain on the blue-blazed trail.
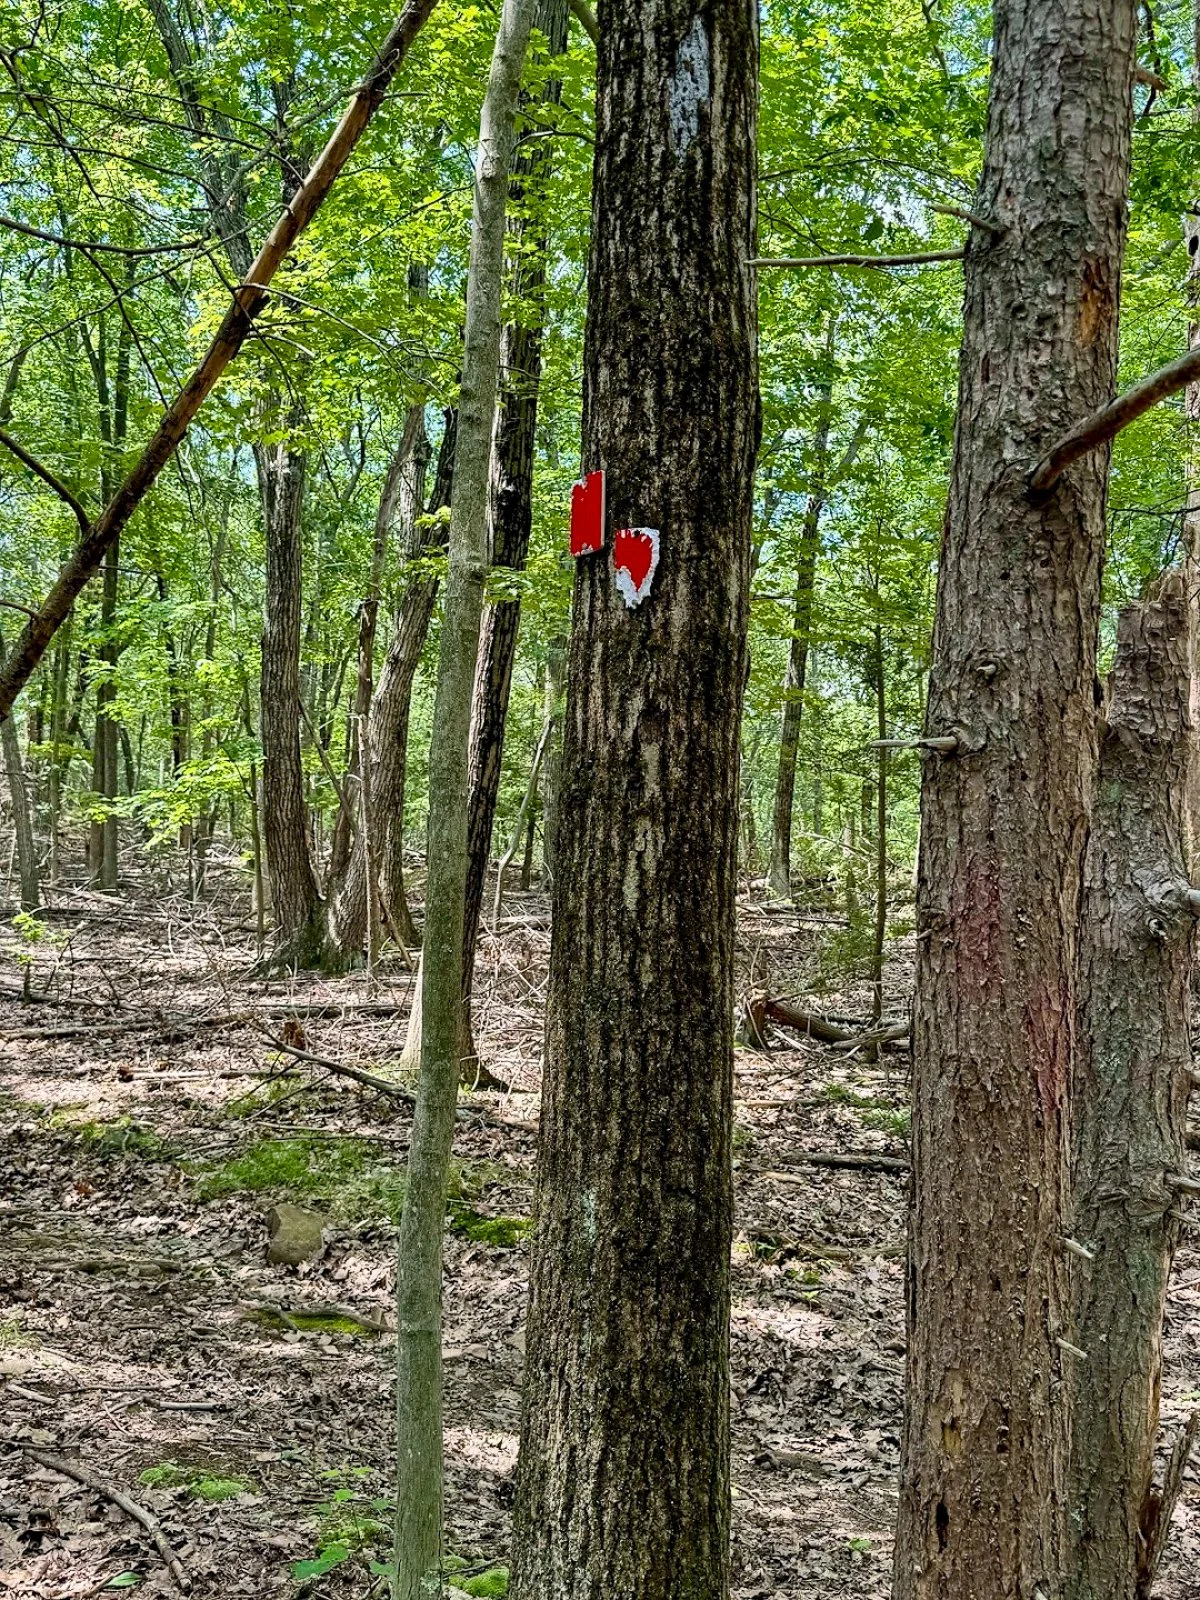
The trail may be rocky or wet through this section. Continue for a short distance until reaching another obvious intersection with a woods road on the left. Look carefully for faded or occasional red blazes.
Turn left here.
Climbing South Mountain
The red-blazed woods road begins a steady but manageable climb toward South Mountain. The incline is gradual rather than brutally steep, but it is enough to get the heart going.
The trail markings become less reliable as you gain elevation. Stay on the most established woods road and check your map whenever you reach a questionable intersection.
As you approach the top, watch for a poorly marked side trail on the right. This short path leads to one of the best viewpoints on the entire hike.
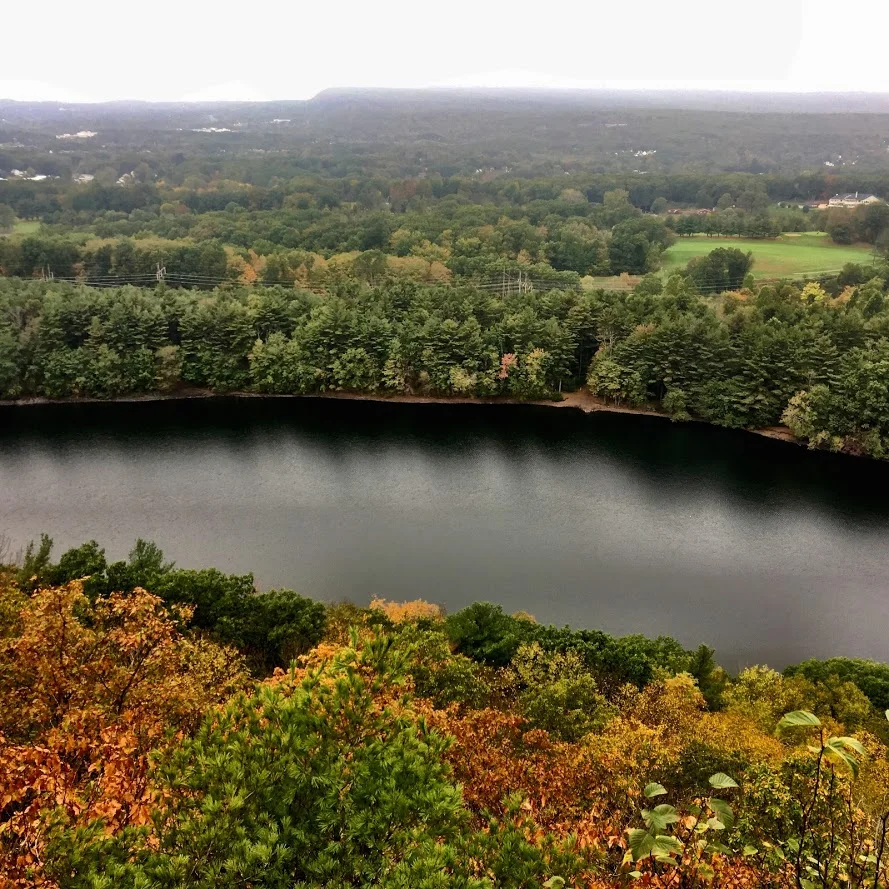
Merimere Reservoir Overlook
The first major overlook provides a gorgeous view across Merimere Reservoir.
Mine Island sits prominently in the water, with East Peak rising behind it. Castle Craig may also be visible along the ridgeline. This is the money-shot view of the hike and a great place to stop, catch your breath, and take a ridiculous number of pictures.
The open ridgeline provides a wide view across the reservoir and surrounding Hanging Hills. It feels like a much bigger mountain experience than you might expect from central Connecticut.
South Mountain rises to approximately 767 feet, while the reservoir and surrounding valleys sit several hundred feet below the cliffs.
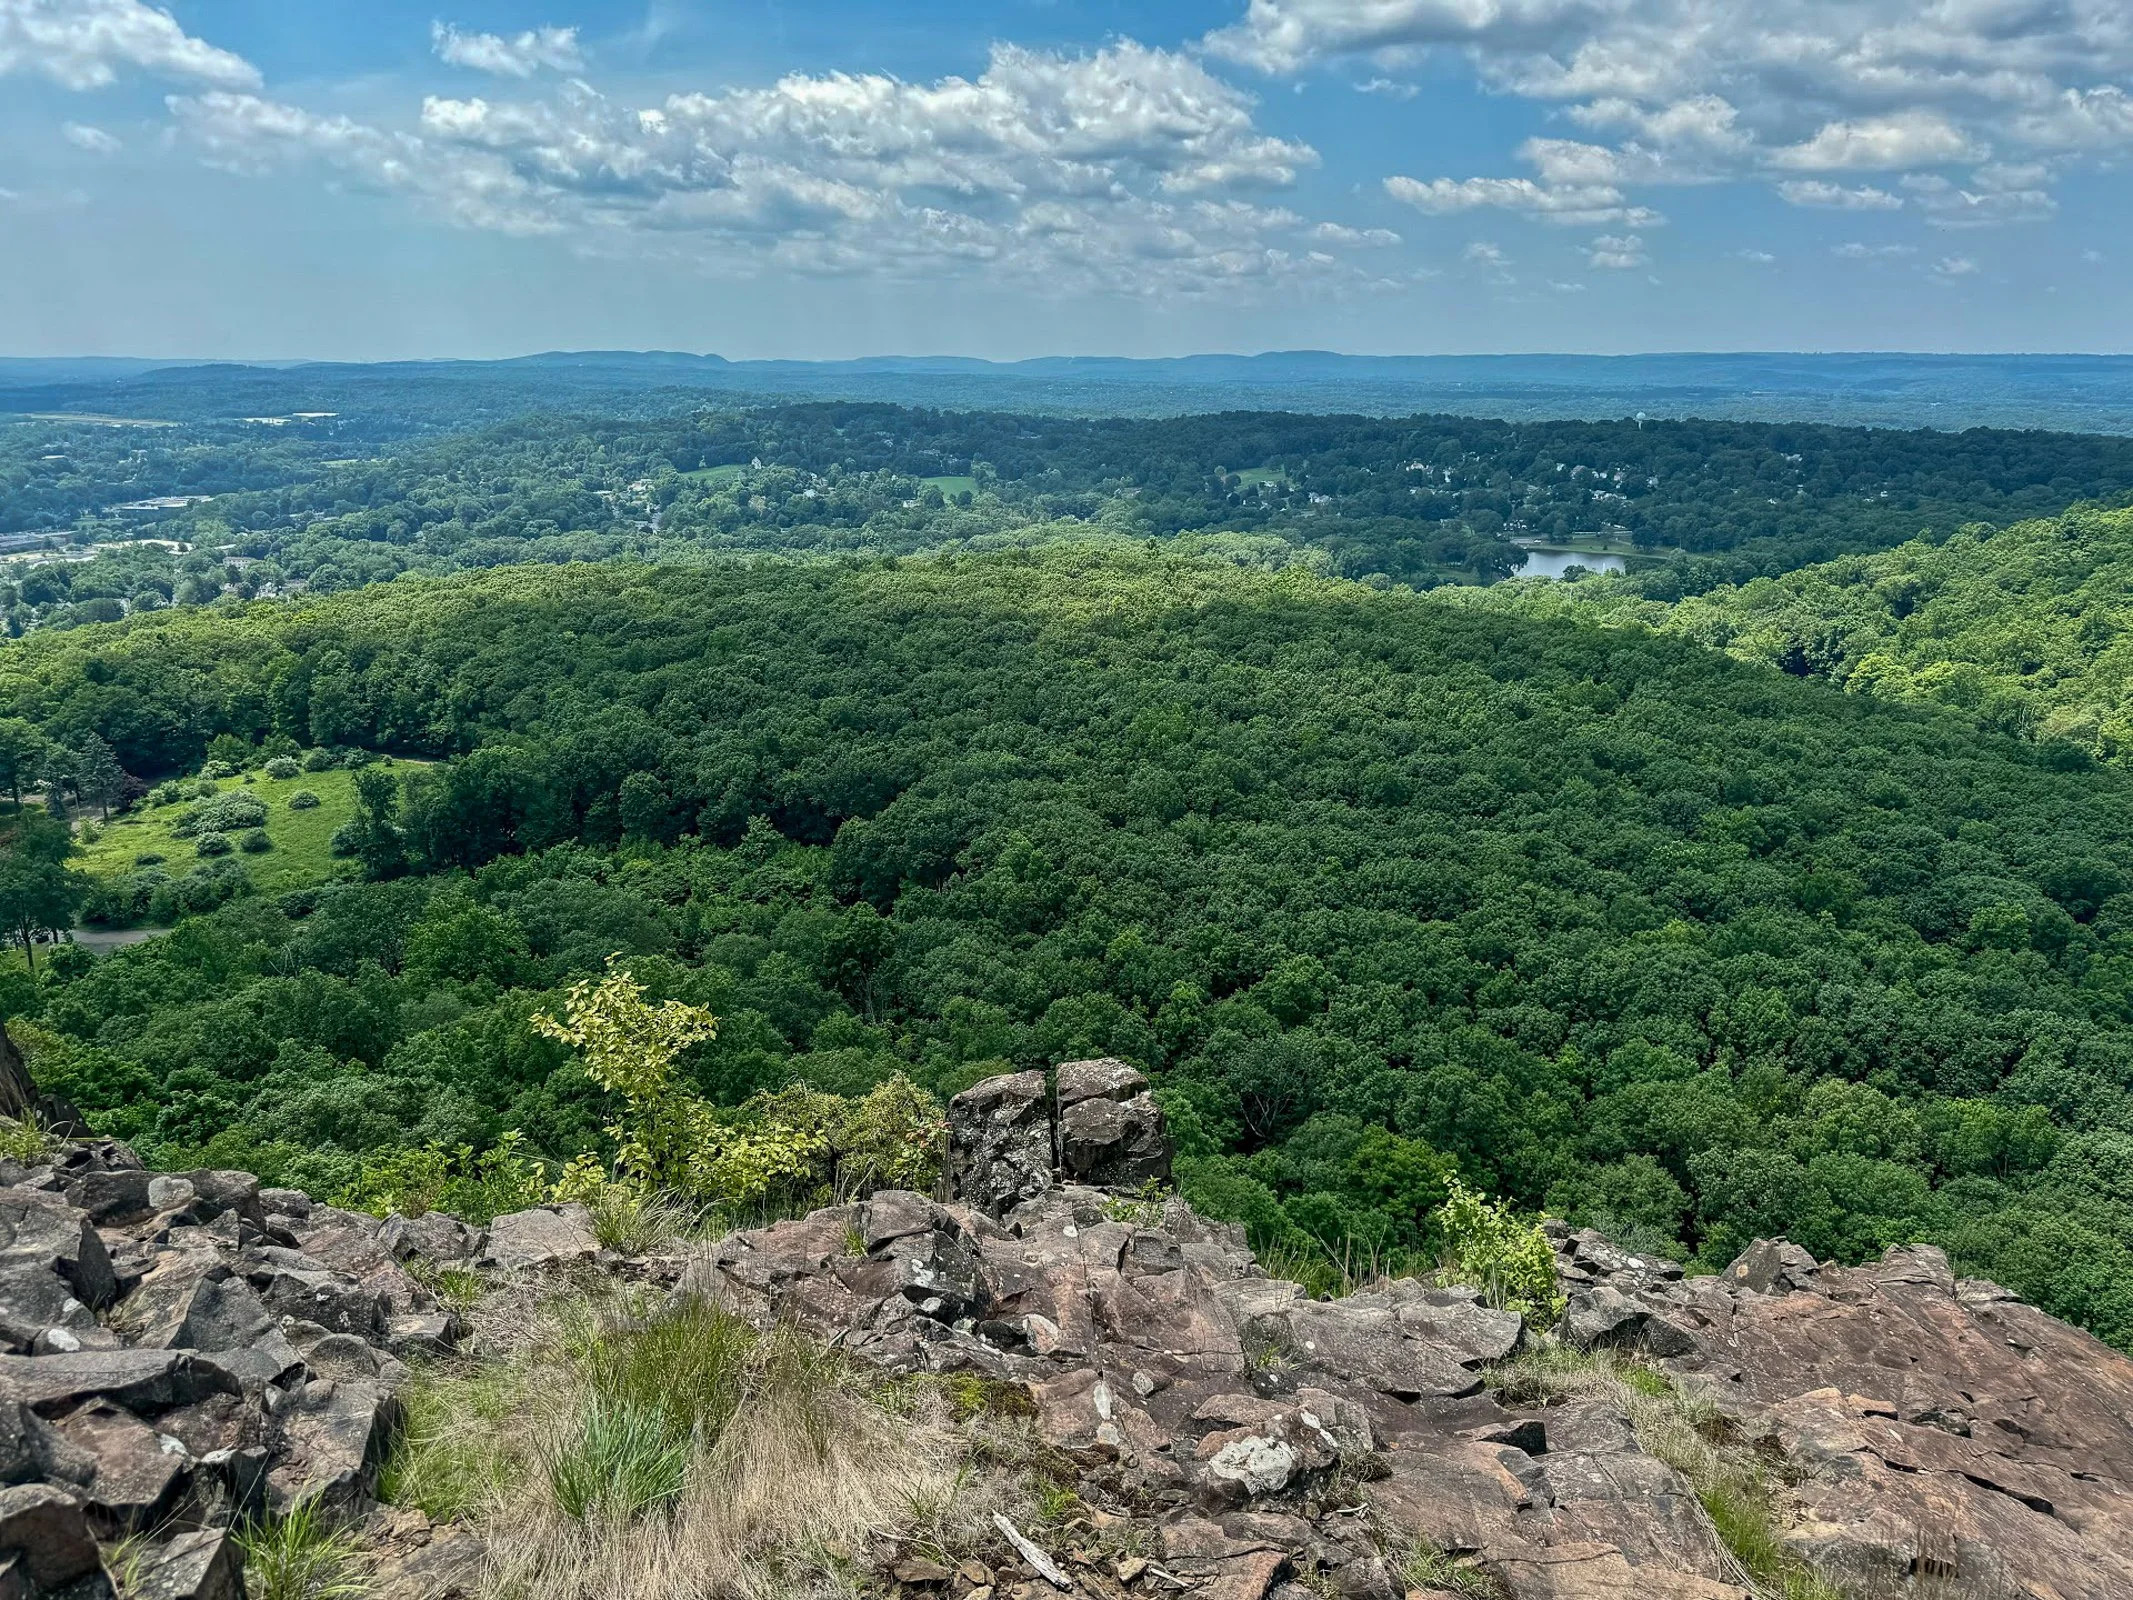
Downtown Meriden Overlook
After taking in the reservoir views, return to the main loop trail and continue along the ridge.
The woods road dips and climbs gently before reaching another open viewpoint. This side of South Mountain provides a dramatic look toward downtown Meriden and the developed areas surrounding Hubbard Park.
The contrast is interesting. One minute you are looking across a quiet reservoir toward Castle Craig, and the next you are standing above the city.
Continue following the ridgeline through the open woods. Trail markings may still be inconsistent, but the main route is usually easy enough to identify.
Target View and the Return Route
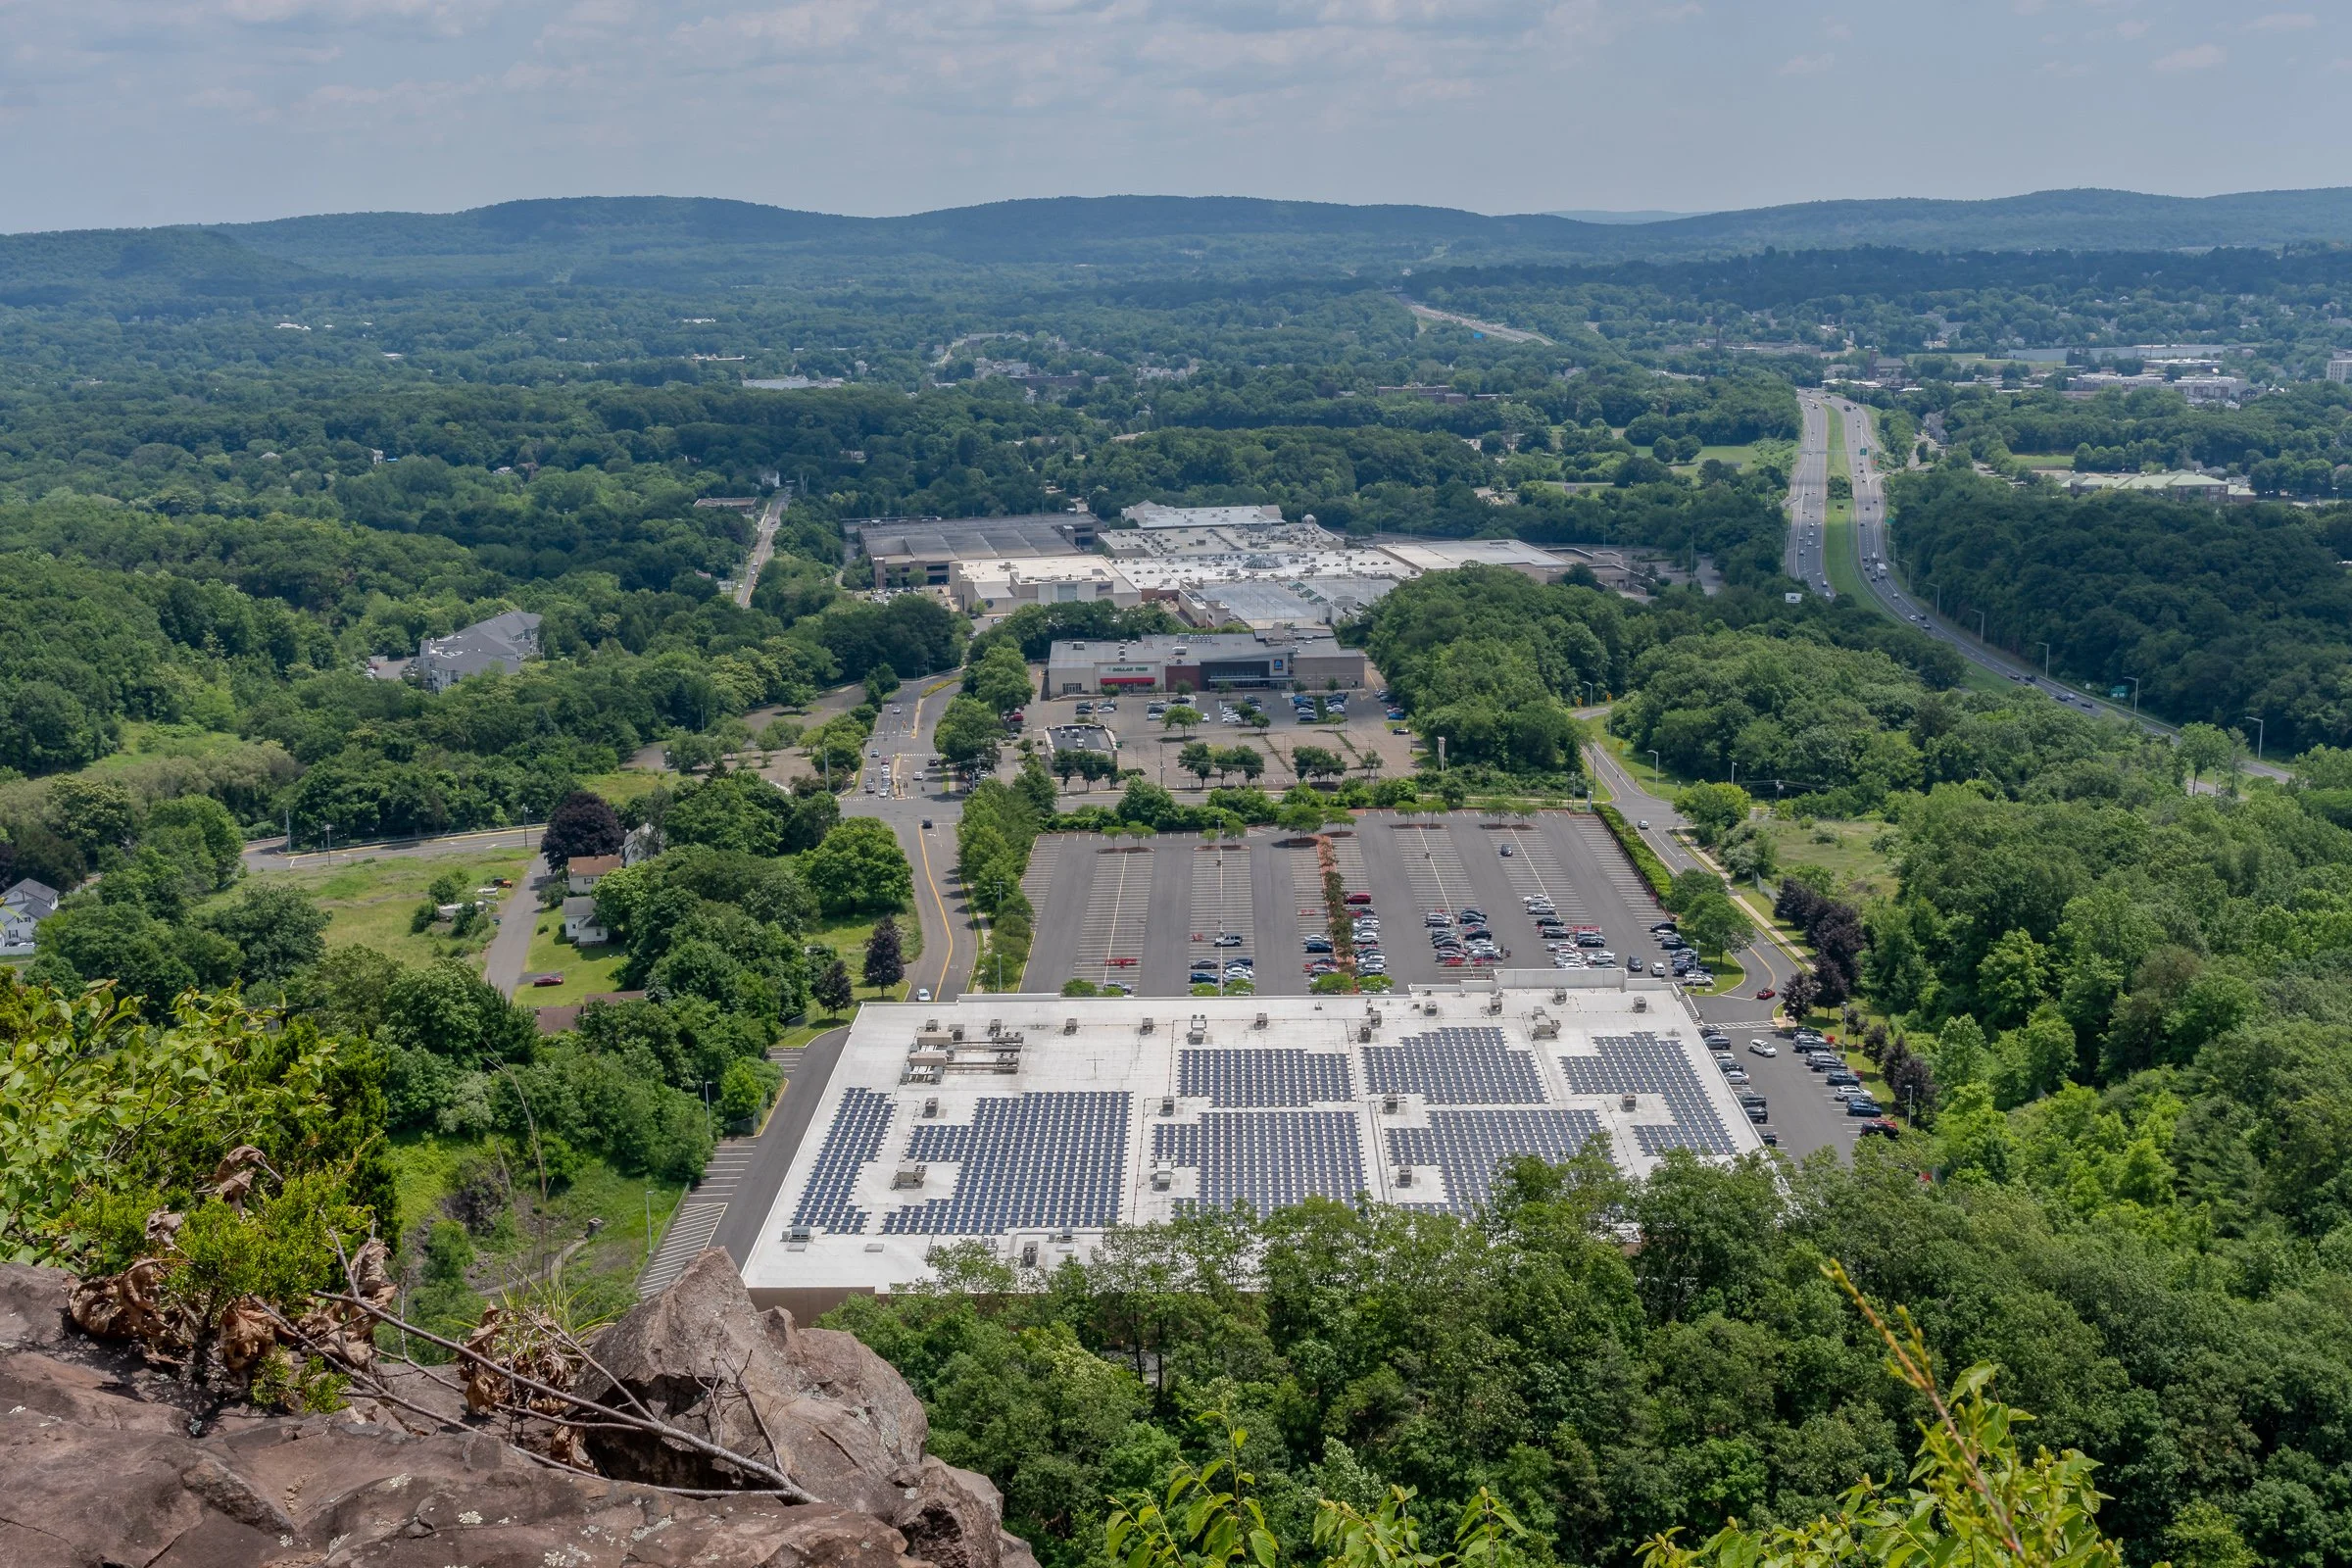
As the trail curves around the mountain, you will reach the east-facing cliffs sometimes referred to as the Target View. The shopping area sits directly below, with Interstate 691 and several additional traprock ridges visible in the distance.
It may not be the classic wilderness view, but it shows just how suddenly South Mountain rises above the surrounding city.
Continue descending on the woods road. This portion completes the loop and eventually returns to the earlier intersection near Elmere Reservoir.
Once you reconnect with the blue-blazed Metacomet Trail, turn right and retrace the opening section of the hike. Pass Elmere Reservoir and the water tank before returning to Chamberlain Highway.
Nearby Things to Do
It would not be Hiking for Donuts without a post-hike treat. Swiches & Coffee Donuts is a good option in town. After this hike, me and my buddy went to the local brewery, Coles Road Brewing. Also, Kensington Pizza is a big spot locally. Downtown Berlin has been getting new restaurants so be sure to stop in town.
Neil’s Donuts in Wallingford is a solid option as well after exploring South Mountain. It is not too far away for some amazing donuts.
Other Connecticut Hikes Nearby
Looking for more scenic Connecticut hikes?
Follow Hiking For Donuts on Instagram for more New England hiking adventures.

HIKING FOR DONUTS
Hi, I’m Mark. I live in Connecticut. I take new trips every chance I get. A good trip has a great hike, great food, and something fun to do. My goal is to search out new trips and share them to inspire others to try something new and exciting.
If you are looking for posts in a particular place, search City or State here.
SEE OTHER POSTS IN ARCHIVE
Archive
RECOMMENDED POSTS


RECENT POSTS


See the latest on Instagram and follow @HIKINGFORDONUTS
Haystack Mountain Trail, Connecticut: Fire Tower Hike With Epic Views
Haystack Mountain State Park Trail Guide (Norfolk, CT)
Haystack Mountain State Park might be one of Connecticut's best "bang for your buck" hikes. Less than a mile round trip gets you to a stone fire tower with sweeping views across four states.
Haystack Mountain State Park in Norfolk, Connecticut is one of the best short hikes in New England. This quick out-and-back trail leads to a historic stone fire tower with sweeping 360-degree views into Connecticut, Massachusetts, New York, and Vermont.
At less than a mile round trip from the upper parking area, this is an excellent beginner-friendly hike with a huge scenic payoff. If you’re looking for an easy Connecticut hike with mountain views, this trail deserves a spot on your list.
Trail Description: Haystack Mountain Trail contains an impressive stone fire tower with stunning views of the mountains in Connecticut, Massachusetts, New York, and Vermont.
Trail Info:
Location: Norfolk, CT (See link below)
Distance: 0.8 mile (30-45 min) Round Trip
Difficulty: Moderate
Trail Type: Out and Back
Highlights: Views, Mountains, Valley, Fire Tower, Panoramic Views
Dog Friendly: Yes
How to get there:
Haystack Mountain State Park - On Rte. 272 Norfolk, CT 06058
Trailhead parking location here.
Easy to find off Route 272. The road goes halfway up Haystack Mountain to a parking lot, where the shortest trail starts. The parking lot can hold about 10 cars.
Hiking Tips
Download park map, click here.
Cell phone service is spotty. Hike carefully.
There can be seasonal closures of the park.
Nearby Things to Do:
Yellow Trail: Longer 1.8 Mile Hike (starts at the beginning of park road at the gate entrance)
Nearby Hikes: Litchfield County area has some great short hikes you could pair with this one.
Post Hike Brews: NorBrook Farm Local Brewery

Panoramic Views
Haystack Mountain Trail Guide
Haystack Mountain State Park in Norfolk, Connecticut is one of the best short hikes in New England.
At less than a mile round trip from the upper parking area, this is an excellent beginner-friendly hike with a huge scenic payoff. If you’re looking for an easy Connecticut hike with mountain views, this trail deserves a spot on your list.
This guide will be for the shortest trail route at 0.8 miles from the top parking lot of Haystack Mountain. These days my time is a bit limited and the best bang for your buck is what is more appealing. If you want to make it a longer hike, there is the Yellow Trail that starts near the beginning of park road at the gate entrance. This will be 1.8 miles, out and back. Both of these options will be great hikes to get to the main attraction, the amazing tower views.
Trail Overview

Haystack Mountain Trailhead
Parking Information
Once you have parked at the top parking, which is about a mile once you enter the park, the trail is to the left to begin the summit.

Haystack Mountain Trail
The Hike to the Fire Tower
This trail is fairly straightforward. It is well-maintained and clearly marked. The first 0.2 miles are flat and easy breezy. The next 0.2 miles will get your heart pumping as the trail bends to the left and starts a quick incline with 200 feet of elevation. Those quads might be on fire but it is all worth it once you see the bad ass tower at the top.
Check out my Instagram reel for a video walkthrough of the Haystack Mountain Trail and the fire tower views here.

Haystack Mountain Trail Incline
Now, it’s time to climb the 34 foot stone tower up to the top for the 360 views at 1,683 feet of elevation.
Tower Views and What You’ll See

Haystack Mountain Fire Tower
Definitely some of the best views you will have in Connecticut. It was a bit overcast and cloudy for me, but still impressive views nonetheless. On a clear day, there is visibility of the Riga Plateau in Northwest Connecticut, the Berkshires in Massachusetts, the Catskills in New York, and the Green Mountains of Vermont. That is quite a combination of views.

View at the Top

Haystack Mountain Trail Views

Nearby Breweries and Things to Do
This would be great to pair with some other short hikes in the Litchfield County area. In addition, there are great local breweries as well such as NorBrook Farm for post hike brews.
Things to Do Nearby:
Yellow Trail: Longer 1.8 Mile Hike (starts at the beginning of park road at the gate entrance)
Nearby Hikes: Litchfield County area has some great short hikes you could pair with this one.
Post Hike Brews: NorBrook Farm Local Brewery
Other Connecticut Hikes Nearby
Looking for more scenic Connecticut hikes? Check out these links to other trail guides for hikes in Litchfield County:
Follow Hiking For Donuts on Instagram for more New England hiking adventures.
HIKING FOR DONUTS
Hi, I’m Mark. I live in Connecticut. I take new trips every chance I get. A good trip has a great hike, great food, and something fun to do. My goal is to search out new trips and share them to inspire others to try something new and exciting.
If you are looking for posts in a particular place, search City or State here.
SEE OTHER POSTS IN ARCHIVE
Archive
RECOMMENDED POSTS
RECENT POSTS
See the latest on Instagram and follow @HIKINGFORDONUTS

Hiking Mount Agamenticus, York, Maine
Trail Description: The Mount Agamenticus Conservation Region is located in Southern Maine. The Mount Agamenticus Loop is a popular trail that provides 360 degree views at the summit of the surrounding mountains in the distance.
Trail Info:
Where: York, ME Distance: 1.8m (1 hour) Difficulty: Easy toModerate Trail Type: Loop Features: Views, Mountains, Valley
How to get there:
Typing the location “Mount Agamenticus Trailhead” into Google Maps will take you to the parking lot. You can’t miss it. There is a lot of parking. It’s $2/hr to park and there is a barcode to scan for the app to use to pay. It was easy peasy in my opinion. And, worth the money based on how well they keep up with everything.
Coordinates: 43.21720438450835, -70.69198787482621
Link to google maps location here.
Hiking Tips
I suggest caution if it rained days prior. The trails in the forest are mostly roots and rock. Dry it’s no biggie but wet I don’t think it would be as enjoyable.
Download a copy of the trail map here.
There are multiple trail options. This guide is for the loop via Blueberry Bluff, Witch Hazel, and Ring Trail. The Big A trail has separate parking and is a 1 mile loop that’s mostly gravel & an easier option (stroller and wheelchair friendly).
The trail and parking lots are well maintained and great facilities. Nicest outhouse bathrooms I ever been in!

The Hike
Once parked at the Mountain Road parking lot, the beginning of the trail head is visible with markers at end of the parking lot.

There will be trail signs promptly upon starting the hike at a fork. Stay right and hop on the Ring Trail, which is the white marked trail.

As stated prior, the trail is very well marked. However, the trail is mostly rocks and roots. I saw some reviews mentioning that it was muddy and unpleasant after a rainstorm. And, I totally understand what they meant. The rocks and roots could be slippery. For us, it was dry and there were no issues.

There isn’t much of an elevation gain, only about 340 feet. But there is a small incline as you make your way to the top. Hiking along the Ring Trail, at almost 0.7m, there will be a small foot bridge with a path to the left at the end. This is the Witch Hazel trail. I did not see signs but based on the trail map, this was the way to go.

The Witch Hazel trail is brief. Only a few minutes to reach the Big A Trail. There will also be a small foot bridge.

And following the Big A trail at the top is where the first lookout platform is to take in all the views.

There is another lookout platform with stairs where you can see even higher out into the valley. There is also a fire tower, but it is fenced out and cannot be climbed.


Follow the Big A Trail out until it connects to the Blueberry Bluff, which is marked red. There is also an additional viewpoint here before the Blueberry Bluff.

Continue down the Blueberry Bluff back to the Ring Trail. Take a left at the sign back to the parking lot. You will cross the road at the end to get back to your car.

Southern Maine is tracking to be one of our favorite areas to visit and this was a great first hike in the area. Good hike to get the heart going and see some cool views. The platforms are a cool feature for viewing on the summit. And, the trails and parking lots are so well maintained. I cannot speak highly enough on that. I was not able to find a great guide with details for this hike so I am hopeful this will be helpful for others. It’s also good to see directions/steps before you go to get comfortability. Not a hard hike to follow but I understand where folks can get tripped up. I still do it many times. Luckily, my wife is always the voice of direction.
POST HIKE ACTIVITIES: The fun doesn’t have to stop here. Lots to do in the area. We stopped by the 90s themed brewery, Odd by Nature Brewing, for some post hike beers and nosh, which is about 8 minutes from the trailhead. And, the Nubble Lighthouse is roughly 15 minutes or so away. Definitely a trip to view. Cape Neddick is really cool. Many restaurants in the area as well. No matter what you decide to do, there is a lot to plan for a great weekend or day trip.

HIKING FOR DONUTS
Hi, I’m Mark. I live in Connecticut. I take new trips every chance I get. A good trip has a great hike, great food, and something fun to do. My goal is to search out new trips and share them to inspire others to try something new and exciting.
If you are looking for posts in a particular place, search City or State here.
SEE OTHER POSTS IN ARCHIVE
Archive
RECOMMENDED POSTS


RECENT POSTS
See the latest on Instagram and follow @HIKINGFORDONUTS

Zion Narrows Hiking Guide for Beginners, Zion National Park
The Zion Narrows is not an everyday hike. The hiking is different, the planning is different. Without question, this is one of the most popular hikes in Zion National Park, if not all of the National Parks. And, one of my personal bucket list hiking adventures. I wanted to put together a guide of knowledge that I thought was helpful for me before I attempted this hike. There will be lots of items below that may seem intimidating. But I am telling you, this hike is something that you will remember forever. One of the best experiences I have had hiking and I hope the same for anyone else who takes on this adventure. For more on Zion National Park, check out my full park guide to plan your next trip, click here.
About the Zion Narrows
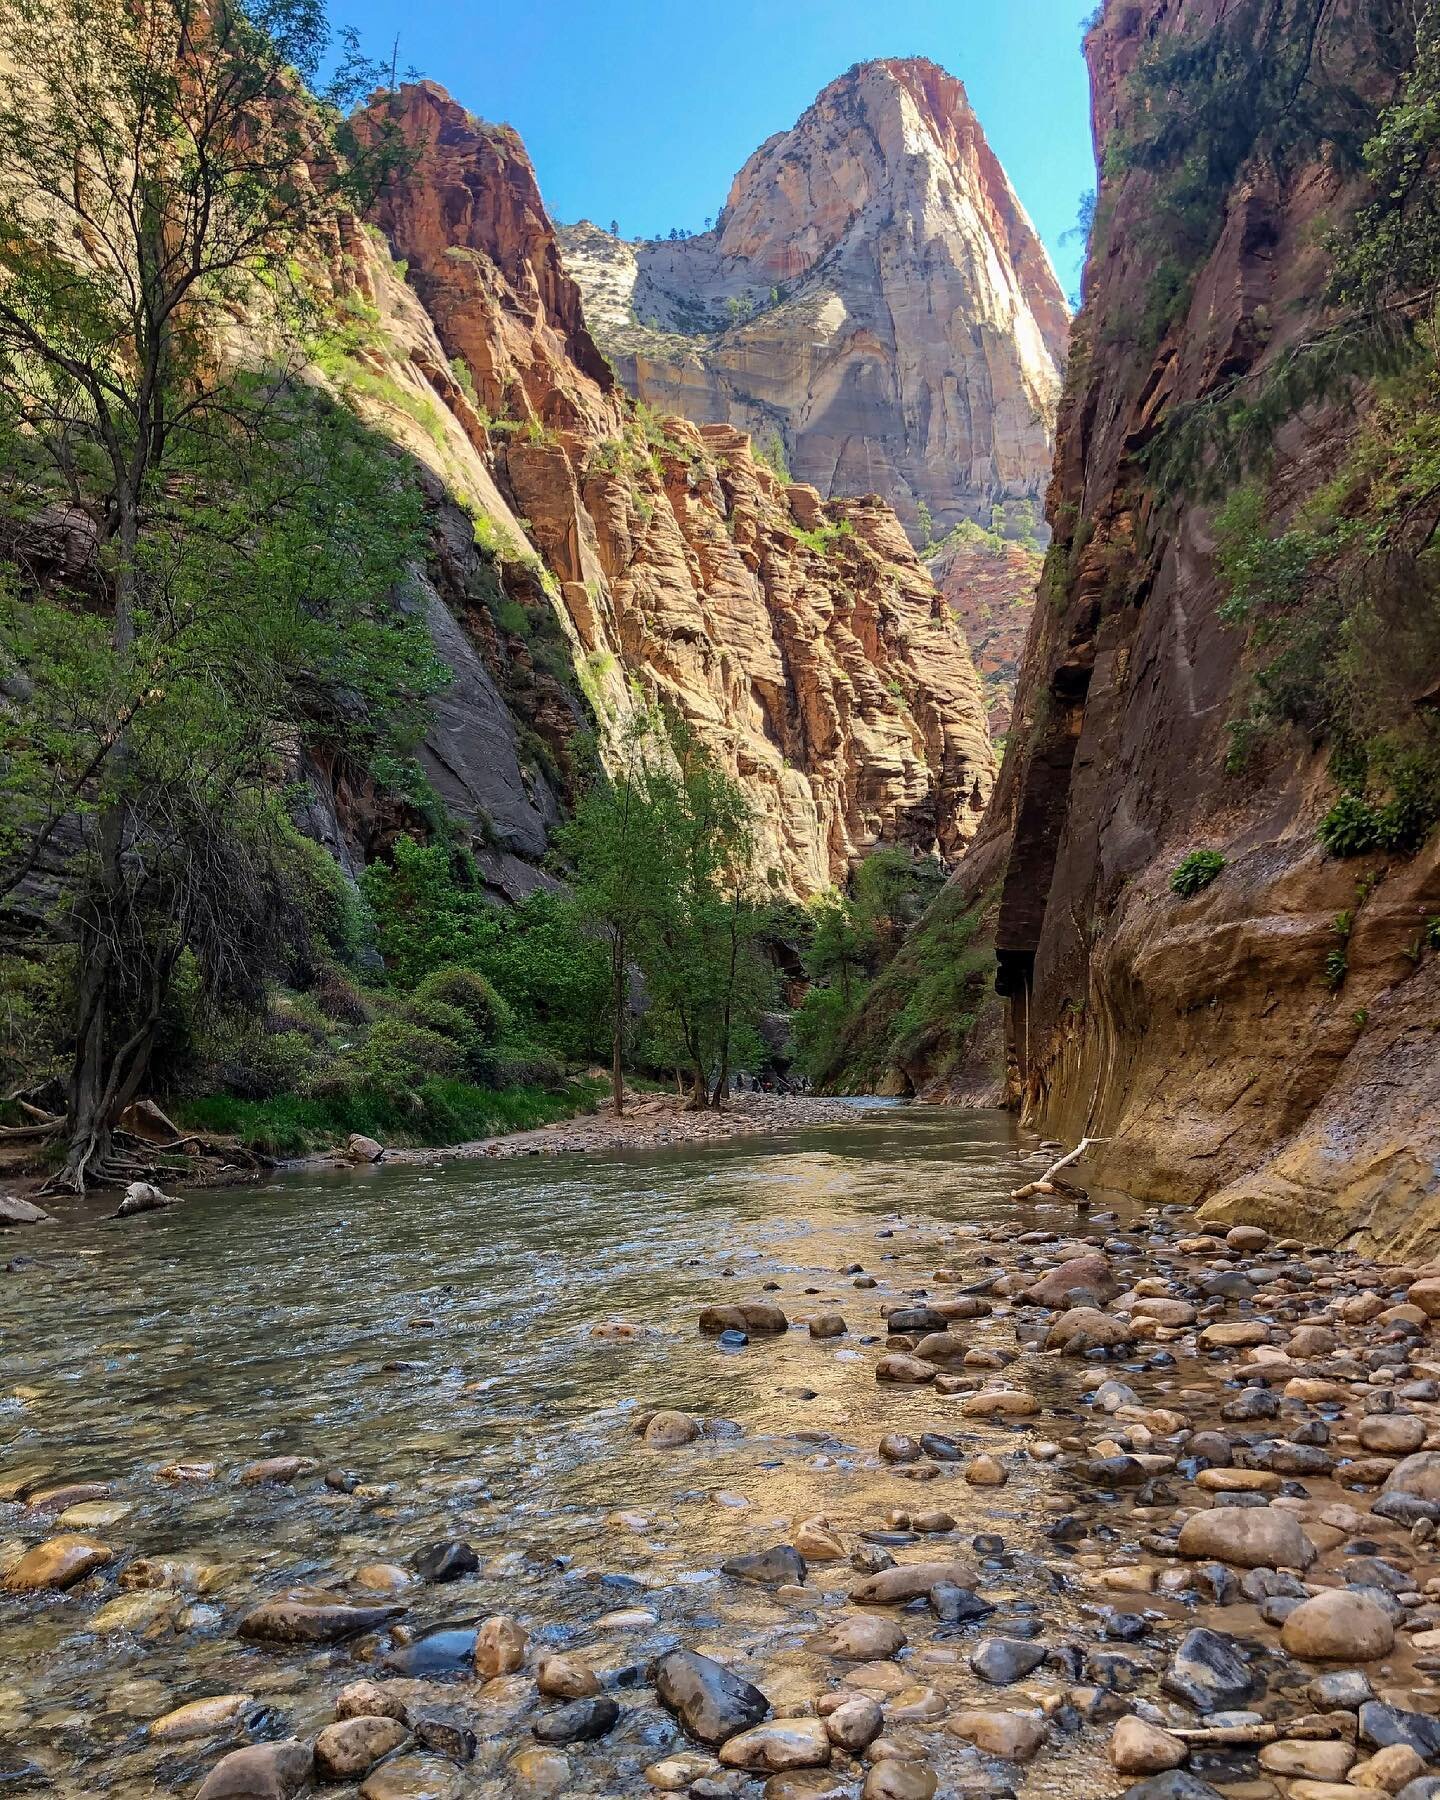
The Narrows is a popular “trail” that leads you through Zion Canyon and the Virgin River with twists and turns through the stunning slot canyon less than 20 feet wide in some areas stretching 15 miles. Red canyon walls tower thousands of feet above, catching sunlight that lights up the otherwise dark passageway. Most of the journey you’ll be ankle-deep in water, but depending on the river’s flow that day there may be some chest-deep or even swimming sections. Proper planning and gear is important for this hike.
The Narrows hike stretches 16 miles from start to finish. However, depending on your route you can hike up to what you are comfortable with. There are 2 ways to do this hike, Bottom-Up or Top-Down. Bottom-Up is the most popular and can be a day hike, as you can turn around when you want. Top-Down could be a very long and challenging day hike or most likely an overnight, two day backpacking trip.
This hike is unlike any other. It is a full on adventure. For instance, there is a lot more to think about hiking the Zions Narrows: water flow rates, flash floods, gear, permits (if applicable), and walking miles on rocks in a river. This may sound daunting but I assure you this experience can be enjoyed by all levels of hikers. I cover all of this in my guide so you can feel comfortable and knowledgeable for the best experience.
HOW TO GET THERE
For the Bottom-Up route of this hike, the roads to the Narrows trailhead are closed to the public and only buses are permitted. Hence, you will need to take a shuttle to get to The Temple of Sinawava trailhead. You will have to park at the Visitor Center, which is near the West Entrance of the park closest to the town of Springdale. The Visitor Center is located inside the park and has its own parking lot. If that parking lot is full, you can try to park in a lot outside of the park and walk over.
At the Visitor Center, the Zion Canyon Shuttle to The Temple of Sinawava trailhead is available free of charge. This is a first come, first serve shuttle. Once on the shuttle, get off on shuttle stop #9, which is the last stop. The shuttle ride from the Visitor Center to the trailhead is approximately 45 minutes.
Hiking Tip: You want to get on this early in order to spend ample time on the hike. Depending on the day/season, this could be overwhelmingly busy. I recommend getting on the shuttle by 8-9am in order to start the hike no later than 9-10am.
If it is a busy time and the wait is cutting too much into your hiking time, another option is to book through an outside shuttle company like Zion Guru, who are permitted to enter the road to the trailhead of the Narrows. This option will cost you more as a roundtrip ticket will cost about $40 per person, but it’s a solid option to avoid potential busy lines for the Zion Canyon Shuttle.
The Top-Down trailhead starts at Chamberlain’s Ranch. This requires a second vehicle or paid shuttle. It takes one hour and 30 minutes to drive from Springdale to Chamberlain’s Ranch.
Hiking Tip: Don’t miss the last shuttle. Or else it is another 4 mile walk to the Zion Lodge and then you need to figure out how to get back to the Visitor Center!
Best Time to Hike the Zion Narrows
In the Spring, the trail is typically closed in the March to May timeframe when flow rates are high from the snow melting and spring run-off. This could vary based on the winter weather conditions. Also, the weather is cooler and the water is much colder. And, yes flow rates are yet another thing to worry about prior to hiking. When the water flow is low, hiking is easier. The flow rate of the Virgin River is measured by Cubic Feet Per Second (CFS). The river is open with flow rates 0-150 CFS, which is considered to be safe hiking rates for bottom up hikers. For top down hikers, flow rates of 0-120 CFS is considered safe. Under 50 CFS is considered easy and over 70 CFS makes the hike a lot more challenging with the faster current and higher water levels. The park’s website will have this info daily as well.
Summer is a great time to hike the Narrows. The weather is excellent with high temperatures. The days are longer, shuttles run all the way to 9pm, and the water in the river is at its warmest. However, the park is crowded this time of year and the weather can be scorching. In addition, the monsoon season creates the highest risk of flash floods during this time.
Fall is another great time to hike the Narrows. The crowds start to diminish and the flow is at his lowest in the river. However, the air temperature goes down as does the water temperature. On September 30, the last shuttle pick-up time of the day is 7:15 pm, cutting your adventure by 2 hours.
This can be done in the Winter but the temperatures, air & water, are much colder. The shuttle bus does not run often, only on certain days. And, snowfall can potentially close the trail.
Personally, me and my wife went in the second week of May and everything worked out great. It was high 70s to mid 80s, which to me felt like 100 degrees! The temperature of the water was cold, roughly 45 degrees, but the gear we chose helped us not even notice how cold it was.
Before you go: Flash Floods
Monitoring the forecast for rain is one of those extra items to worry about if you are looking to hike the Zion Narrows. With rain, the potential of a flash flood in Zion Canyon is very possible. However, Zion National Park does a great job providing info on their website and issuing flash flood warnings. Even with a clear blue sky, the Narrows can close due to a rain forecast nearby.
There are sections of the Narrows with no high ground. Water levels rise very fast when a flash flood occurs in the canyon. There have been deaths with hikers being caught during a flash flood. I do not think this should deter but always proceed with caution. Always check the weather and the flash flood potential before planning your hike.

Can Beginners Hike the Narrows?
In short, of course! A lot of the information and what you read may sound frightening compared to most hikes, but the key to this hike is preparation. I couldn’t wait to hike this but my wife did not have that same sentiment. We just made sure to check all of the boxes that made us both comfortable. If that didn’t happen, we would probably haven’t done it. We researched the gear, watched the weather, spoke with Rangers on the flow rate and we were good to go.
To be honest, the trickiest part is your footing on the rocks in the water and any current that comes along. There is no elevation to worry about. Tons of hikers of all levels, children with families and older people. At any time, you can just turn around and head back.
It’s simple, if all the boxes don’t check, don’t go. But if they do, I highly recommend the time of your life and a memorable experience you will not forget.
WHAT GEAR DO I NEED?
At this point of my life, sometimes it is better to take the easy route. I researched and researched all the gear needed for the Narrows hike. And, it was a lot. Lugging that around on the plane and then spending the extra money on items I don’t have and would possibly never use again. My very smart wife said, stop being stubborn and let’s just rent it. That’s what we did and I have zero regrets. We would have enjoyed our hike less without all the gear I may not have purchased myself. No stress, just enjoyment.
There are quite a few rental equipment companies near the park. Our hotel was a 5 minute walk to the South Entrance and there was a Zion Outfitters across from the hotel, where we saw countless hikers each day go and rent for the Narrows. What they suggest to use, I would say is 100% needed. There are multiple rental options. What we went with was the Dry Bib package, which costs $55 per person that includes: Dry bibs (waders), Adidas Hydro Lace Canyoneering Boot, 5mm Neoprene Socks, and a Wooden Hiking Stick.
The Narrows bottom-up is quite the unique challenge in comparison to most hikes. You will be hiking in a river. Proper footwear, accessories, and clothing are essential.
Shoes - It’s all about grip and traction on the rocks. Canyoneering boots are waterproof and designed for the slippery conditions of this hike. I could not see myself getting by without them. You could use anything you want, but these are optimal for beginners in my opinion.
Neoprene Socks - These socks are very tight, waterproof socks that protect your feet and keep water from entering your boot. This will help prevent blisters. And, depending on the water temperature, keep your feet from getting cold.
Clothing - During the colder months, dry pants will help keep you warm and dry. Hence, we went with the full waders through the rental company. Quick dry, light clothing will be helpful as you go further and the water rises up or if you end up falling in. Bring extra layers as the canyon can get chilly, such as a light jacket, even in summer months.
Walking Stick - The rocks are darn slippery. The hiking stick helped me not fall flat on my face and keep my balance.. If you have your own hiking poles, make sure they are very sturdy.
Dry Pack or Waterproof Bag - This will be everything carrying necessary items such as water, snacks, extra clothes, and sun protection. Snacks and water are necessary if you will be hiking most of the day.
Waterproof Cell Phone Case - This was helpful so I could take pictures without fear of dropping my phone. I did not have it in me to bring my camera along for the trek with concerns of the water. But I did not see a few brave hikers with expensive cameras willing to risk it all.
2 WAYS TO HIKE
From the Bottom Up: This is the route most people will take. By far, the more popular of the two. No permit required. Taking the Zion Shuttle to The Temple of Sinawava trailhead, start at the Riverside Walk. This will lead you upriver for several miles. When you have taken in all the scenery, simply turn around and go back the same way you came. The farthest you can go without a permit is Big Springs, which will make your journey roundtrip 9-10 miles.
From the Top Down: This is for the adventurous hiker. A permit is required for this route. This is a 16 mile trek one way from Chamberlain’s Ranch to The Temple of Sinawava. If you make this a two day hike, you will reserve your campsite when you reserve your permit. For permit details and other info on this hiking route, I suggest doing a quick google. Lots of info out there by some good bloggers/websites. I did not take this route so I can’t speak in depth.
THE HIKE BOTTOM-UP
Trail Info: Distance: up to 9+ miles (1-8 hours) Difficulty: Moderate to Strenuous (depending on water flow/distance) Trail Type: Out & Back Permit required: No Elevation: Mostly flat
The Zion Shuttle will drop you off at the last stop, the Temple of Sinawava, where the trail begins. The first mile will be paved on Riverside Walk along the Virgin River. After one mile, there is a drop off and it’s time to enter the river. This can be a crowded start as all the other hikers on the bus will be right with you. Take your time. The water is cold and the rocks are slippery immediately. Acclimate yourself to the rocks before you increase your pace. I almost fell a few times. Unfortunately for my wife, she took a fall right in catching herself enough to keep her face dry. Her upper body was pretty cold after that.
Sometimes you will walk on small rocks and other areas in the hike will be larger rocks. It is flat but the terrain does change. Then add in the water levels. Sometimes it is ankle deep, knee deep, or even waist deep. Sometimes it’s deeper or more shallow depending on the time of the year. There are even areas where you can swim, but we did not reach that far into the canyon. We went in May and it got up to my thighs and my wife’s waist at its highest. Given, we are shorter people.
The further you go into the canyon, the more narrow it gets. The beginning is the most crowded part of the hike for the first mile or two. The farther you go, there will be less crowds. The first landmark you will come across is Mystery Falls. This is a very small waterfall that flows down the canyon walls into the Virgin River about a half mile into the river. I mean small, you could easily miss it.
The next section is Wall Street, the most popular and well-known part of the hike. This is also the most narrow section of the hike, just after the Orderville Canyon junction. The canyon walls are only 22 feet apart. There is no land to go on, just water so be cautious about flooding here. This is about 2 miles into the water, 3 miles total from the trailhead. Most hikers reach this point and turn around.
The last known landmark is Big Springs, about 3.5 miles into the water. This the furthest you can go on the Bottom-Up route of the Narrows. A permit is required to proceed past this.
You can turn around any time. If it feels too difficult or not safe, just head back to the trailhead. Even hiking the shortest amount in the water will give you amazing views that other hikes do not offer.
ADDITIONAL TIPS
Before you go, always check Zion National Park’s website for conditions and closings, https://www.nps.gov/zion/planyourvisit/index.htm.
The shuttle season is typically from March to November.
Use the bathrooms at the Temple of Sinawava before you start. There are no bathrooms or privacy once you are in the river.
Be prepared to get wet. Your feet and parts of your lower body will be submerged in water, or your whole body if you fall in! Dress appropriately as the water can be very cold. And, bring spare clothing and shoes for after the hike.
Leave no trace! Please ensure to clean up after yourself.
HIKING FOR DONUTS
Hi, I’m Mark. I live in Connecticut. I take new trips every chance I get. A good trip has a great hike, great food, and something fun to do. My goal is to search out new trips and share them to inspire others to try something new and exciting.
If you are looking for posts in a particular place, search City or State here.
SEE OTHER POSTS IN ARCHIVE
Archive
RECOMMENDED POSTS

RECENT POSTS
See the latest on Instagram and follow @HIKINGFORDONUTS

Garden of the Gods Hiking Guide
Garden of the Gods can be explained in one word: majestic. Colorado is one of my favorite states to travel to and explore. At one time, I visited 3 times out of 4 years. Mostly spending time in Denver, Boulder, and Rocky Mountain National Park. I wanted to see more of the state and my research came across Garden of the Gods. I had to go. And, I immediately included it on my next trip. The park is filled with red rock formations, big and small, overlooking Pike’s Peak and the southern Front Range of the Rockies. It is one of those parks, you have to step your foot in and explore all its beauty. It is 100% percent worth planning your trip around visiting.
About Garden of the Gods
The stunning rock formations throughout the park were created during a geological disruption millions of years ago. The look of the rock you see today is due to subsequent erosion and glaciation. Adding to the park’s distinctiveness, it is also one of the only places in Colorado where you can find red sandstone and Pikes Peak granite together.
Garden of the Gods can be explored by foot, car, or biking with hiking trails and bike lanes throughout the park. There are some wheelchair accessible trails. There are 16 hiking trails that range from 0.25 miles to 6 miles. Most of the trails are relatively easy, but there are a few trails with rockier terrains. And, they connect pretty easily. Rock climbing is another popular activity here as well. There is truly something for everyone at the park.
The visitor center is across from the park itself and is worth a visit to speak to rangers, grab a map, and check out displays and history of the park.
Best of all, the park is FREE. The original owner of the park land, Charles Perkins, wanted to share the experience with everyone. After his passing, his family donated the park to the city to fulfill his wishes. The park is open from dawn until dusk. Check their website for specific hours for the time you are visiting.
How to Get to Garden of the gods
Garden of the Gods is located in Colorado Springs, CO. It is only about 5-10 minutes from the Interstate highway and close to downtown, hotels, shopping, and dining. Traveling from the popular city of Denver will only take just over an hour, which would also make for a great day trip visit. For most out of state explorers, flying into Denver is the best bet and then driving to the park. It is pretty easy to find using your gps.
When to Visit Garden of the gods
The beautiful rock formations and visuals of this park really make any time of the year a feasible time to visit. I went in early May and it was snowing! It was not as warm as expected but the snow made everything look pretty cool. As one would expect, the summer is the busiest time of the year. There is a decent amount of parking but I could see that being filled up by afternoon in the summer/fall time.
Park Entrance
Hiking trails at the Garden of the Gods
There are many hiking trails in the Garden of the Gods. You can’t go wrong with the paths you choose. The park may seem small but you can spend an entire day hiking in the park. The trail system totals up to 15 miles. Here are some of the more popular hikes that offer great sights.
1) The Perkins Central Garden Trail is an easy, 1.5 mile round trip path with minimal elevation. This trail is in the heart of the Park at the base of the highest rock formations. This trail is right near the North Main Parking lot.

Perkins Central Garden path
2) The Ridge Trail is a moderate, 1/2 mile loop with less than a 100 feet in elevation. This trail starts at South Garden Parking Lot and head towards the Sleeping Giant formation to hop on the trail.
3) The Siamese Twins Trail is an easy 1-mile round trip, with less than 150 feet in elevation. On a clear day, there is a fascinating view of Pikes Peak through the natural window of the Siamese Twins. This can be found near the southwest entrance of the park.
Siamese Twins
No views of Pike Peak on this day!
4) The Scotsman/Buckskin Charlie Trail are moderate trails located in the Central Valley of the park that loop through the park. There is a small parking lot to join the Scotsman Loop. It is best to start hiking from the main parking lot and connect to this trail. This area is more open and you can see distant views of the Central Garden formations.
5) The Palmer Trail is a rocky trail that runs along the north and west sides of the park from the North Main Parking Lot to the middle of the Siamese Twins hiking trail. On this trail, there will be more greenery to see and elevated views overlooking Gateway Rock. This is one of the longer hiking trails in the park.
Views from Palmer Trail
6) Choose multiple trails and make your own hiking adventure. It is very easy to connect trails at the park. When I arrived at the park, I went to the visitor center, spoke with a ranger, and grabbed a map. The ranger said the most popular hike in the park to get as many views as possible was taking the 2.7 mile loop starting on the Palmer Trail behind the North Main Parking Lot. From here, you will reach the Siamese Twins Trail and explore this area. Then cross Juniper Way at the Scotsman Picnic Area and hop on the Scotsman Trail. This will lead to the Perkins Central Garden Trail to finish the loop up to the North Main Parking Lot. That is what I did on my visit and I was able to see all the popular rock formations. And, it was a fun and awesome experience exploring amidst all the rock formations.
Hiking Tips: Due the elevation, bring lots of water and keep hydrated to avoid any affects. On those sunny days, be sure to bring sunscreen as there is no shade here. Lastly, as you would expect, come early to visit the park or try the off-season.


Bonus: Post Hike Donuts
It’s called Hiking for Donuts, so it would be a disservice if I did not include a post hike donut shop to visit after the hike. Fortunately, there is a fantastic donut shop in Colorado Springs about 20 minutes from the park called Amy’s Donuts. No exaggeration, they had over 40 different flavors/topping to choose from, which is a very tough decision to make. Flavors from Butterfinger to Fluffer Nutter to Nutella Crumb to all the standard donuts. And, the jelly donuts are filled fresh to order! Great donut shop find.
HIKING FOR DONUTS
Hi, I’m Mark. I live in Connecticut. I take new trips every chance I get. A good trip has a great hike, great food, and something fun to do. My goal is to search out new trips and share them to inspire others to try something new and exciting.
If you are looking for posts in a particular place, search City or State here.
SEE OTHER POSTS IN ARCHIVE
Archive
RECOMMENDED POSTS


RECENT POSTS
RECENT POSTS
See the latest on Instagram and follow @HIKINGFORDONUTS
First Trip to the Adirondacks: Hiking in Upstate New York
My first trip hiking in the Adirondacks in Upstate New York. Adirondacks Travel Guide. I was able to wake up to Paradox Lake each day, hike Mount Severance, and check out Paradox Brewery. Moderate hike, amazing views along the way!
Trail Description: Planning your first trip to the Adirondacks? Discover beginner-friendly hikes, breathtaking views, and tips for exploring New York's stunning wilderness.
Trail Info:
Where: Schroon Lake, NY Click here for directions. Distance: 2.4 miles Difficulty: Moderate Trail Type: Out and Back Trail Features: Picturesque views of Schroon Lake and Pharaoah Lake Wilderness
How to get there:
The parking lot for the hike was easy to find. It is right off State Route 9. However, my gps got confused and made us go out of the way. Once parked, the trailhead is right in front of you through the tunnels under the I-87.
Hiking Tips:
Put your name in the Sign In chart once you arrive.
This hike could easily been done in normal gym shoes.
Adirondacks Weekend Travel Guide Recommendation: Mount Severance Hike and Paradox Brewery
The warm weather is finally here to stay in the northeast. Summer of 2017 looks pretty darn good. I have been planning as many trips as my wallet can handle. My weekends are booked up through almost October. There will be many adventures and lots of food. The first real travel this summer was thanks to friends of mine. They have a friend who owns a house on Paradox Lake. It was a good opportunity to check out some hiking in upstate New York. It was my first trip to the Adirondacks. The house was legit right on the lake. We had our own little beach area and dock. The house was pretty remote so there was no internet connection. It is good sometimes to go without the need of checking your phone on social media and enjoy where you are and who you are with. However, the second I had internet it was game on! It was absolutely, awesome views to see the sun rise and see the sun set. I tried to get good pictures, but I always get distracted by food. I couldn’t help it. My friend’s family always goes all out. It was a weekend of relaxing, filet mignons and tasty ribs.
I have never ventured to this part of New York. The Adirondacks has been on my list of areas to see for a while. When I saw the house was nestled in the Adirondacks Park, I quickly said, “I’m in!”. The first night we hung out at the house and settled in. The next day we did some swimming and soaking in the beauty of the lake. The weather was exceptional. Sun was out with a cool breeze. In the afternoon we headed into the town of Schroon Lake, which was about a 10 minute ride. It was a nice little town area full of small businesses such as ice cream shops, restaurants, and stores. Our mission on this afternoon was beer. We researched a local brewery prior to our stay and it turned out pretty good. It was called Paradox Brewery. All of the seating and bar taps were located outside. There was a food truck and corn hole boards. More importantly, the beer was good. They had a selection of 7 different beers consisting of IPAs, Pilsner, Rye Ale, Saisons, Sour and Stout options. They had one cider from another brewery, Awestruck, which was extremely delish. My favorite beers were the Double IPA and surprisingly the Sour. Sours aren't usually my thing but this one was so good I got a growler. The tartness I did taste was the mix of melons, limes, and citrus. It is a kettle sour aptly named "Oats and Gose". The brewery was a good find to have beers and hang out. I would give it a shot if you are in the area.
Paradox Brewery in Schrron Lake, NY.
The last day I was there, I had to get a hike in. There were a handful of hikes within 30 minutes or so of our location. The one that caught my eye was Mount Severance in Schroon Lake, NY. It was only about 10 minutes from the house rental. The parking lot for the hike was easy to find. It is right off State Route 9. However, my gps got confused and made us go out of the way since the beginning of the hike starts under I-87. Once you were parked, the trailhead is right in front of you through the tunnels under the I-87. One thing that stood out to me, there was a sign-in chart for hikers. I have never seen that before and I thought that was a great idea if people were to get lost or injured. For a longer or more strenuous hikes, I would like to see more of these. For this hike, it was very well marked and and a quick trip to the summit. I can see why this is a popular hike. It was roughly 2 .4 miles round trip and the summit offers picturesque views of Schroon Lake and Pharaoah Lake Wilderness. The terrain wasn’t bad although we got caught in a little rain storm. There were some steep inclines and rocky areas but I would consider this a moderate hike. This hike could easily been done in normal gym shoes. I really enjoyed it. Everything you want in a hike – good photo opportunities, optimal summit location, and fun. I would hike this again given the chance.


HIKING FOR DONUTS
A blog for the outdoors foodie enthusiast
Hi, I’m Mark. I live in Connecticut. I take new trips every chance I get. A good trip has a great hike, great food, and something fun to do. My goal is to search out new trips and share them to inspire others to try something new and exciting.
If you are looking for posts in a particular place, search by city or state here.
EXPLORE OTHER POSTS IN THE ARCHIVE
Archive
RECOMMENDED POSTS
MOST RECENT POSTS
SEE THE LATEST ON INSTAGRAM AND FOLLOW @HIKINGFORDONUTS


Ready to plan your trip? Let us know your favorite Adirondacks hike in the comments!