


Garden of the Gods Hiking Guide
Garden of the Gods can be explained in one word: majestic. Colorado is one of my favorite states to travel to and explore. At one time, I visited 3 times out of 4 years. Mostly spending time in Denver, Boulder, and Rocky Mountain National Park. I wanted to see more of the state and my research came across Garden of the Gods. I had to go. And, I immediately included it on my next trip. The park is filled with red rock formations, big and small, overlooking Pike’s Peak and the southern Front Range of the Rockies. It is one of those parks, you have to step your foot in and explore all its beauty. It is 100% percent worth planning your trip around visiting.
About Garden of the Gods
The stunning rock formations throughout the park were created during a geological disruption millions of years ago. The look of the rock you see today is due to subsequent erosion and glaciation. Adding to the park’s distinctiveness, it is also one of the only places in Colorado where you can find red sandstone and Pikes Peak granite together.
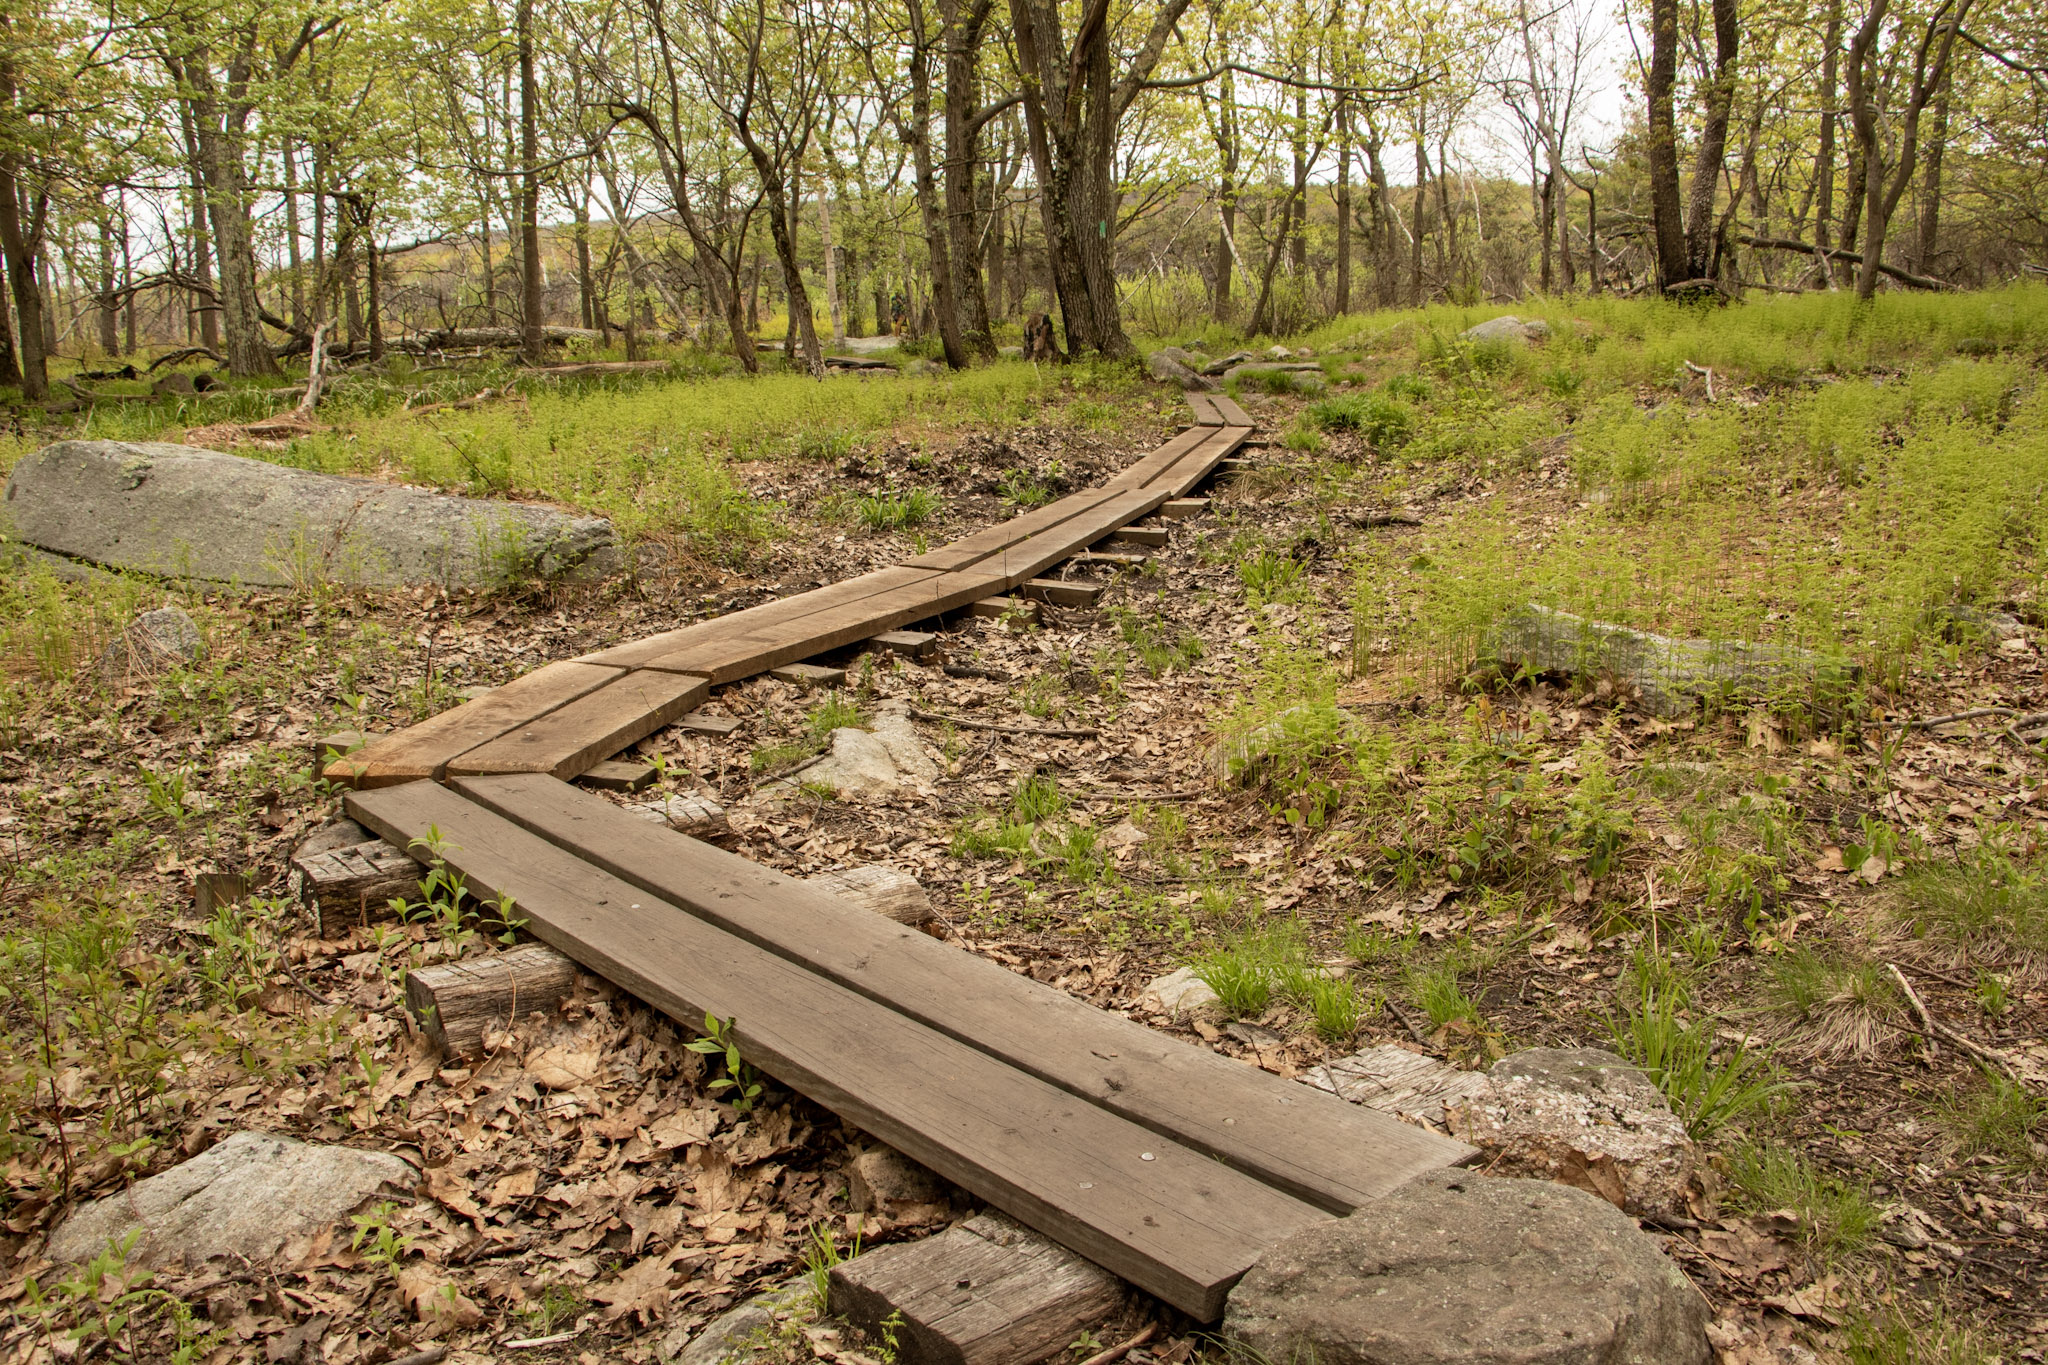
Garden of the Gods can be explored by foot, car, or biking with hiking trails and bike lanes throughout the park. There are some wheelchair accessible trails. There are 16 hiking trails that range from 0.25 miles to 6 miles. Most of the trails are relatively easy, but there are a few trails with rockier terrains. And, they connect pretty easily. Rock climbing is another popular activity here as well. There is truly something for everyone at the park.
The visitor center is across from the park itself and is worth a visit to speak to rangers, grab a map, and check out displays and history of the park.
Best of all, the park is FREE. The original owner of the park land, Charles Perkins, wanted to share the experience with everyone. After his passing, his family donated the park to the city to fulfill his wishes. The park is open from dawn until dusk. Check their website for specific hours for the time you are visiting.
How to Get to Garden of the gods
Garden of the Gods is located in Colorado Springs, CO. It is only about 5-10 minutes from the Interstate highway and close to downtown, hotels, shopping, and dining. Traveling from the popular city of Denver will only take just over an hour, which would also make for a great day trip visit. For most out of state explorers, flying into Denver is the best bet and then driving to the park. It is pretty easy to find using your gps.
When to Visit Garden of the gods
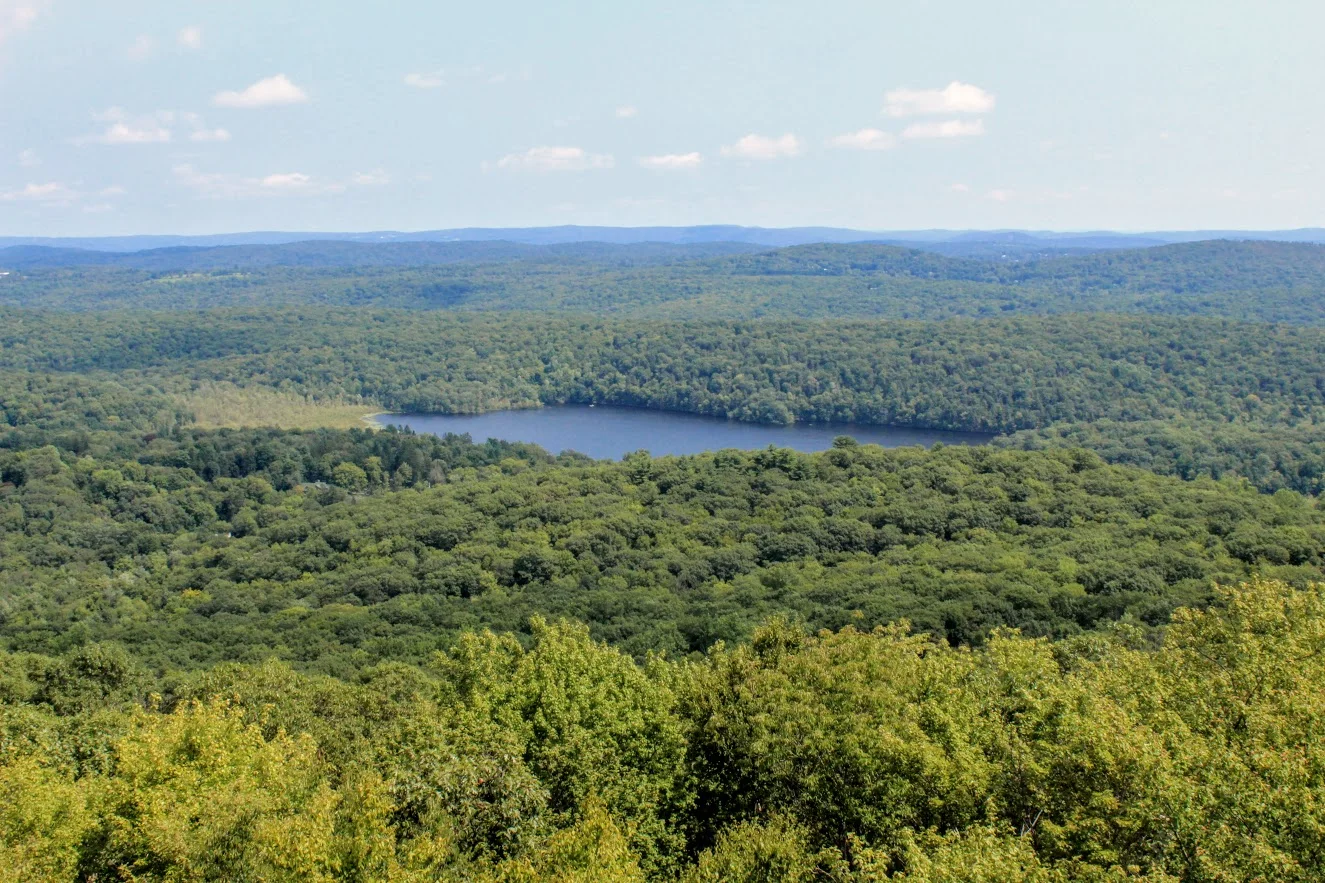
The beautiful rock formations and visuals of this park really make any time of the year a feasible time to visit. I went in early May and it was snowing! It was not as warm as expected but the snow made everything look pretty cool. As one would expect, the summer is the busiest time of the year. There is a decent amount of parking but I could see that being filled up by afternoon in the summer/fall time.
Park Entrance
Hiking trails at the Garden of the Gods
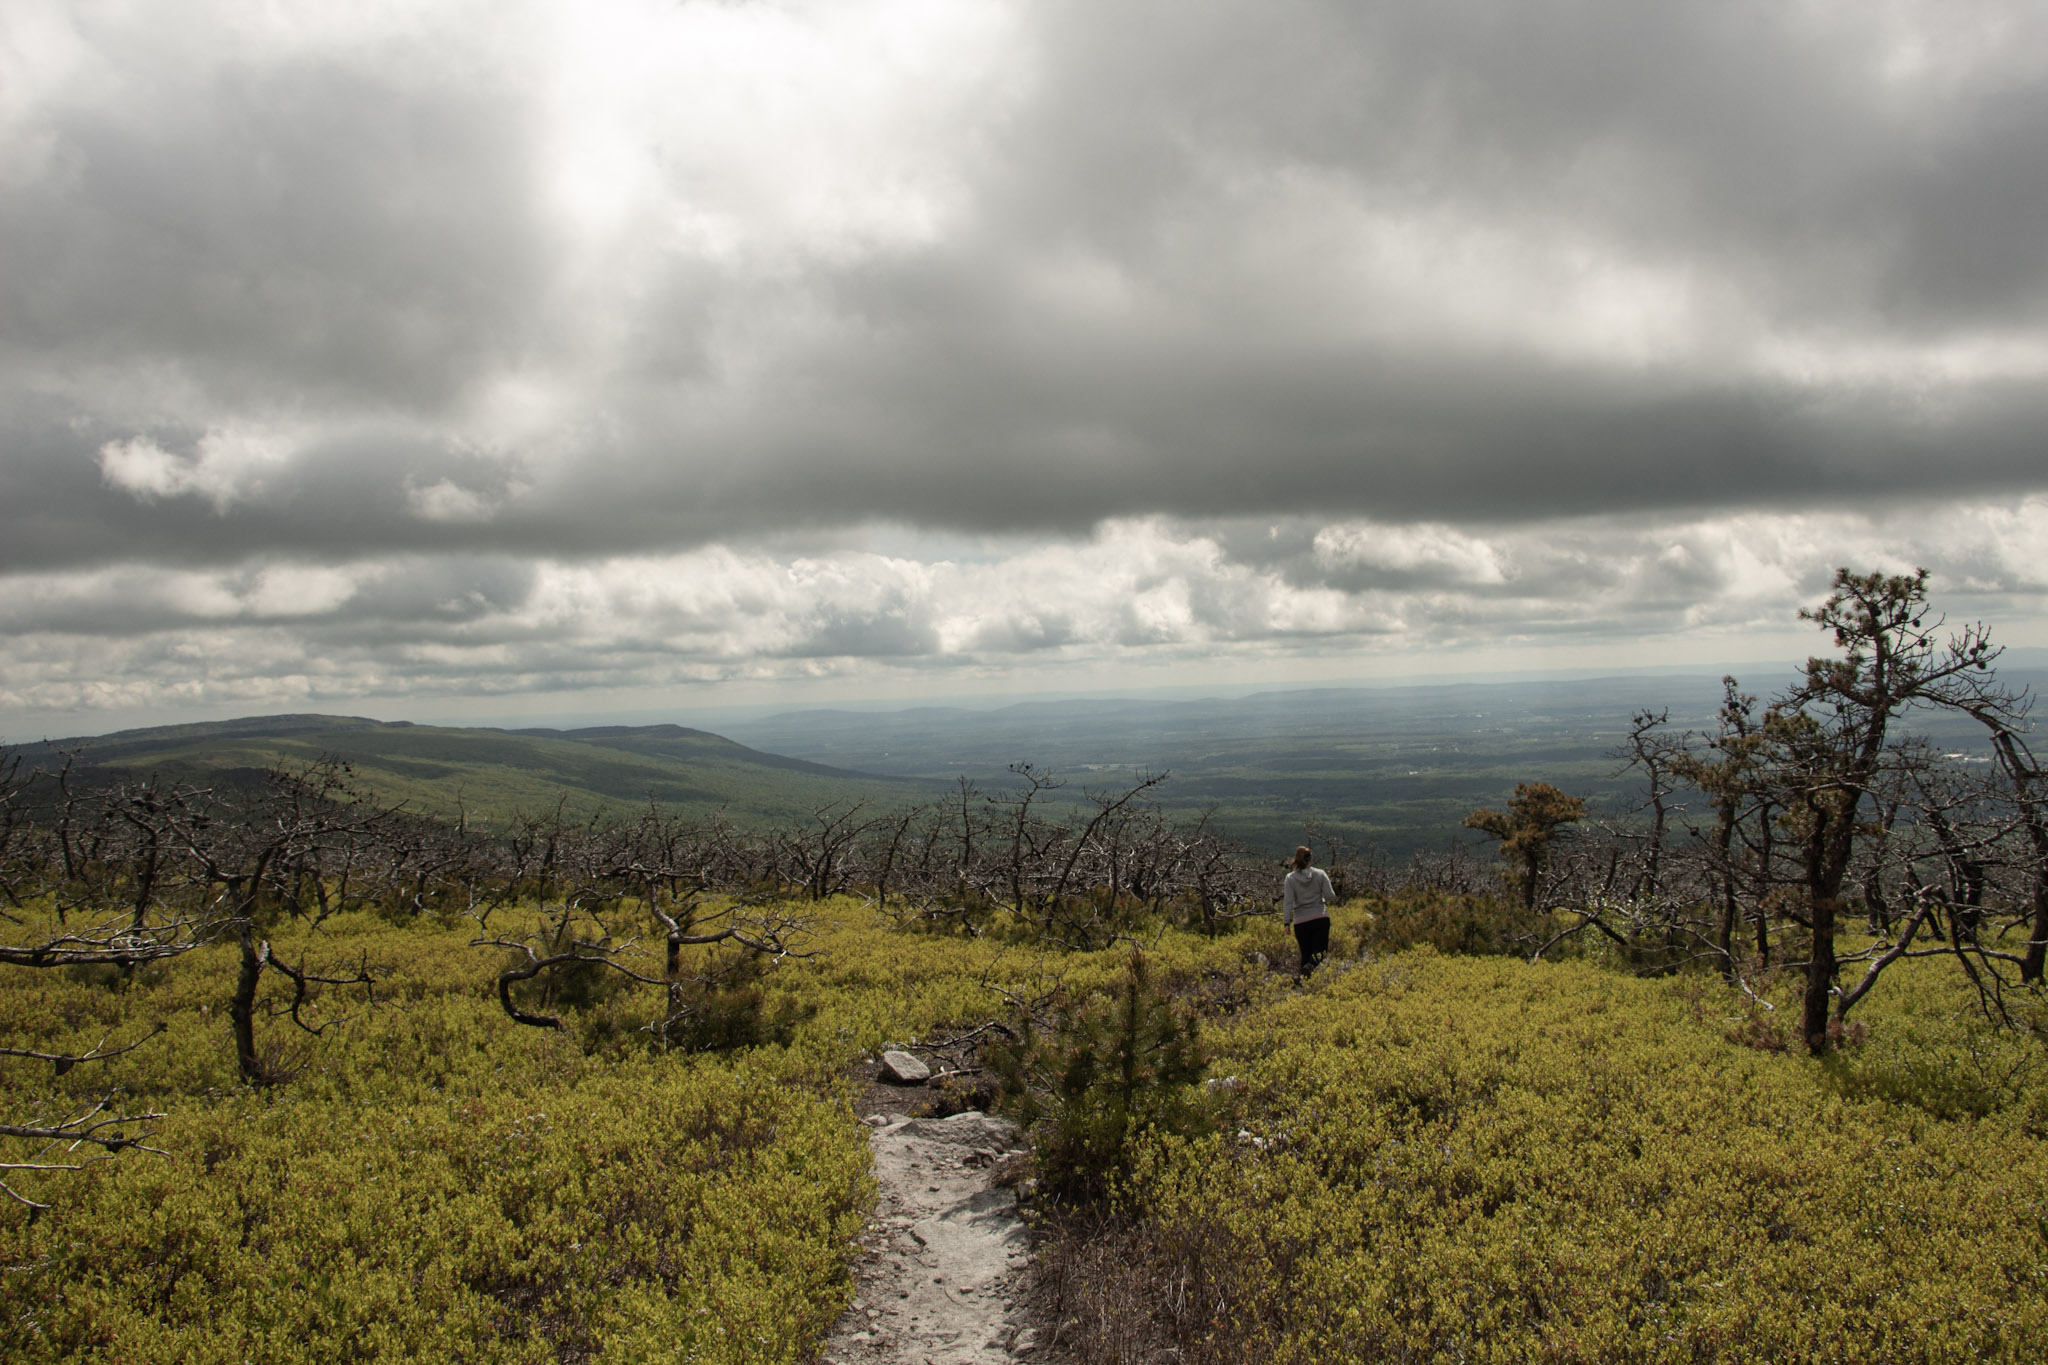
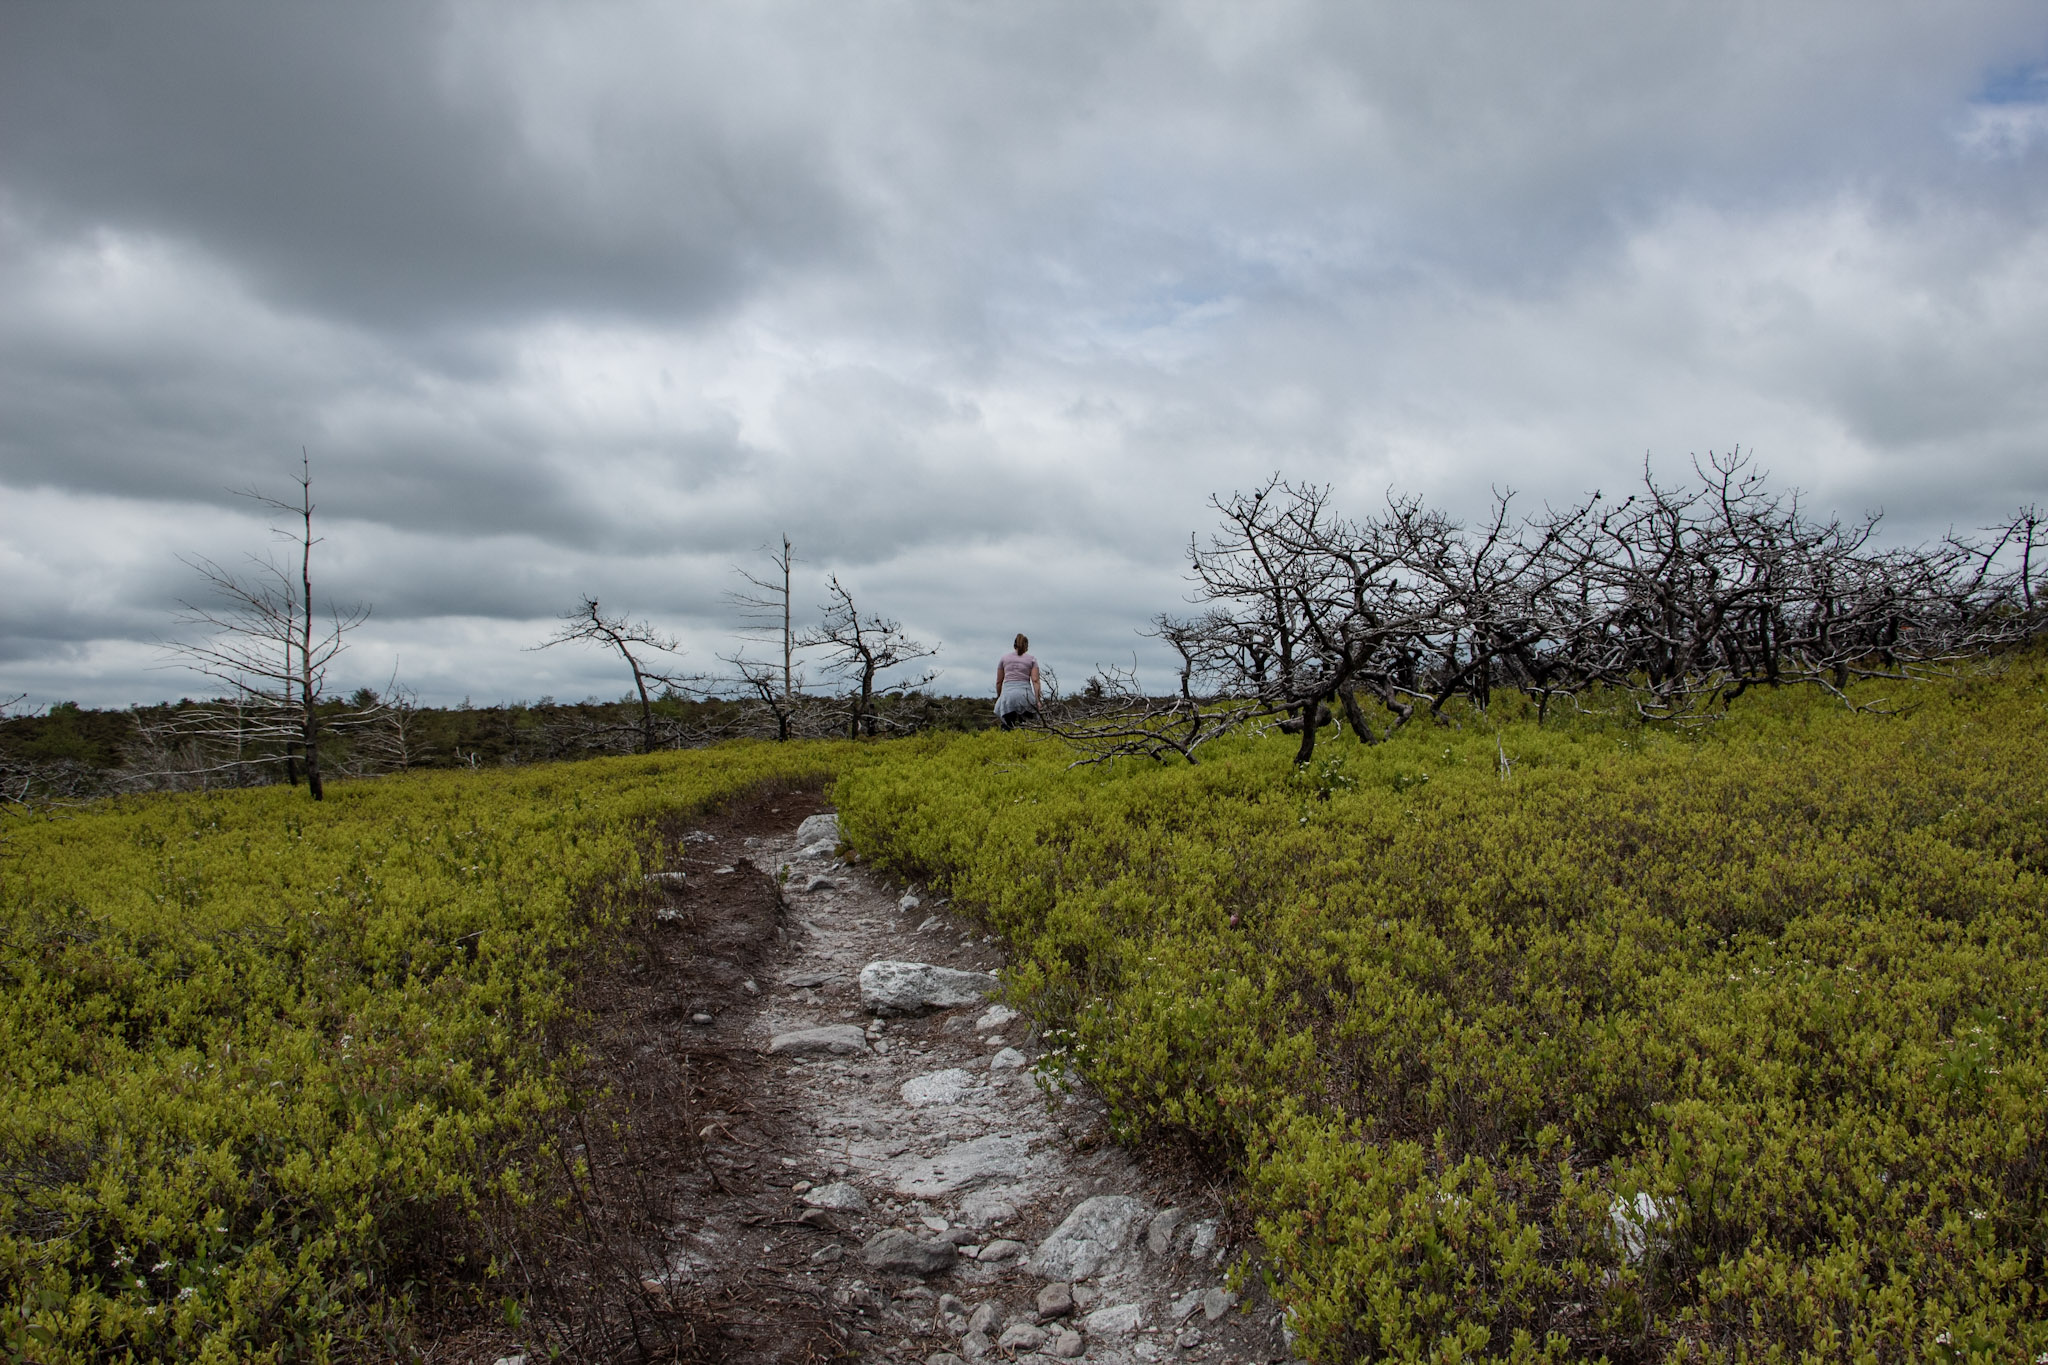
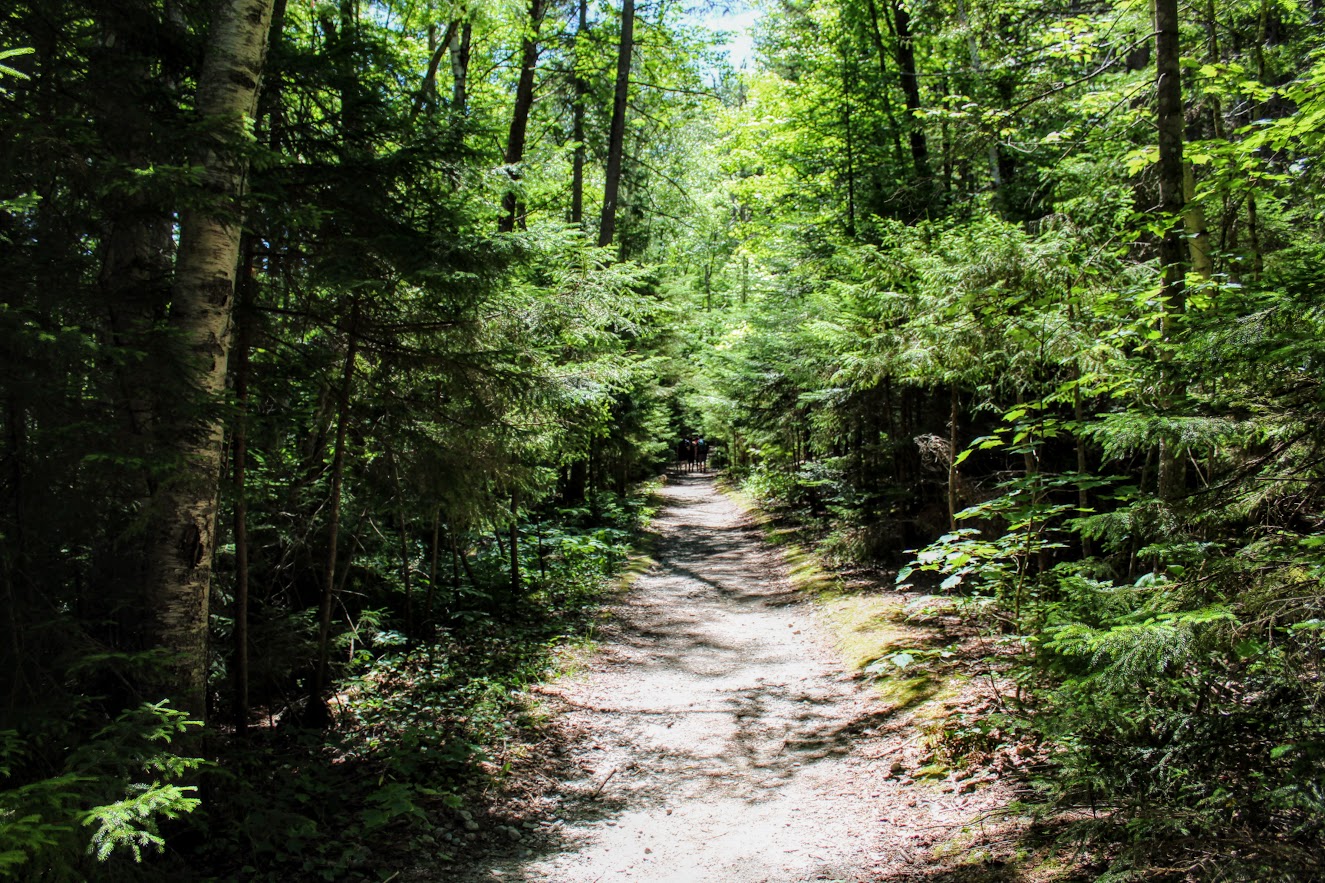
There are many hiking trails in the Garden of the Gods. You can’t go wrong with the paths you choose. The park may seem small but you can spend an entire day hiking in the park. The trail system totals up to 15 miles. Here are some of the more popular hikes that offer great sights.
1) The Perkins Central Garden Trail is an easy, 1.5 mile round trip path with minimal elevation. This trail is in the heart of the Park at the base of the highest rock formations. This trail is right near the North Main Parking lot.

Perkins Central Garden path
2) The Ridge Trail is a moderate, 1/2 mile loop with less than a 100 feet in elevation. This trail starts at South Garden Parking Lot and head towards the Sleeping Giant formation to hop on the trail.
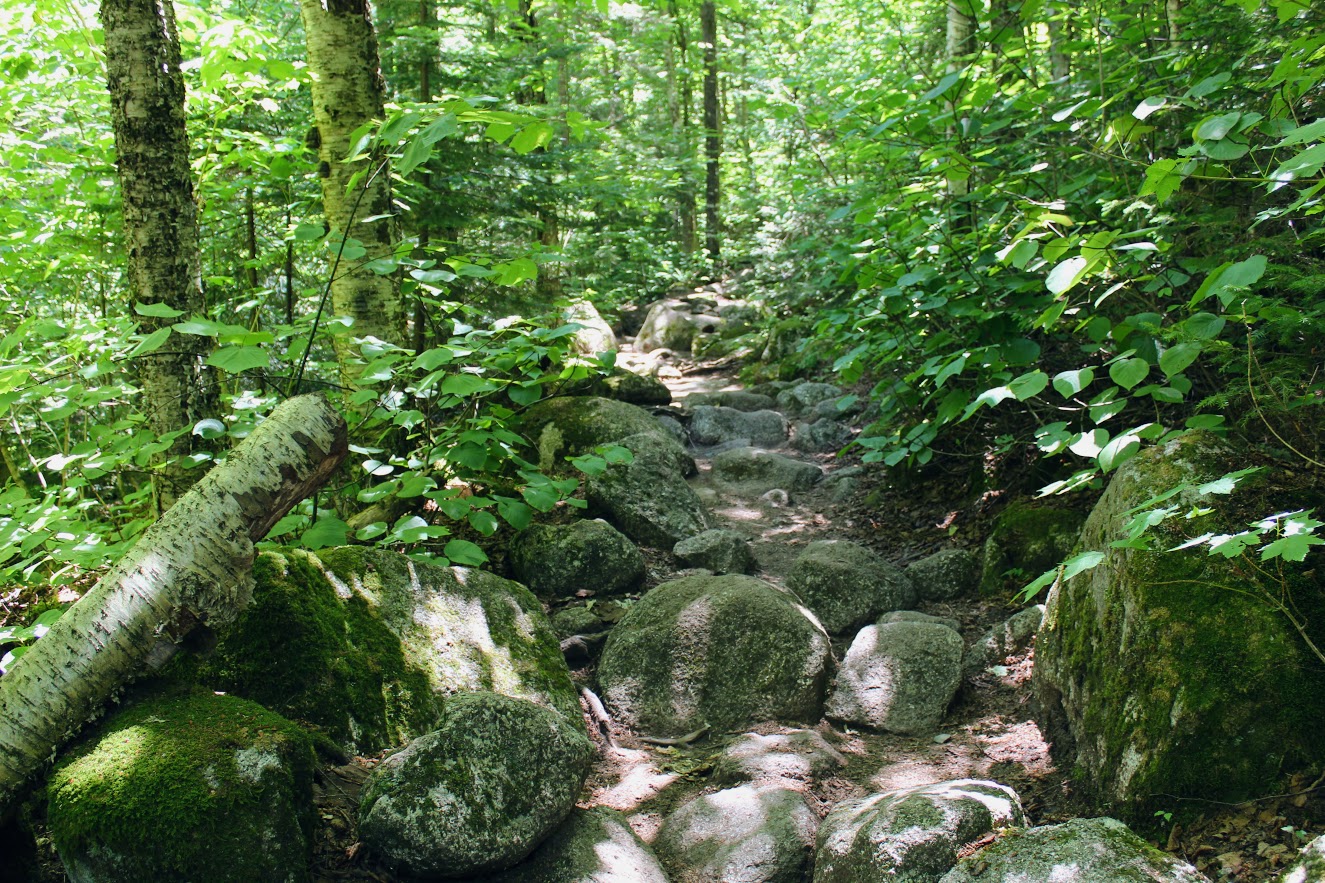
3) The Siamese Twins Trail is an easy 1-mile round trip, with less than 150 feet in elevation. On a clear day, there is a fascinating view of Pikes Peak through the natural window of the Siamese Twins. This can be found near the southwest entrance of the park.
Siamese Twins
No views of Pike Peak on this day!
4) The Scotsman/Buckskin Charlie Trail are moderate trails located in the Central Valley of the park that loop through the park. There is a small parking lot to join the Scotsman Loop. It is best to start hiking from the main parking lot and connect to this trail. This area is more open and you can see distant views of the Central Garden formations.
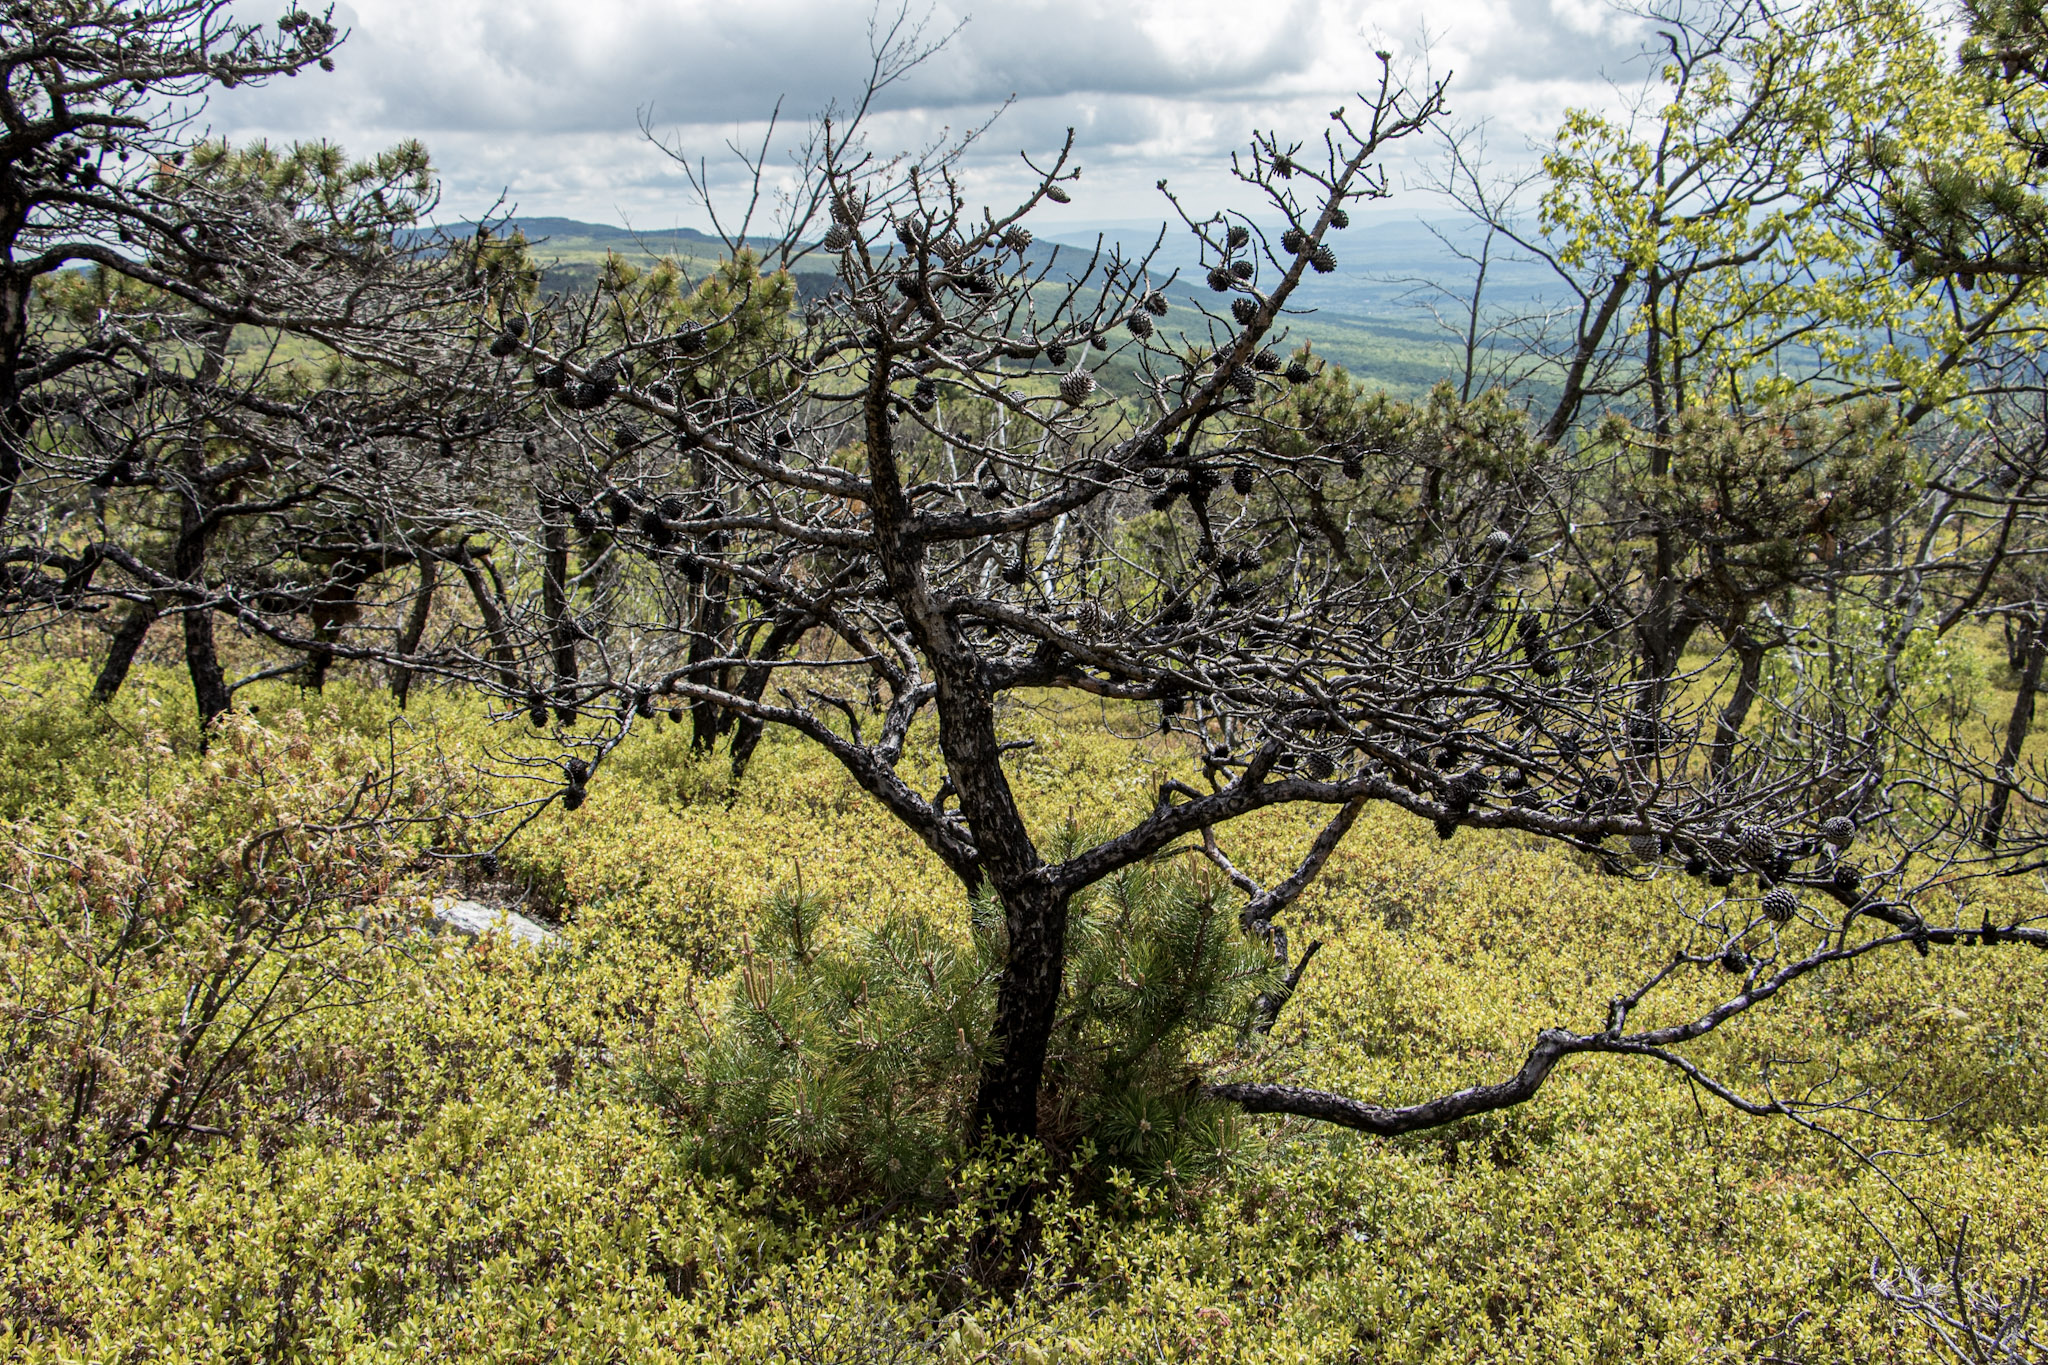
5) The Palmer Trail is a rocky trail that runs along the north and west sides of the park from the North Main Parking Lot to the middle of the Siamese Twins hiking trail. On this trail, there will be more greenery to see and elevated views overlooking Gateway Rock. This is one of the longer hiking trails in the park.
Views from Palmer Trail
6) Choose multiple trails and make your own hiking adventure. It is very easy to connect trails at the park. When I arrived at the park, I went to the visitor center, spoke with a ranger, and grabbed a map. The ranger said the most popular hike in the park to get as many views as possible was taking the 2.7 mile loop starting on the Palmer Trail behind the North Main Parking Lot. From here, you will reach the Siamese Twins Trail and explore this area. Then cross Juniper Way at the Scotsman Picnic Area and hop on the Scotsman Trail. This will lead to the Perkins Central Garden Trail to finish the loop up to the North Main Parking Lot. That is what I did on my visit and I was able to see all the popular rock formations. And, it was a fun and awesome experience exploring amidst all the rock formations.
Hiking Tips: Due the elevation, bring lots of water and keep hydrated to avoid any affects. On those sunny days, be sure to bring sunscreen as there is no shade here. Lastly, as you would expect, come early to visit the park or try the off-season.


Bonus: Post Hike Donuts
It’s called Hiking for Donuts, so it would be a disservice if I did not include a post hike donut shop to visit after the hike. Fortunately, there is a fantastic donut shop in Colorado Springs about 20 minutes from the park called Amy’s Donuts. No exaggeration, they had over 40 different flavors/topping to choose from, which is a very tough decision to make. Flavors from Butterfinger to Fluffer Nutter to Nutella Crumb to all the standard donuts. And, the jelly donuts are filled fresh to order! Great donut shop find.

HIKING FOR DONUTS
Hi, I’m Mark. I live in Connecticut. I take new trips every chance I get. A good trip has a great hike, great food, and something fun to do. My goal is to search out new trips and share them to inspire others to try something new and exciting.
If you are looking for posts in a particular place, search City or State here.
SEE OTHER POSTS IN ARCHIVE
Archive
RECOMMENDED POSTS

RECENT POSTS


RECENT POSTS
See the latest on Instagram and follow @HIKINGFORDONUTS

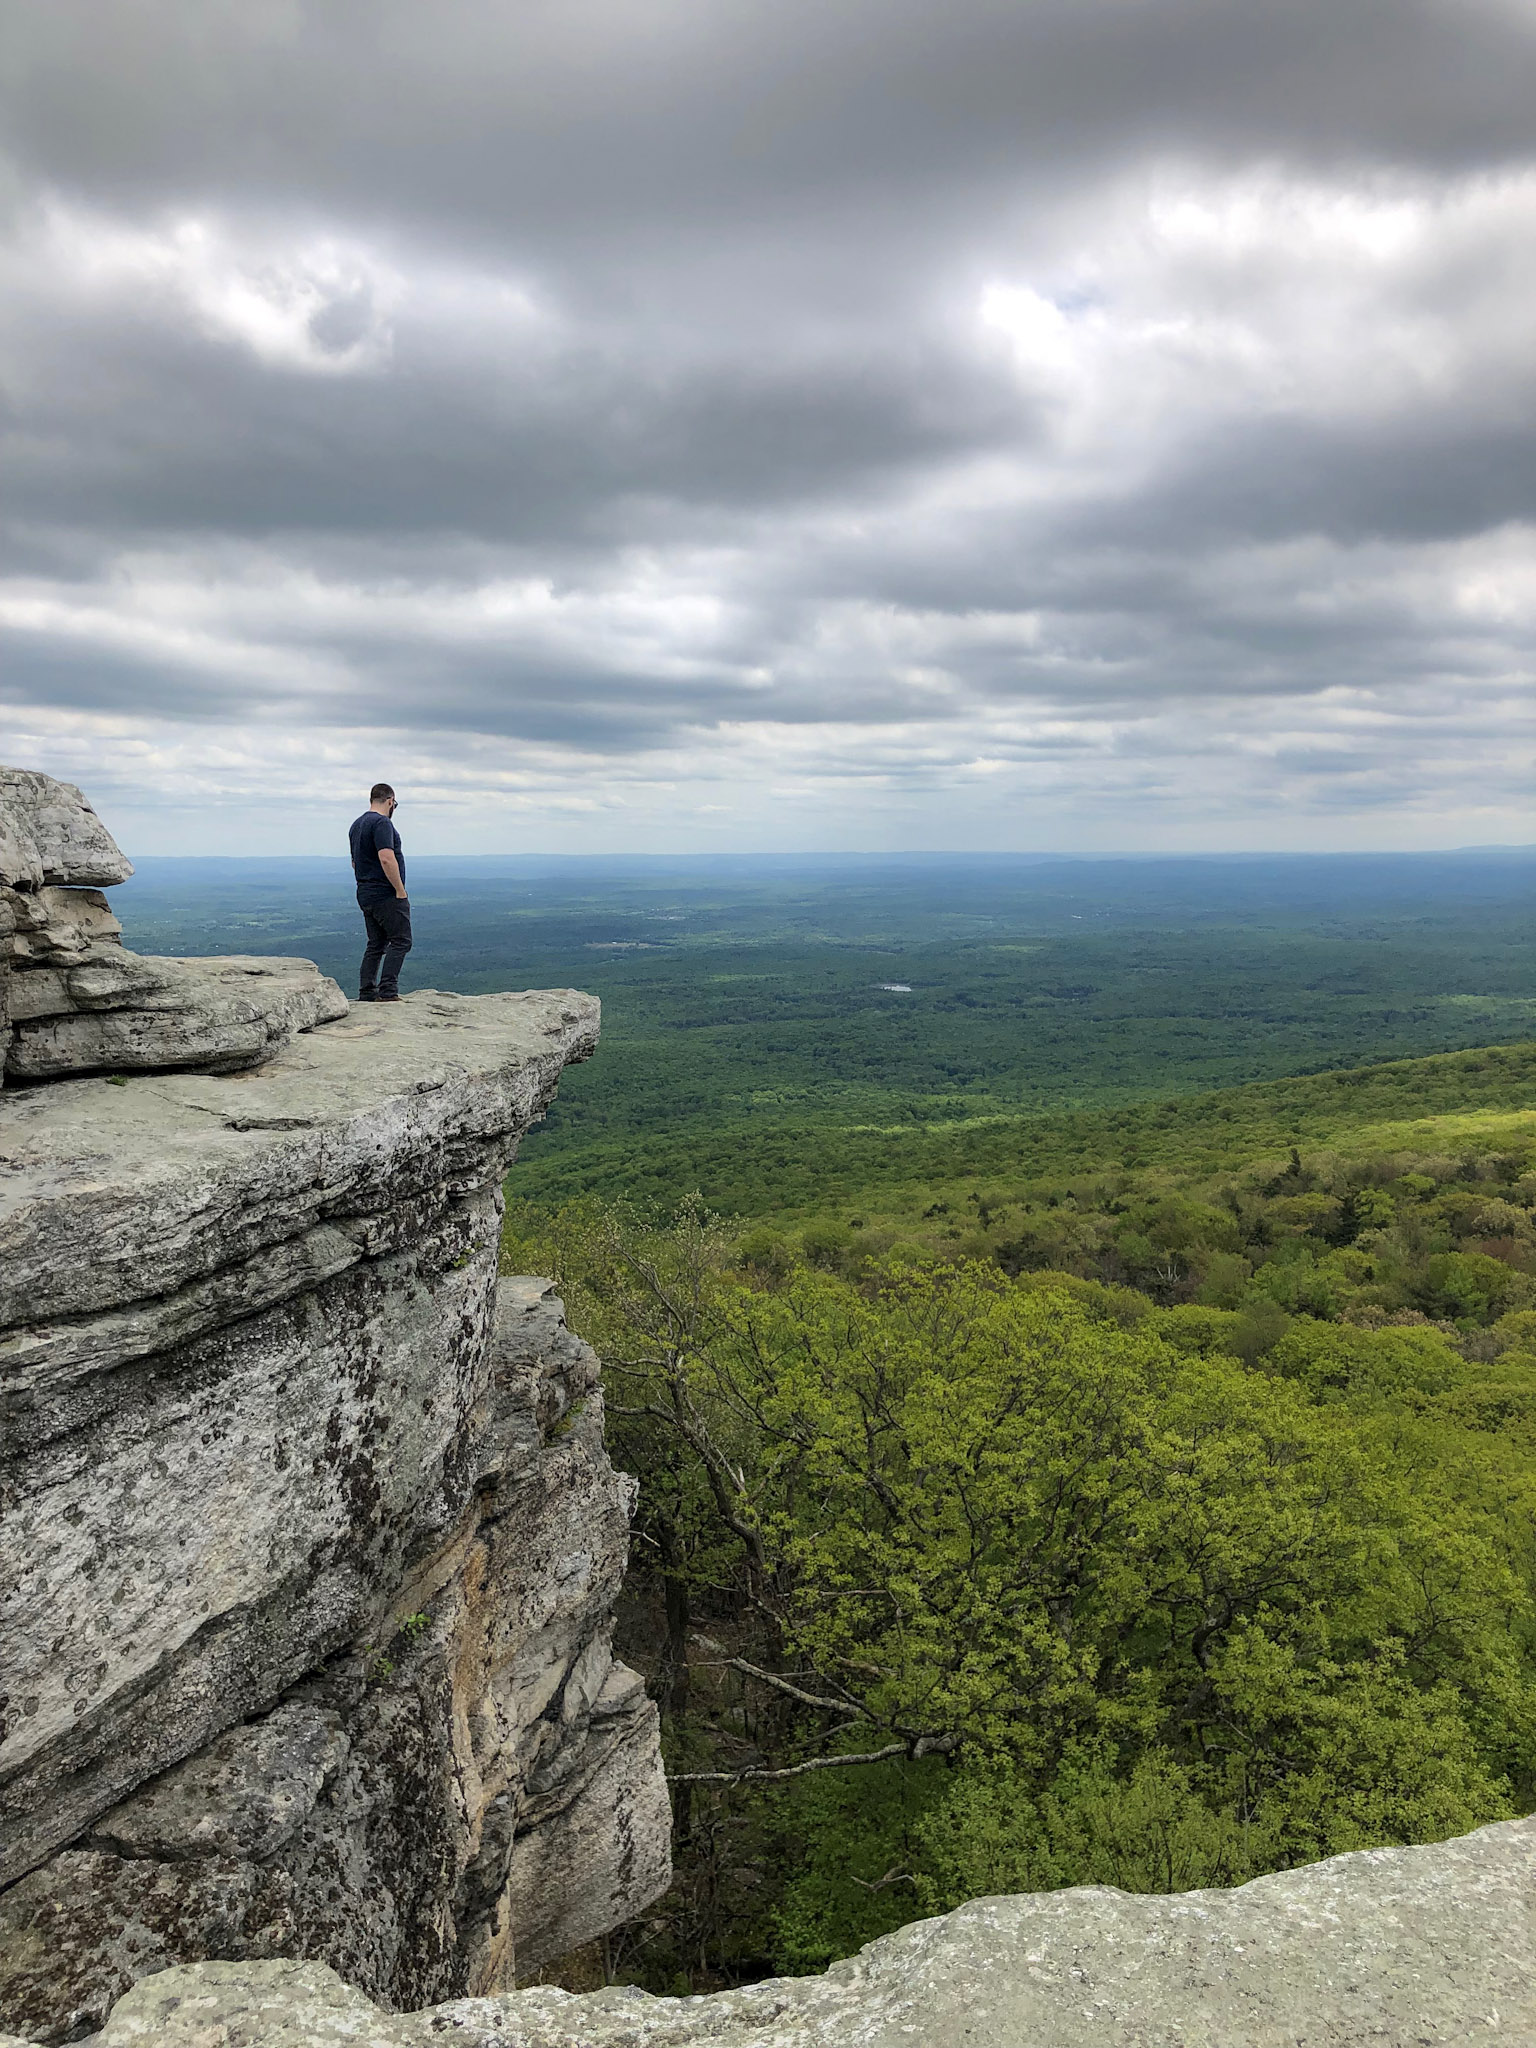
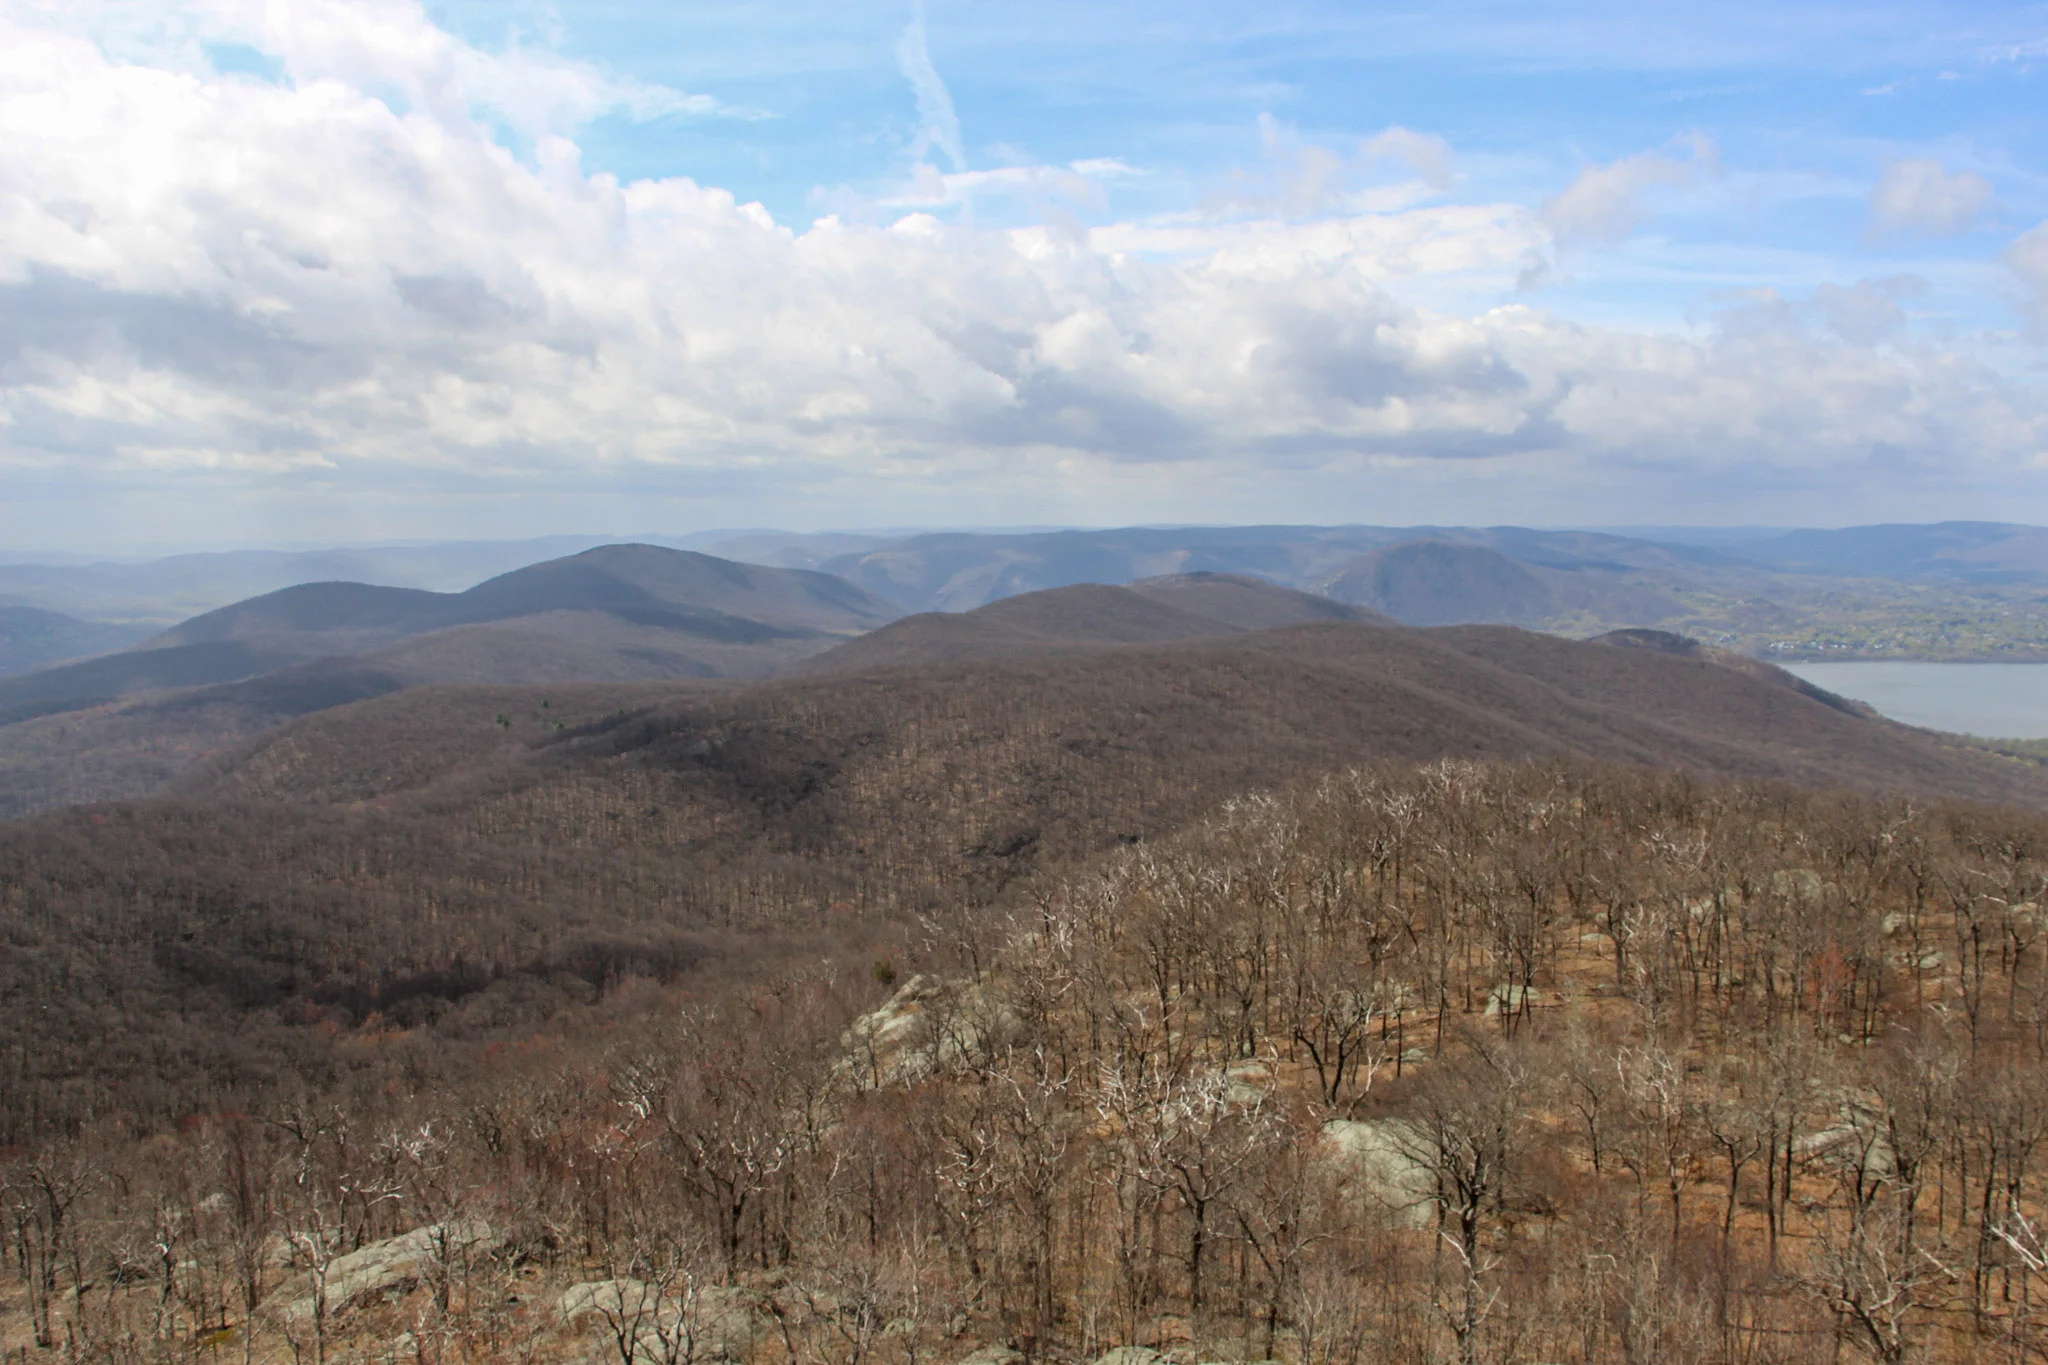
Bull Hill (Mt Taurus) Hike, Cold Spring, NY
Trail Description: Bull Hill (Mt Taurus) is a loop trail that offers amazing views of the Hudson River and surrounding mountains in the Hudson Highlands such as Storm King and Breakneck Ridge.
Trail Info:
Where: Cold Spring, NY Distance: 5.4m (3-4 hours) Difficulty: Moderate to Difficult Trail Type: Loop Features: Views, Mountains, Valley, River, Ruins
How to get there:
The trailhead is north of Cold Spring village along Route 9D by about a mile. The parking is shared with Little Stony Point. The location you may see searching on google map will be the Washburn Trail, which is where the hike begins.
Click here for parking lot coordinates
Hiking Tips
There are multiple trails, can choose short or long route.
Stick to a loop trail and connecting to other trails to get back. The terrain is steep going up, probably not fun going down…unless that is your thing!
Parking lot is small, fills up very quick on weekends!

The Hike
Starting at the parking area, you have a decision. How long do you want to hike? To be completely honest, my intention was to take the short route but I ended up hiking about the same as the full loop somehow. So, this is the short loop with a little twist. To begin, start trekking on the right to the white marked trail, the Washburn Trail.

The trail follows through the woods along a road at first with a gradual incline. This will lead to an open area with a sign to take a sharp right to continue on the trail.


This is a well marked trail and there are many signs for all the viewpoints.

The first few miles are pretty steep before you reach some viewpoints.

The first viewpoint will be a view of the Hudson River with Breakneck & Storm King Mountain in the background. Shortly after, the second viewpoint provides views of Cold Spring & West Point in the distance.


Continue along the white trail markers as the trail incline increases. There will be more views to take in. Eventually, the trail reaches an intersection. The short loop will be to your left following the yellow marker and the full loop is straight ahead following the white trail. I wanted to reach the summit view of Mt Taurus so I went straight here. Continue on this trail and you will notice some rocks with the word “View” painted with arrows pointing up. This will lead to the astonishing views from Bull Hill (Mt Taurus).
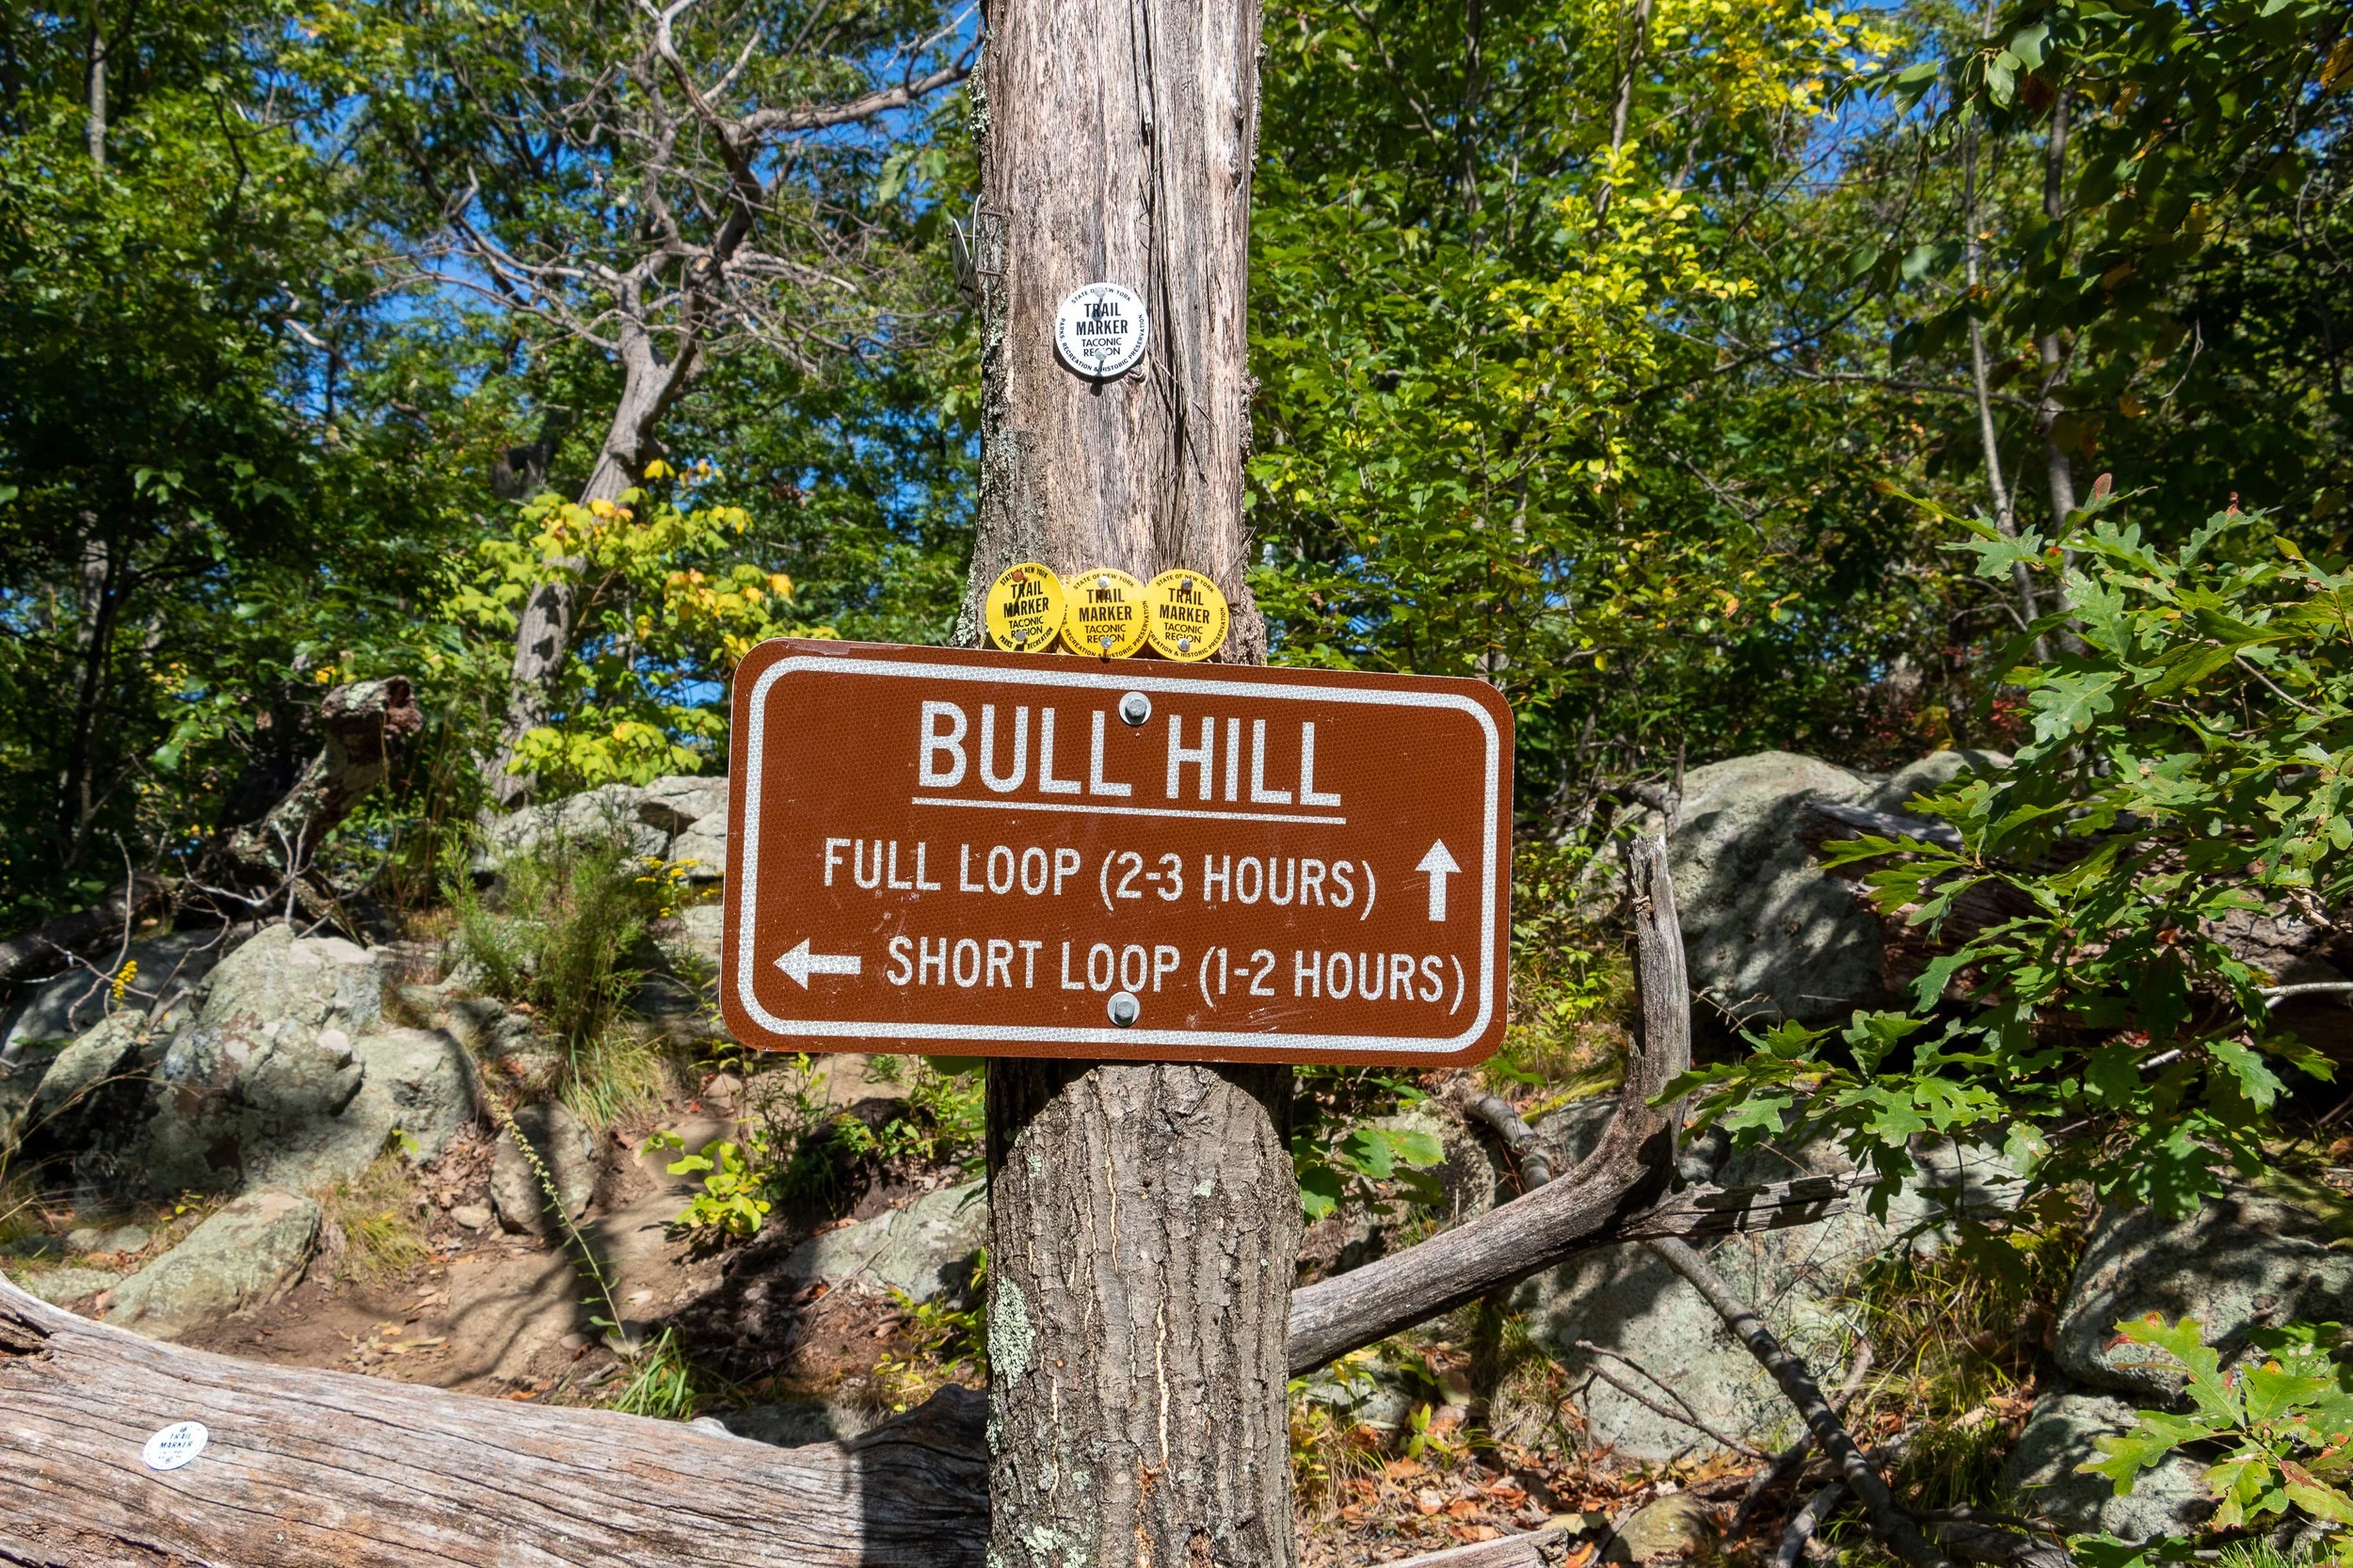

From here, I retraced my steps back down to the intersection and hopped on the yellow marked trail (Short Loop). You could continue on the long loop as well.


Once on the yellow marked trail, there continues to be awesome views such a clear shot of Storm King Mountain.

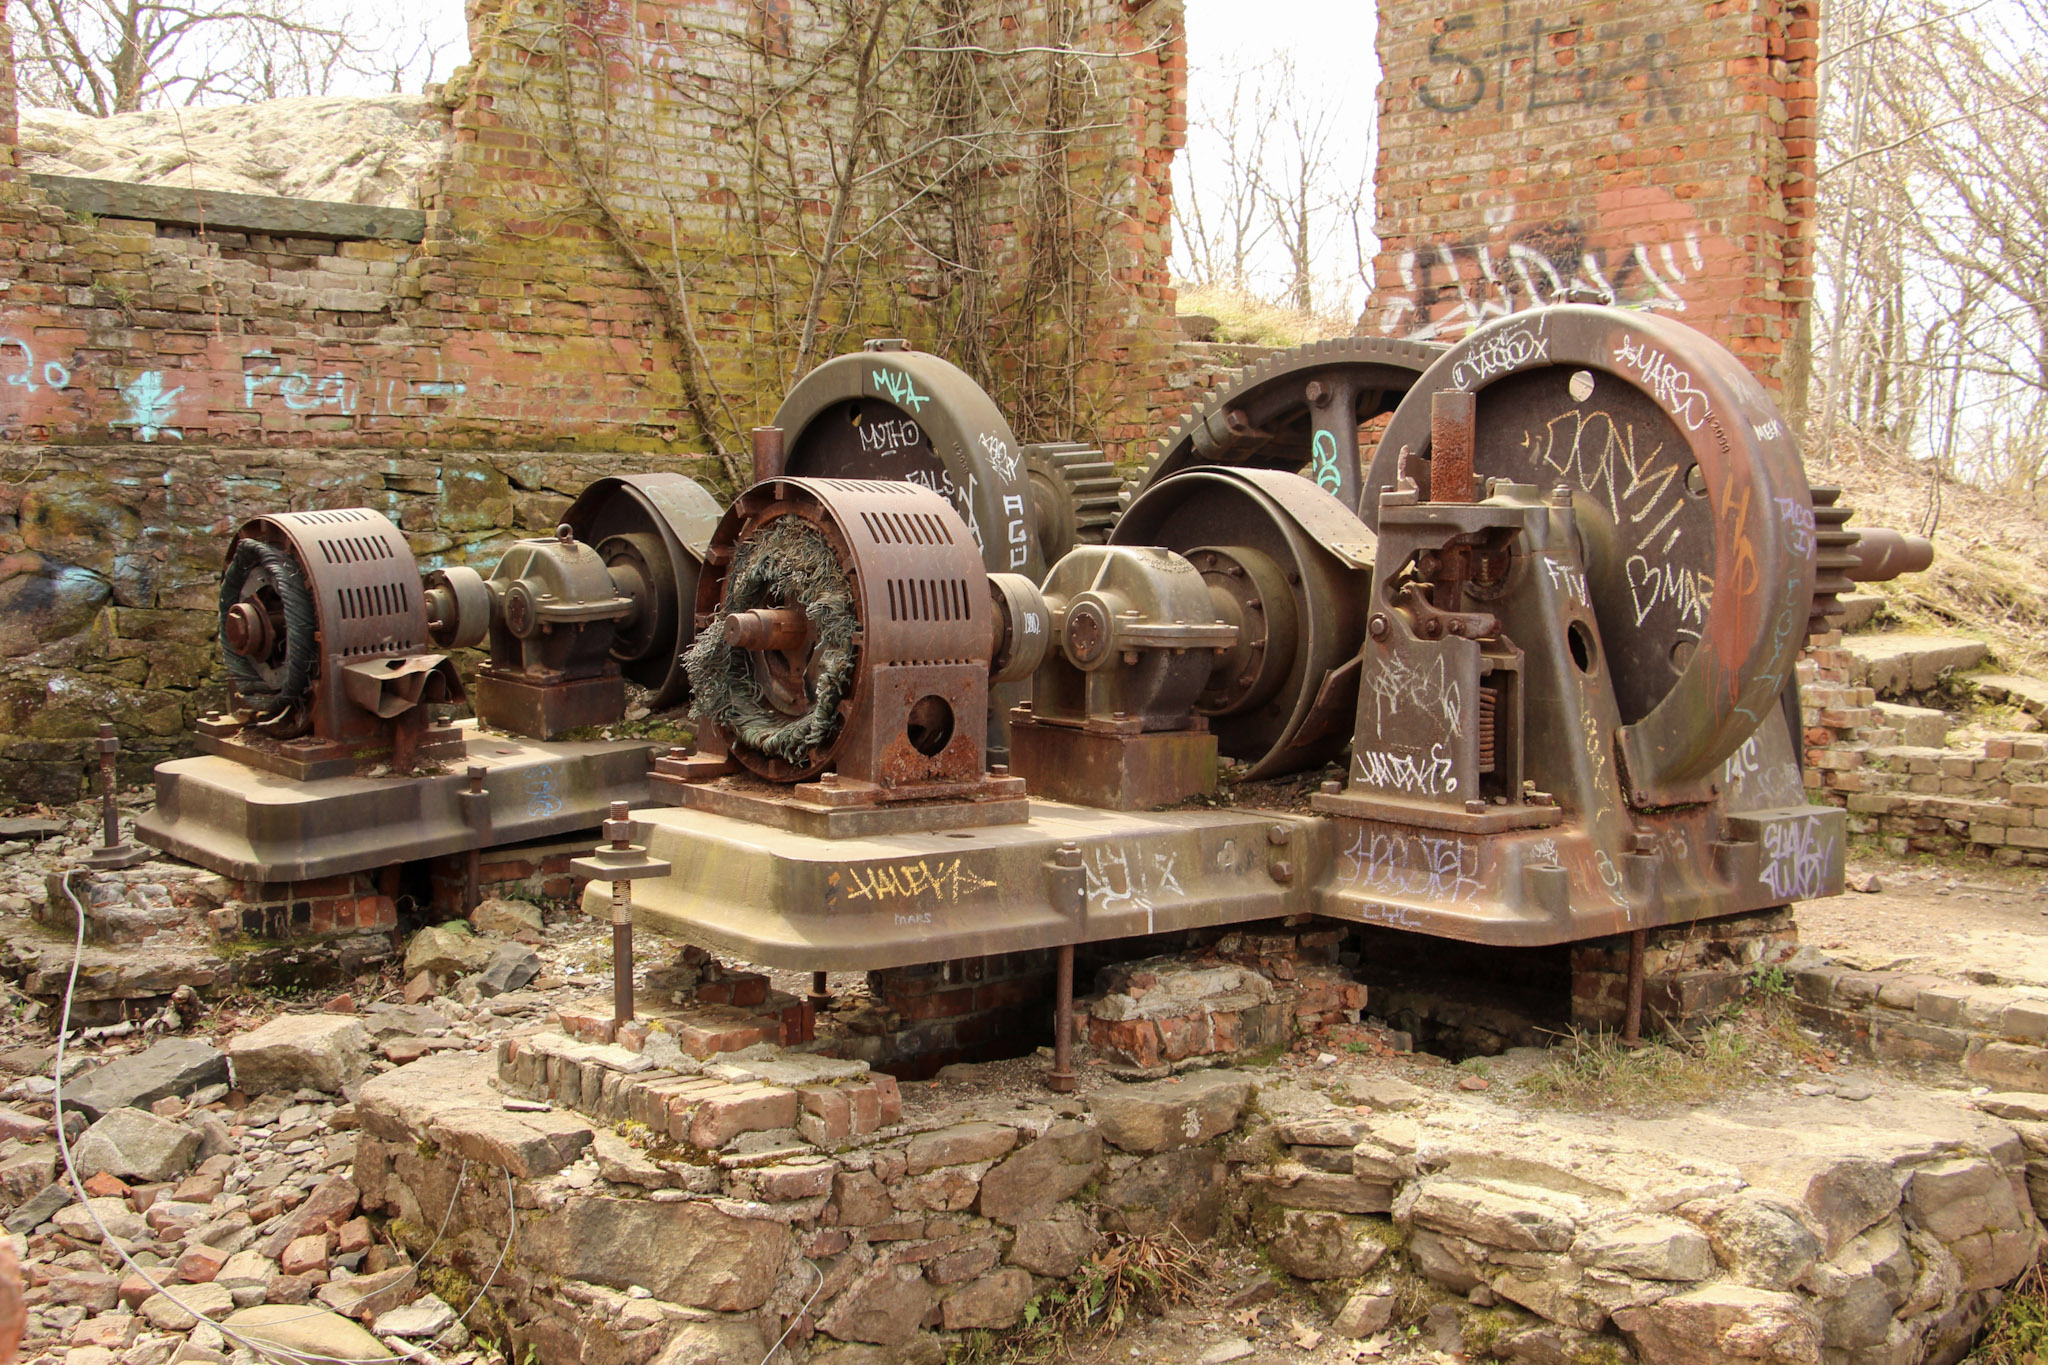
Follow the yellow marked trail until reaching signage for the red marked trail to connect to. There will be a stream to your right and a bridge to pass. Follow that and the blue marked trail will connect quickly and this will lead you all the way to the parking lot. There will be gradual decline in switchbacks and will become flat pavement for the last mile or so. Along the blue trail, the ruins of the Cornish Estate can be explored as well but this was a very crowded day so I decided to skip that.


This is a fun hike with so many viewpoints and exploration. It is certainly not easy with a lot of steep inclines the first few miles but the views are nonstop you won’t even notice the difficulty. This is definitely one of the better marked trails and there are many trail options to make the hike your own. Fantastic day hike!
HIKING FOR DONUTS
Hi, I’m Mark. I live in Connecticut. I take new trips every chance I get. A good trip has a great hike, great food, and something fun to do. My goal is to search out new trips and share them to inspire others to try something new and exciting.
If you are looking for posts in a particular place, search City or State here.
SEE OTHER POSTS IN ARCHIVE
Archive
RECOMMENDED POSTS

RECENT POSTS


See the latest on Instagram and follow @HIKINGFORDONUTS


Hiking the Breakneck Ridge Trail, New York
Trail Description: The Breakneck Ridge hike is one of the most challenging trails in the Hudson Valley. The mountain is known for rocky terrain, steep rock scrambling, and beautiful views of the Hudson Valley. This trail is immensely popular due to its easy access.
Trail Info:
Where: Cold Spring, NY Distance: 3.7 miles (3.5-4.5 hours) Difficulty: Strenuous Trail Type: Loop Features: Views, River, Mountains, Rock Scrambling
How to get there:
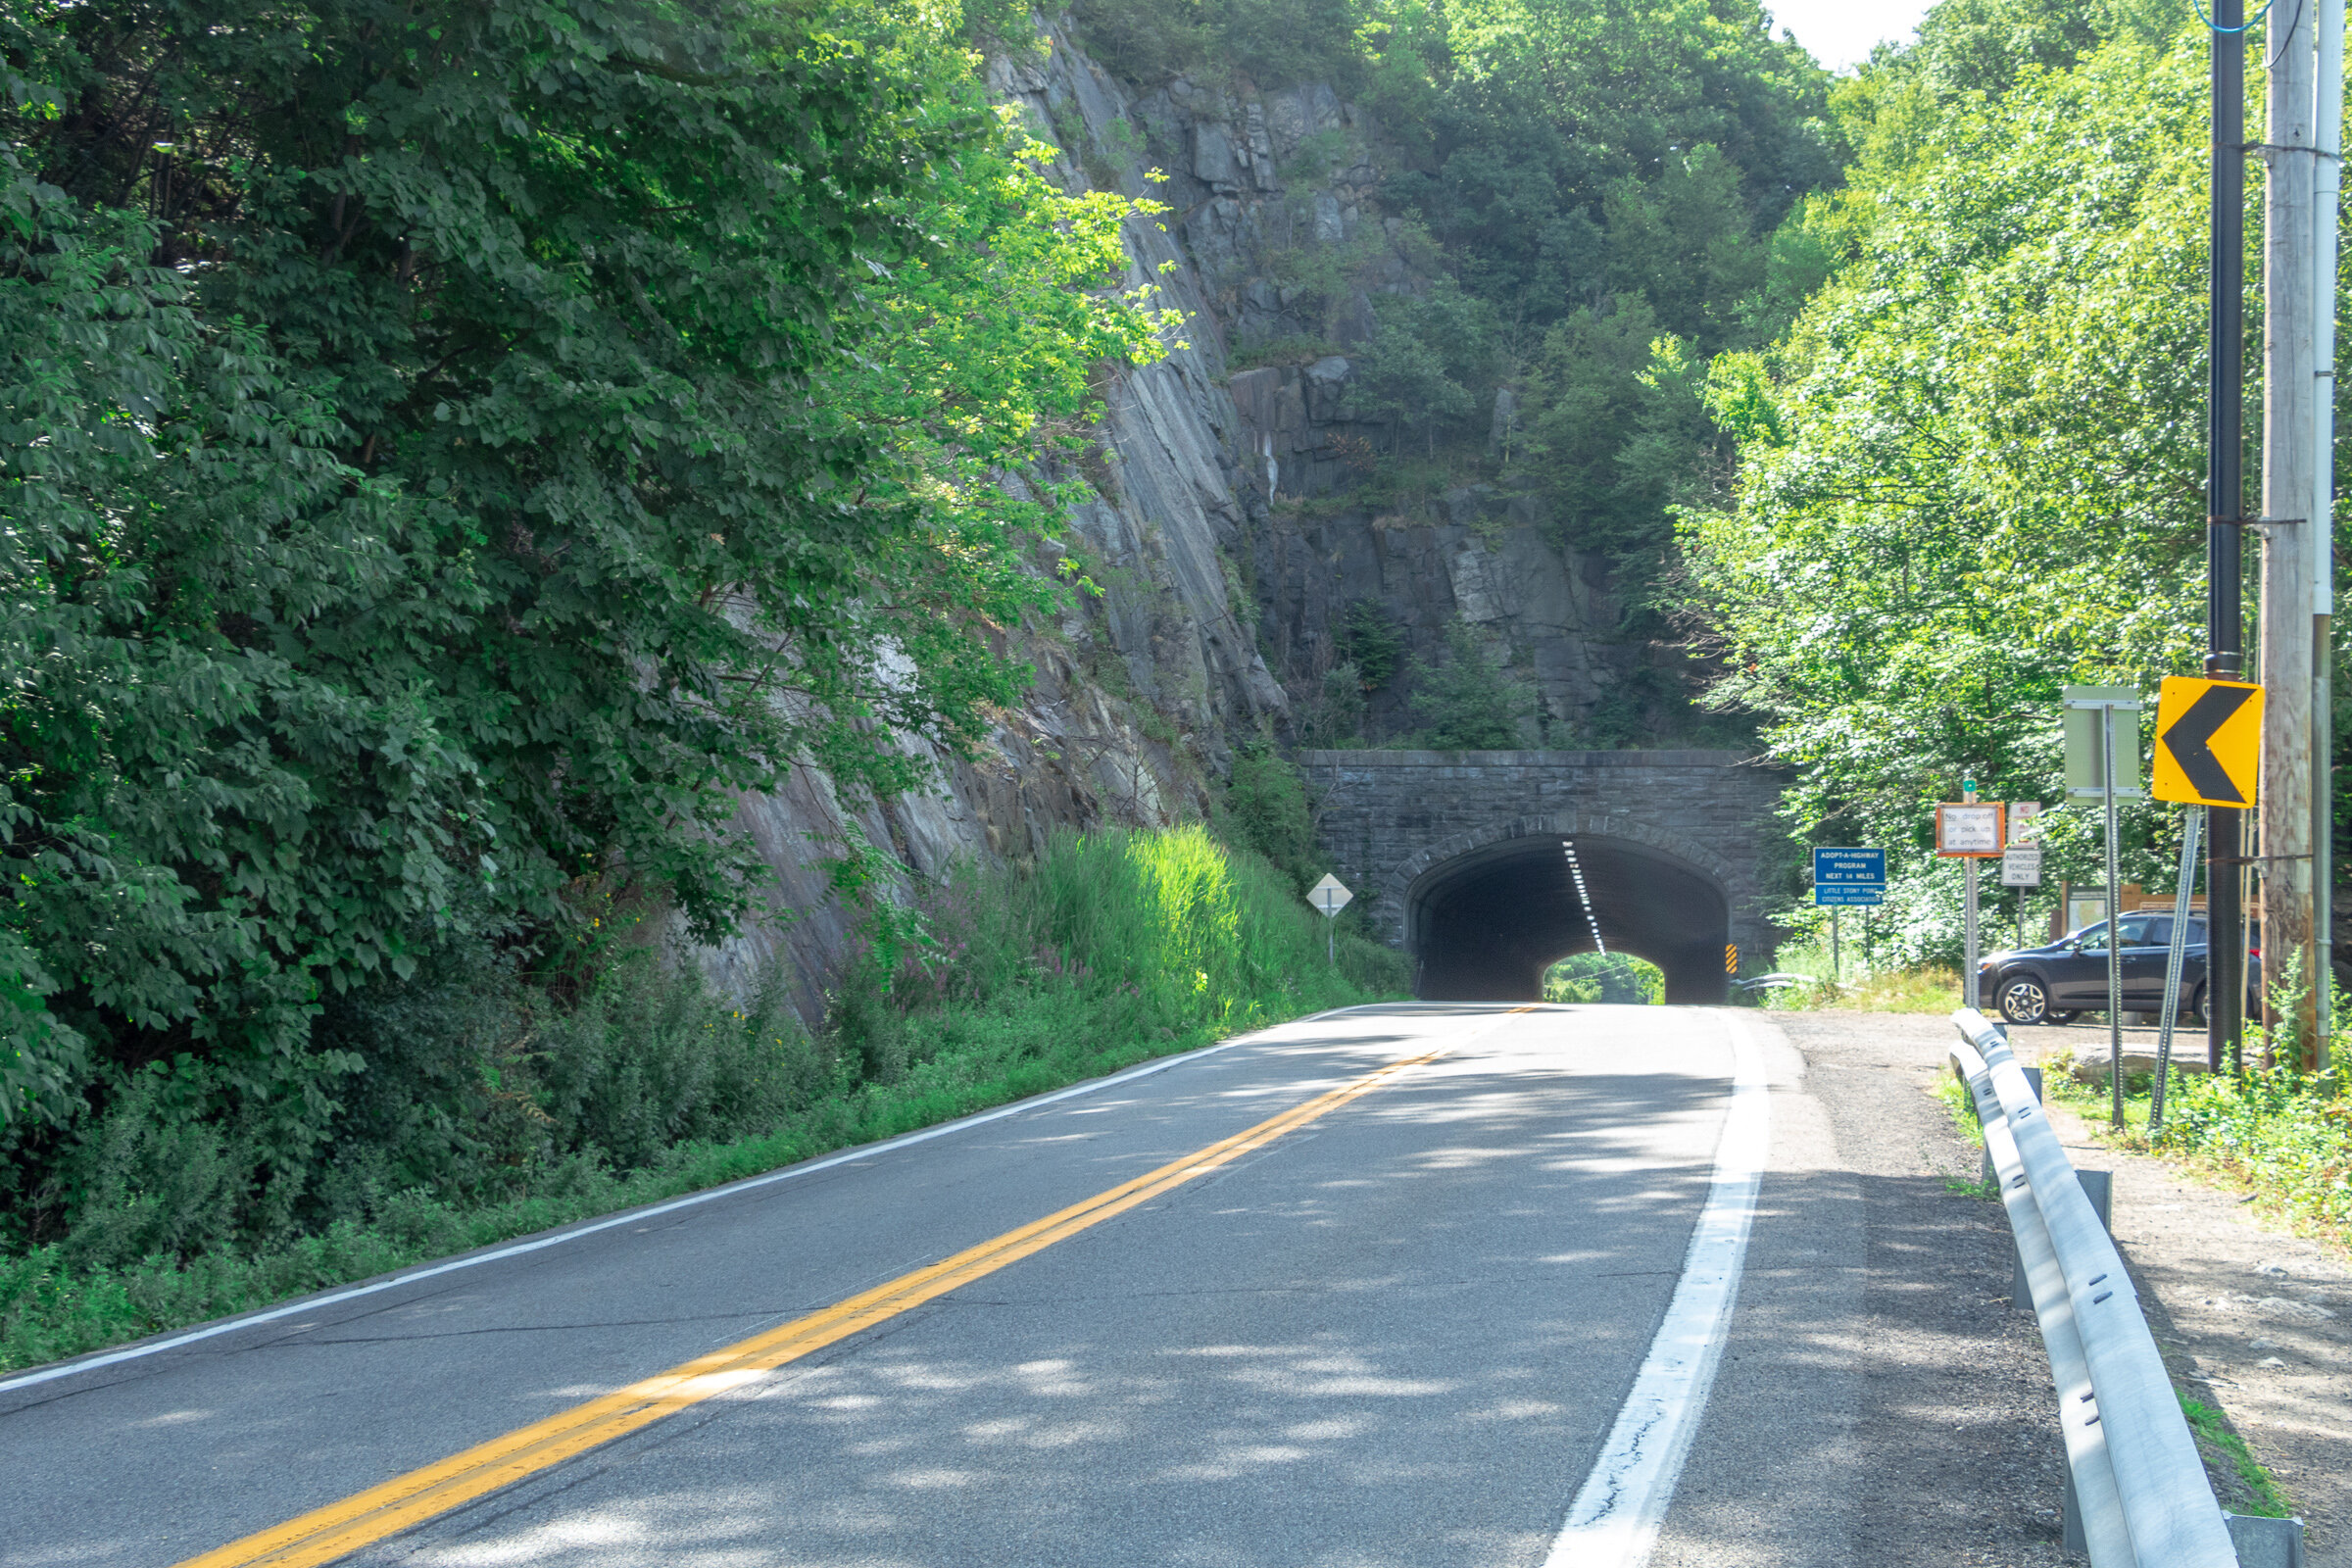
Typing the location “Breakneck Ridge Trailhead” into Google Maps will take you near the parking areas. There are multiple parking spots along State Road 9D, just park where you can north of the tunnel. There is a small lot near the trailhead and a larger lot further down.
For those concerned about parking/driving, this hike is accessible via train. There is a MTA to the Breakneck Ridge train station that is within walking distance to the trail on weekends only.
Hiking Tips
Go on a weekday to avoid the crowds, if possible. Go early on weekends.
Be prepared to rock scramble & use your hands to scale the cliff.
Not dog friendly (unless small dog that you can carry or your dog is a mountain climber)
The Hike
After parking, make sure you are walking along the right hand side of the road. The trailhead starts to the right of the tunnel, where there is trail signage and maps.
There are 3 trail route options for Breakneck Ridge. There is a sign explaining this at the beginning of the trail. The options consist of the short loop (2 hours) ,the regular/classic loop (3 hours), or the trail back to Cold Spring (4 hours). This guide will be the option we took which is the full classic loop.
There is a set of rock stairs that will bring you to the sharp ascent. Follow the white trail markers and start climbing! The terrain on the trail is pretty hard right away. There is a very steep ascent and I needed my hands and knees to get me through this portion of the hike. If you did bring hiking poles, I would suggest securing the poles to your backpack here as they will not be helpful. Depending on your level of climbing up, this can be anywhere from 30 minutes to an hour.

Keep climbing until you reach the flagpole. You will see Pollepel Island with Bannerman’s Castle to your right, along with views of Storm King Mountain straight ahead across the river.


After taking in the views and enjoying a break, continue to follow the white markers as the incline continues. This part is less intense but still some rock scrambling. There is an area in the trail where you can choose to go steeper or take the easier ascent marked with X with an arrow pointing left & right. The easier route was definitely welcomed after the steep climb.

Continue to climb higher and there is another viewpoint with the flagpole far in the distance from above.


Keep climbing until there are no more bluffs and cannot continue further.This is where you head into the forest. The next few miles are much, much easier. You could go back down the way you came but it’s a tough way down and you will be greeted with a traffic jam of many hikers ascending up.

Continue on white markers & ignore the yellow marked trail for now.
There will be a fork eventually. Look for a turn off to the red marked trail (tough to miss red marking on rock). Follow red trail down a gradual descent through woods.

Depending on your pace, the red trail will dead end in about 30-60 minutes where you take left onto yellow trail (Wilkinson Memorial Trail) and keep going downhill and follow all the way to the parking area.


HIKING FOR DONUTS
Hi, I’m Mark. I live in Connecticut. I take new trips every chance I get. A good trip has a great hike, great food, and something fun to do. My goal is to search out new trips and share them to inspire others to try something new and exciting.
If you are looking for posts in a particular place, search City or State here.
SEE OTHER POSTS IN ARCHIVE
Archive
RECOMMENDED POSTS


RECENT POSTS
See the latest on Instagram and follow @HIKINGFORDONUTS
Kaaterskill Falls Trail, The Catskills, New York
Trail Description: The Kaaterskill Falls Trail is short hike to a stunning waterfall in the Catskills.
Trail Info:
Where: Haines Falls, NY Distance: 2.3m (1.5-2 hours) Difficulty: Moderate Trail Type: Out and Back Features: Views, Mountains, Waterfall
How to get there:
Note, you will lose service as you get closer. I put in my GPS:
103 Laurel House Road, Palenville, NY 12463
Depending which direction you are coming from, you will turn onto N Lake Rd off RT 23A and follow up to Laurel House Road. In roughly 2 miles, turn right on Laurel House Road where you will find the upper trail parking lot.
Hiking Tips
Start at the upper parking lot.
Make sure to check out the views from the platform.
Summer water levels may be low and rainy periods may be muddy.
Be safe. Multiple people have got hurt jumping in the falls, or worst, fallen off the top of the fall and died.
The Hike
A trip to the Catskill Mountains in New York has been on my immediate bucket list. The abundance of hikes and mountain peaks to be seen caught my eye. Since this is not a long drive for my fiancé and me, we picked a weekend, laced our boots, and hiked until we couldn’t any longer. The one obvious choice to hike is the ever popular Kaaterskill Falls Trail. Being mid-July and not much rain, the fall wasn’t going to be as cool as in the rain season. But this was the only weekend we could go and it was still worth the hike. I always do my research ahead of time and noticed there were multiple parking lots. The more popular lot seems to be the lower which looked like a train wreck. We drove by it. The parking is miserable with tons of cars in the highway on a narrow strip parked in the road. I would be concerned walking back to my car. The better option is the upper falls lot off Laurel House Road, where there is a platform you can see the falls from above. As long you can there before 10-11am on the weekend, there should be enough parking. The other thing in my mind was the crowd. I suggest doing this hike very early on weekends or if you can on a weekday. The lower falls are popular for swimming in summers. We started this around 9am and it was pretty crowded, especially at the lower trail.


Once we parked in the lot on Laurel House road, there is a gravel path to the kiosk of trail info where the hike begins. From here, we proceeded to take the Yellow Trail on our left. In short time, the Blue Trail will be on the left. We continued on the Yellow Trail to the right heading to upper platform for views of the falls. This portion of trail was developed and improved in 2016 to make it safer for everyone to hike. While this may be manmade, I think that was essential for this trail. If not for all the new steps and paths, people would get hurt and there is way more to offer on this trail for everyone. And, the platform offers a new perspective with remarkable views of Kaaterskill Falls. I am glad I did not start from the lower trail!
After checking out the platform, we retraced our steps back to find the intersection for the Blue Trail. This will lead to a bridge crossing that will lead to another intersection. From here, turn right toward the Lower Falls. This is where difficulty of the trail increases but not too bad. To proceed along to the Lower Falls, we proceeded to head on the Yellow Trail. There will be more signposts to veer onto other trails if you want to adventure but we just wanted to see the falls. As we descended closer to waterfall, you can hear the crowd of people below as you get closer on this hot summer day. There was a side trail venturing to our right where the falls are up close. You could actually get in the water and take a picture under them.


We returned back to the fork and proceeded to descend down the steps to lower part of the waterfall. Once we reached the bottom, you can see both sections of Kaaterskill Falls. We climbed up on some rocks to get closer. And, of course I hiked with a donut. Hence, obligatory donut and waterfall shot. We stopped at a local donut shop about 10 minutes away from
The crowd was a lot to deal with. We headed back retracing our steps back onto the Yellow Trail until we reached the bridge again. Then take the path toward the parking lot. As I mentioned previously, this was non-rain season so the fall was not as robust. However, it is one of the must hike locations in the Catkskills. I ensured my first trip included Kaaterskill Falls.
HIKING FOR DONUTS
Hi, I’m Mark. I live in Connecticut. I take new trips every change I get. A good trip has a great hike, great food, and something fun to do. My goal is to search out new trips and share them to inspire others to try something new and exciting.
If you are looking for posts in a particular place, search City or State here.
SEE OTHER POSTS IN ARCHIVE
Archive
RECOMMENDED POSTS
RECENT POSTS
See the latest on Instagram and follow @HIKINGFORDONUTS

24 Hours in the Black Canyon at the Gunnison National Park
The Black Canyon of the Gunnison National Park is one of the least known national parks and that is a travesty. I admit, I wasn’t too familiar with this park myself. Located in western Colorado, the Black Canyon of the Gunnison did not gain National Park status until 1999, making it the second youngest national park in the U.S. The Black Canyon is named so because the walls are often covered in shadows making them appear black. These steep walls were formed over 1.7 billion years ago. Another awesome note on this park is that it contains 12 out of the 48 mile-long canyon of the Gunnison River.
For most national park or outdoors enthusiast, you want to experience as much as possible in your travels. Planning trips can be difficult and offer time restraints. Exploring most national parks you need anywhere from 3 days to two weeks. On my recent Colorado road trip, I planned for one day at the Black Canyon of the Gunnison National Park. There is a North and South Rim. This guide will be for the South Rim only. This rim is more developed and accessible. Can you explore the entire South Rim in 24 hours? The answer is yes. The best time to visit is April to November. We stayed in Montrose, which is about 15 minutes from the park. The downtown is pretty cool. Oh, and there is an amazing donut shop, Montrose Donut and Deli Shop. The best donuts I had in Colorado. Get the biscuit donut. I digress…..
The South Rim is comprised of a modest 7 mile loop with 12 spectacular overlooks. I suggest to stop at each overlook. A lot of the overlooks do require walking a short trail but nothing strenuous. I would not miss out on Painted Wall, Cedar Point and Sunset View. There are multiple hikes on the South Rim. I went out of my way to do them all and to be honest, if you are stressing for time, skip the hikes. If camping is your thing, there are campgrounds here. Lastly, do NOT leave the park without driving down East Portal Road. I cannot recommend that enough. There is no crowd concern at this park. I counted maybe 30 people on a Friday in mid-May. I read the peak of the visitors stroll through in July. There are even less visitors on the North Rim, which is a 3 hour drive from the South Rim. However, the views are even more dramatic from the North Rim. The scenic driving was amazing. This park should be way more popular. The views were ridiculous. One of the best experiences I had in a national park. Here’s my guide to the South Rim of the Black Canyon of the Gunnison.
How to get there
Black Canyon’s South Rim is about 14 miles from Montrose and 63 miles from Gunnison. To get there from Montrose, travel 7 miles north on CO Highway 347 from the intersection with U.S. Highway 50 east of the city.
Viewpoints (South Rim)
The first viewpoint that visitors will see entering the park is Tomichi Point. This is right off the side of the road, no hiking needed. The second viewpoint, Gunnison Point, is located right behind the visitor center. A short path down some steps leads views of the canyon facing northwards. The view is more vivid than Tomichi Point and there is sneak peak of the ravine.


The next viewpoint is about two miles down the road at Pulpit Rock Overlook. There is a 134 yard trail leading to this area. The canyon really opens here with the river in view as it curves around a 90 degree bend. Cross Fissure View offers a different a unique look at the canyon. The river is not visible and most of the canyon is hidden. There is a view of overlapping ridges and crevasses from multiple angles. This viewpoint is a 357 yard walk.


Rock Point is a less traveled path at 294 yards. The longer the path the less visitors you will see. Devils Lookout is the longest path at 607 yards. This path goes right the edge of the rims for great views including the river and the valley. Both this and Rock Point lie above the narrowest part of the entire canyon.


Chasm View is one of those jaw dropping views. This is a very short path off the road above the steepest part of the whole canyon. Painted Wall View is almost adjacent to Chasm View. This may be the most well-known viewpoint. Painted Wall is the highest cliff in Colorado at 2,250 feet and a half mile across.


Every viewpoint from here on is a must see. Cedar Point is a 303 yard path overlooking the lower canyon. This is a spectacular view as you can see 1.5 miles of the river, flowing rapids, and some greenery below. Next up, Dragon Point offers very similar views. The widening ravine enclosing colorful waters of the river. This can be reached by a path of 300 yards.


Sunset View was one of my favorites. This is the westernmost viewpoint along the South Rim road. There is large parking area along with restrooms and picnic tables. This a great place to soak in amazing views of the canyon. This is the longest stretch of V shaped canyon. The last viewpoint is another mile down the road, High Point. There’s not much to this but you have to pass this in order to turn around and head back.


The Hikes (South Rim)
At the end of South Rim road, there is a parking lot where the Warner Point Trail begins. This a 1.5 mile out and back that takes you to the furthest overlook on the South Rim. The trail starts flat with views of green fields 1,000 feet above Bostwick Park. The trail begins to climb slowly then drops and ascends again before reaching the final viewpoint. This overlook offers stunning views of the San Juan Mountains, West Elk Mountains, Uncompahgre Valley, and the canyon. If you choose a hike in the South Rim, this would be the one I suggest.
Warner Point
The Oak Flat Loop begins by the visit center. The trail is narrow and traverses down a steep slope. This offers a peek at the landscape below the canyon’s rim. This is the most challenging hike in the South Rim with steep uphill and downhill portions. In total, the loop is 2 miles.
Rim Rock Nature Trail starts at the visit center or the Campground Loop C entrance. You can even hop on this trail from Tomichi Point. This relatively flat hike takes you along the rim of the canyon for views of the Gunnison River and sheer walls of the gorge below. This can be between 1-2 miles.


East Portal Road River Access
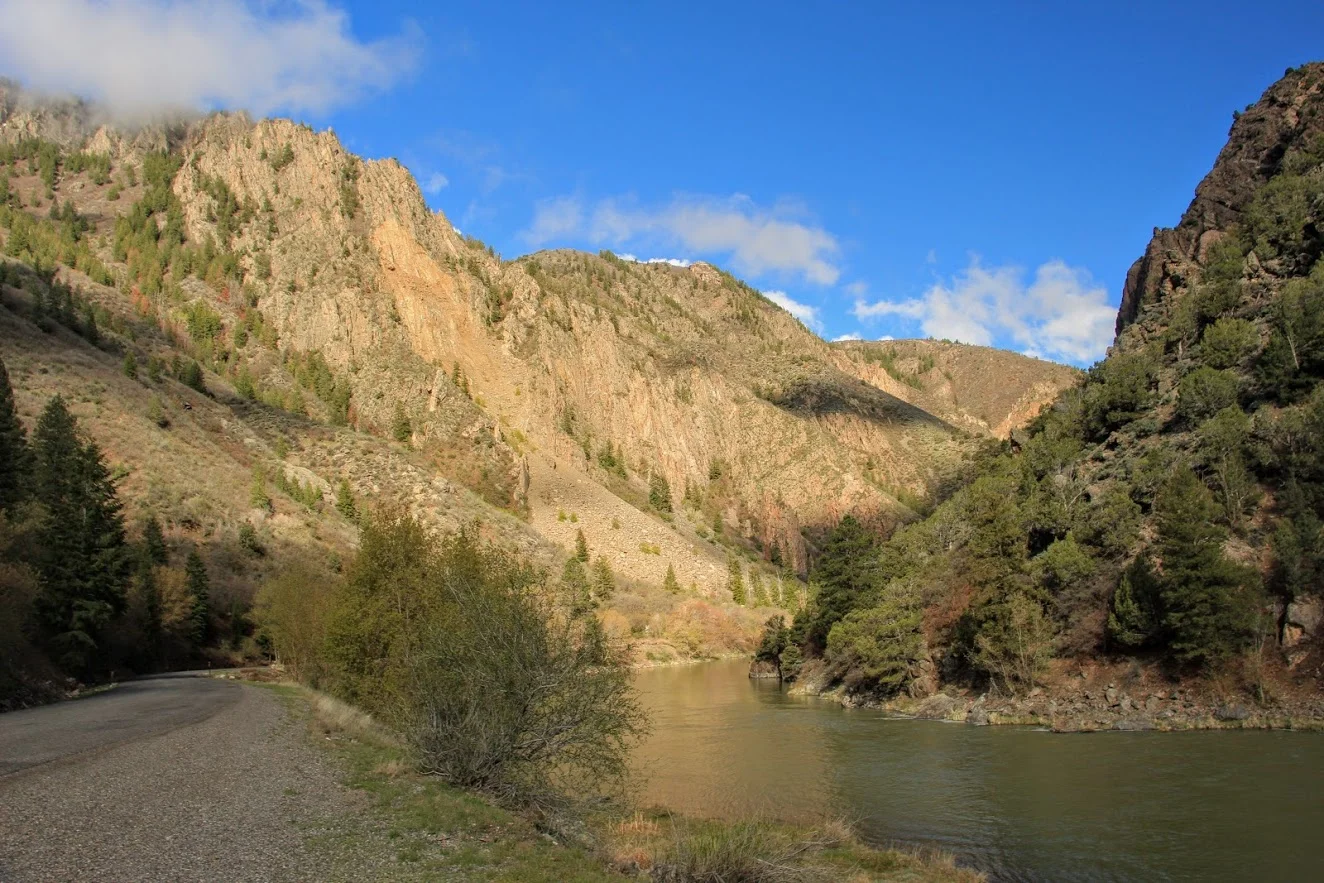
Located right at the entrance/exit to the park, you will see the access for East Portal Road. This is a 5 mile road with a significant decline (16% grade) with hairpin turns taking your car to the base of Black Canyon. This is the only way to get down into the canyon. Once arriving at the bottom, the views from down below are gorgeous. The picturesque surroundings of the beautiful lake and the cliff walls of the canyon from up above are majestic. By far the coolest experience I had in the park. I was just in awe. I read a lot of things online and it made it sound dramatic and dangerous to drive down. Any car/van can handle it. Vehicles with an overall length (including trailer) greater than 22 feet are prohibited. Trailers may be left unhitched and left at a parking area at the campground entrance. This road is closed in the winter. Just be smart about driving down. It took us about 30 minutes. This is a bucket list type event. Don’t chicken out!
The drive down into the canyon.


HIKING FOR DONUTS
Hi, I’m Mark. I live in Connecticut. I take new trips every change I get. A good trip has a great hike, great food, and something fun to do. My goal is to search out new trips and share them to inspire others to try something new and exciting.
If you are looking for posts in a particular place, search City or State here.
SEE OTHER POSTS IN ARCHIVE
Archive
RECOMMENDED POSTS
RECENT POSTS
See the latest on Instagram and follow @HIKINGFORDONUTS
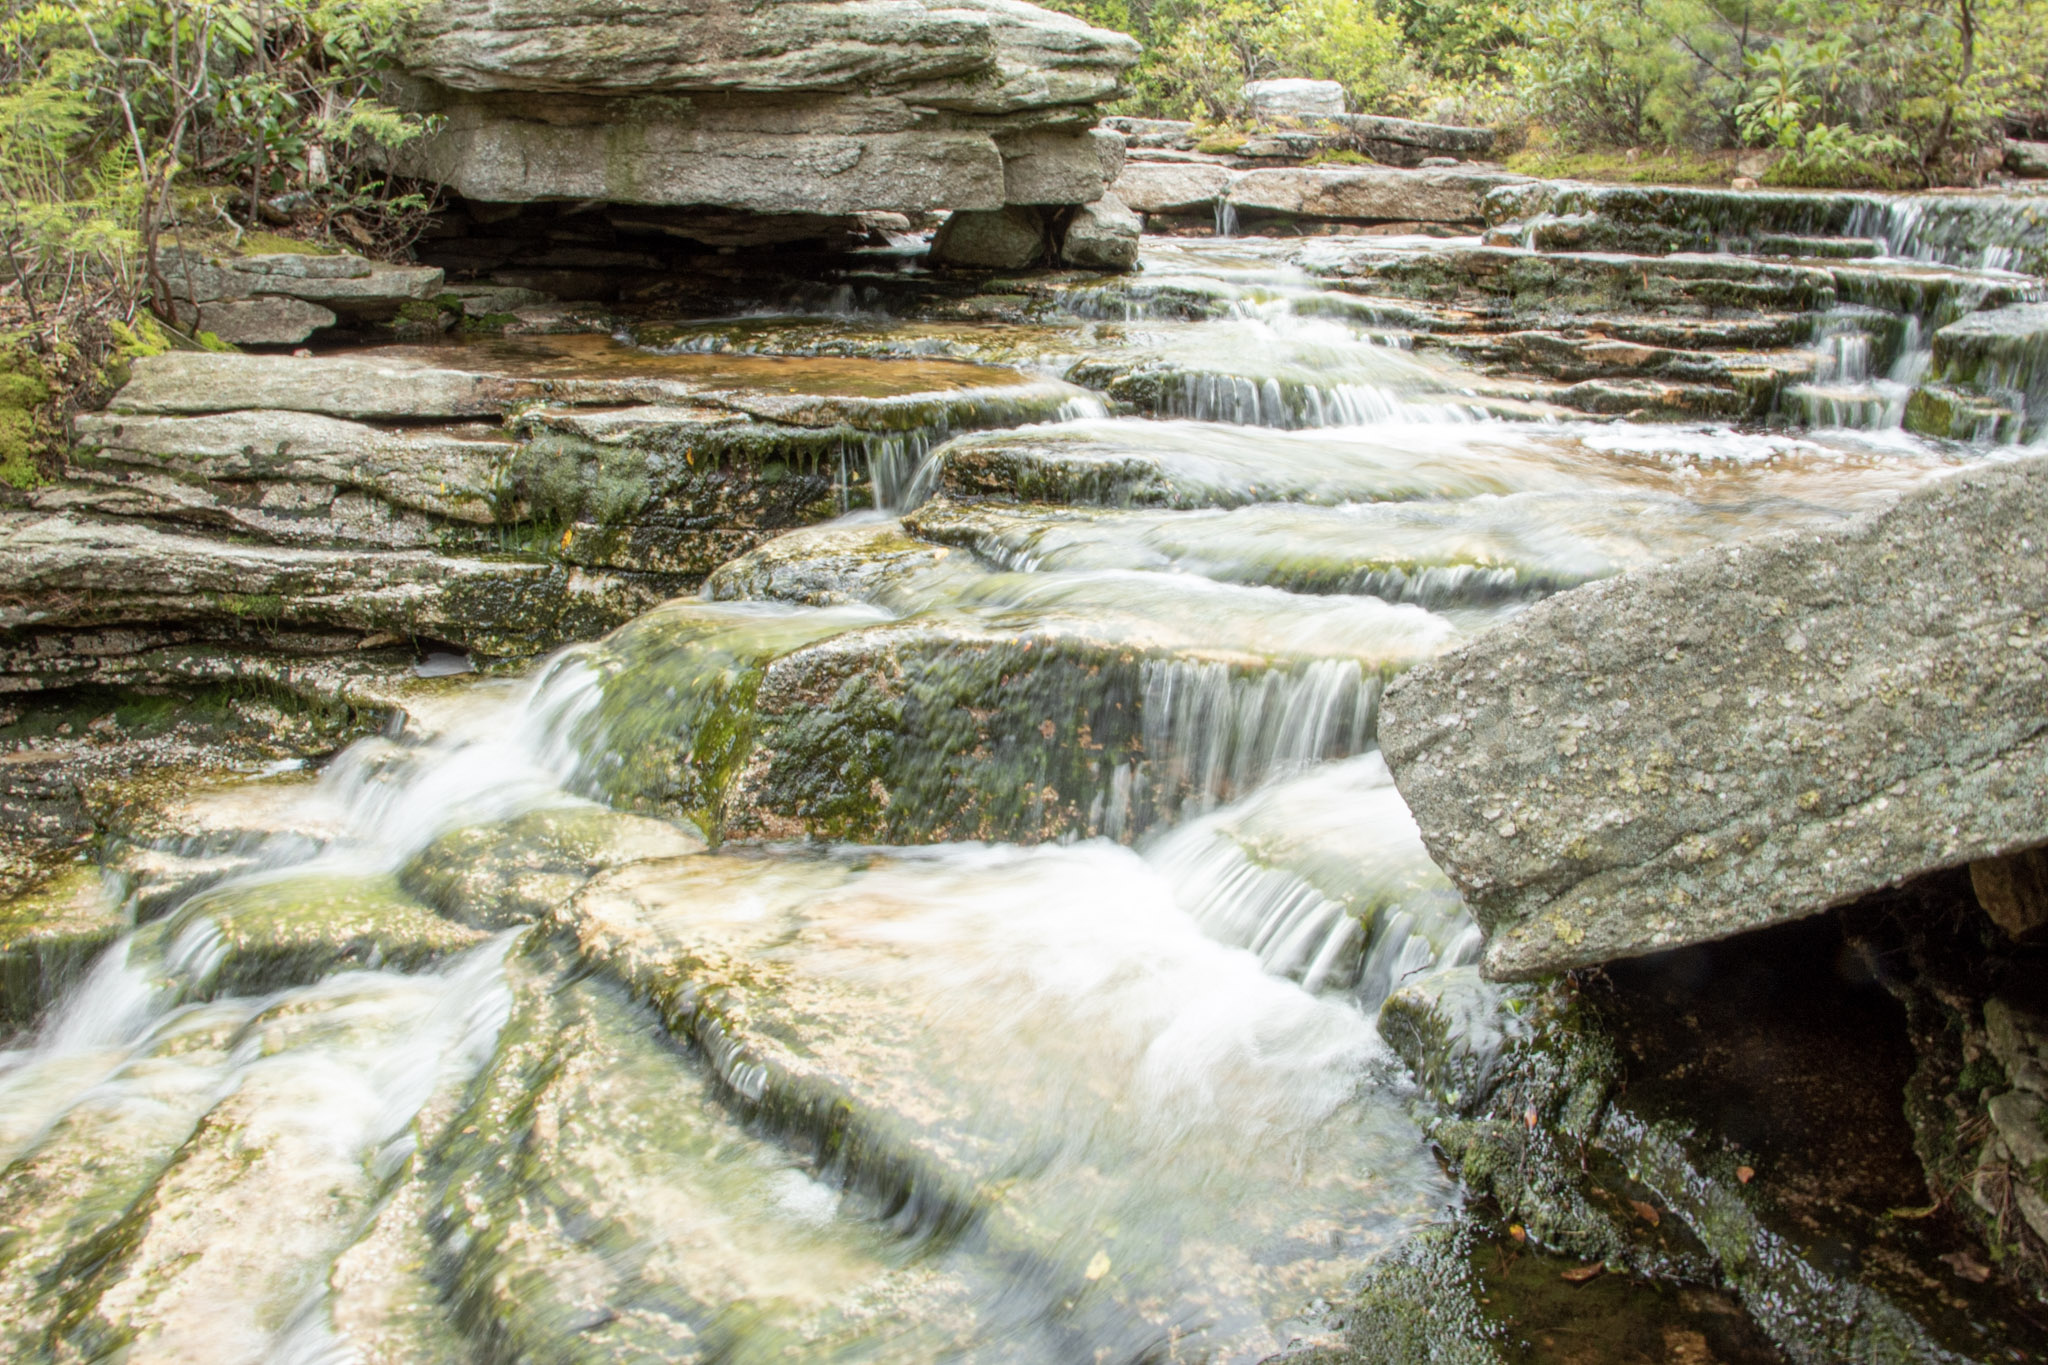
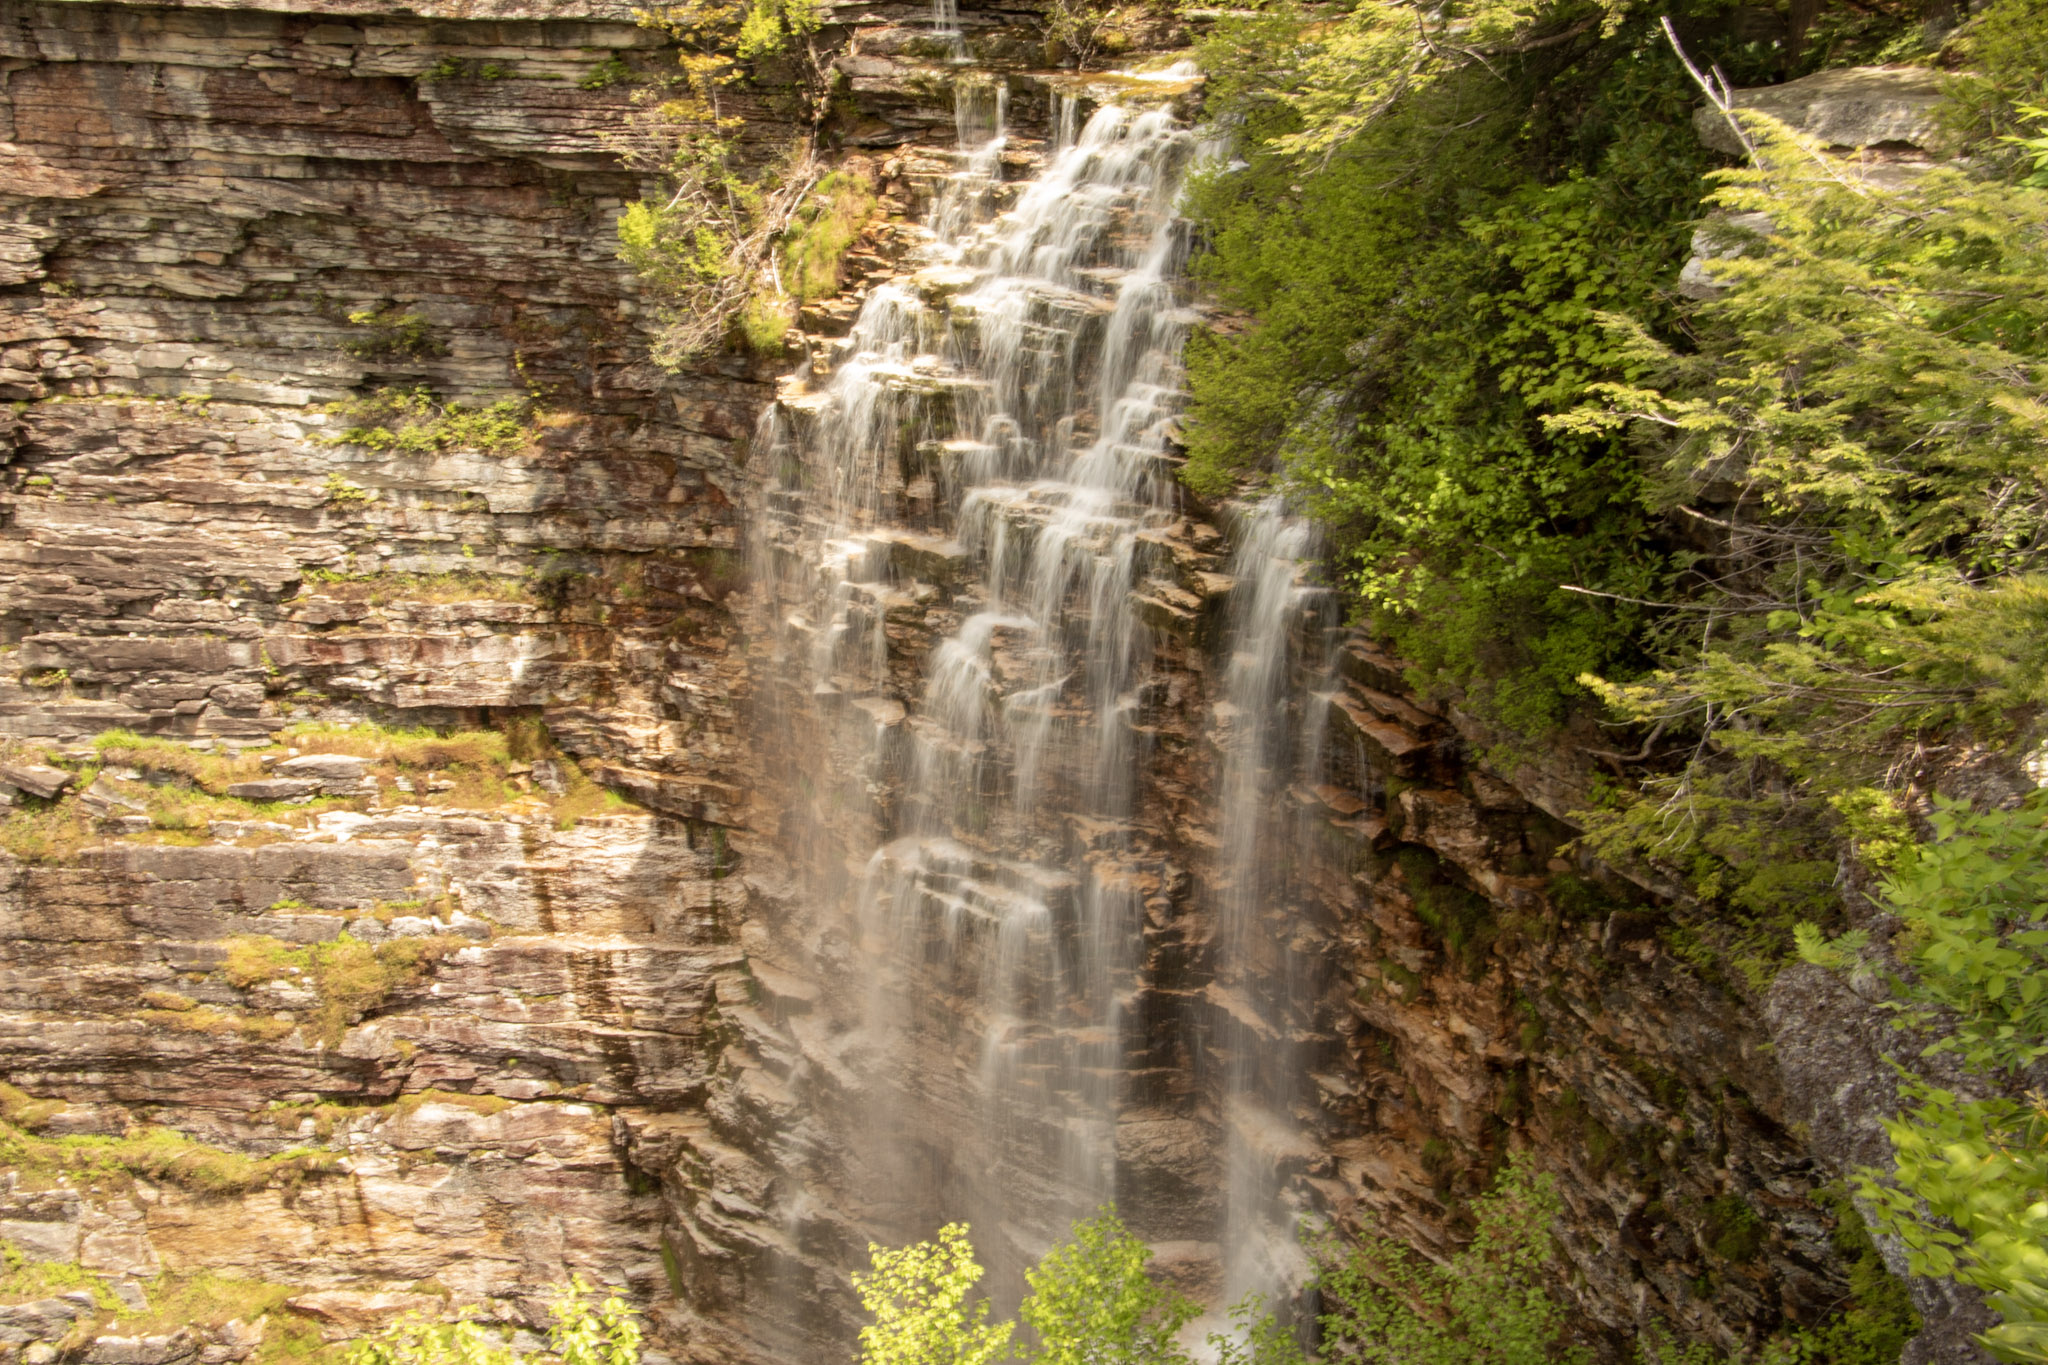
Sam’s Point and Verkeerderkill Falls Trail, New York
Trail Description: Sam’s Point Reserve offers panoramic views of the Shawangunk Ridge along with exploring a 180 foot waterfall.
Trail Info:
Where: Ellenville, NY Distance: 6.2 miles (3-4 hours) Difficulty: Moderate Trail Type: Out and Back Features: Views, Mountains, Valley, Waterfall, Ice Caves (optional)
How to get there:
400 Sams Point Rd Cragsmoor, NY 12420
This will take you right to the parking lot. Parking costs $10. There is a kiosk to pay near the visitor center.
Hiking Tips
Parking lot opens at 9am. If parking lot is full, you have to wait until someone leaves. Plan accordingly as parking is limited.
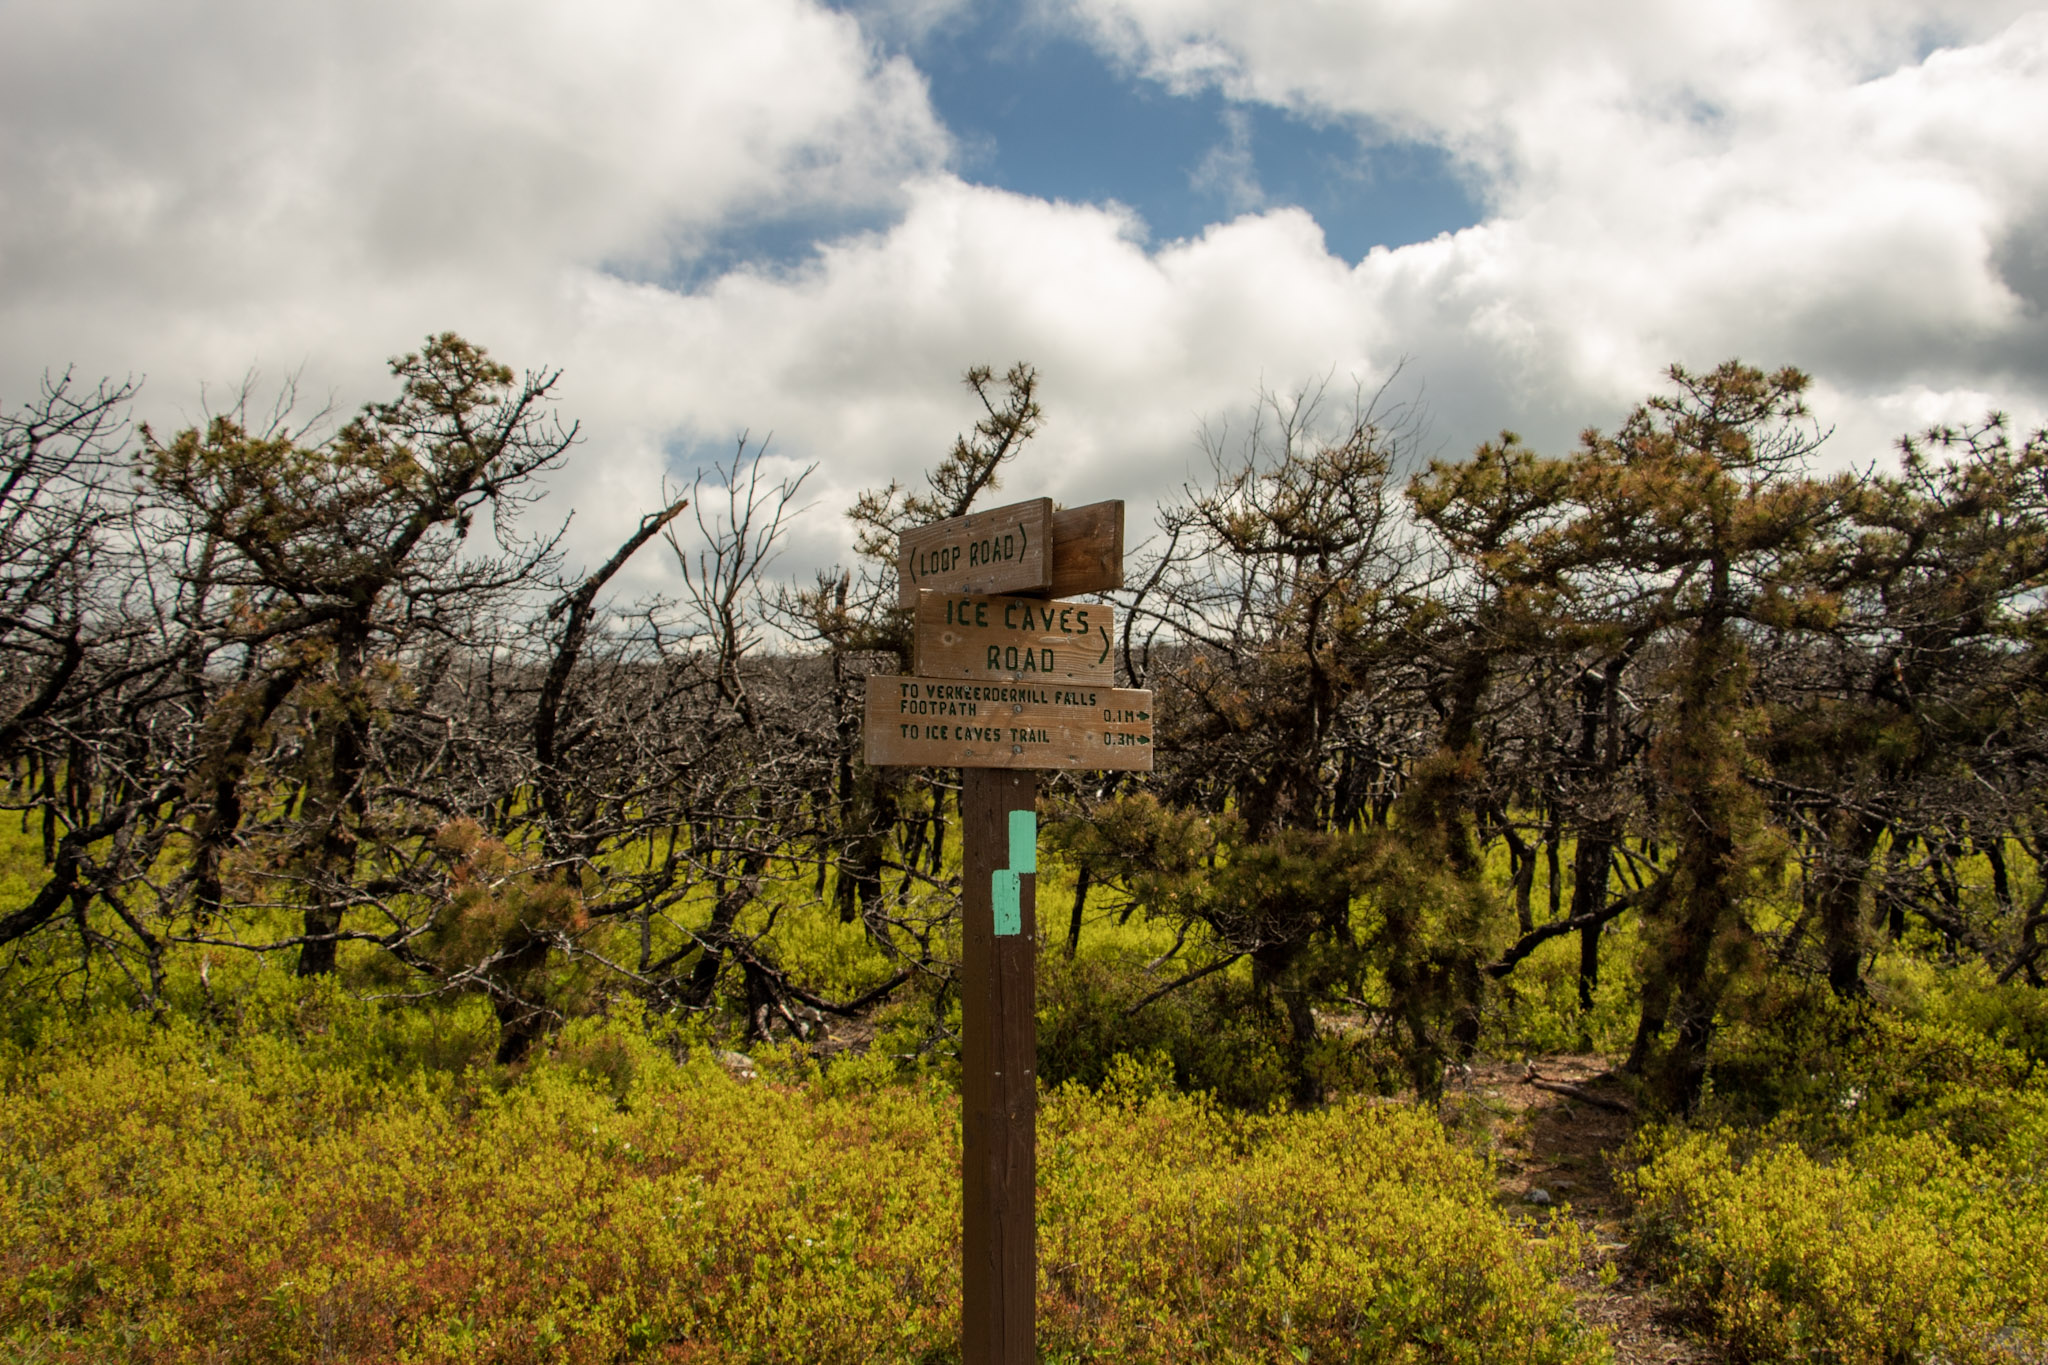
Did not include the Ice Caves on this day. Would add an additional 1.1 miles to the hike.
Use bug spray for ticks and sunscreen when sun is out. Most of the hike is the open.
The Hike
The next hike in the Hudson Valley to check off my list is Sam’s Point. I anticipated great views but there was much more to this hike than I thought. Until I researched recently, I didn’t realize a waterfall was part of the hike. Veerkeerderkill Falls is the tallest waterfall in the Shawangunk Mountains at 180 feet. And, there are even ice caves on this trail. Sam’s Point is part of Minnewaska State Park, but the parking is located at a different location than the park’s entrance. We left early in time to beat the 9am opening and there were already quite a few cars in line. Once parked, there is a kiosk to pay for parking and there is a visitor center at this lot, where there are 2 restrooms.
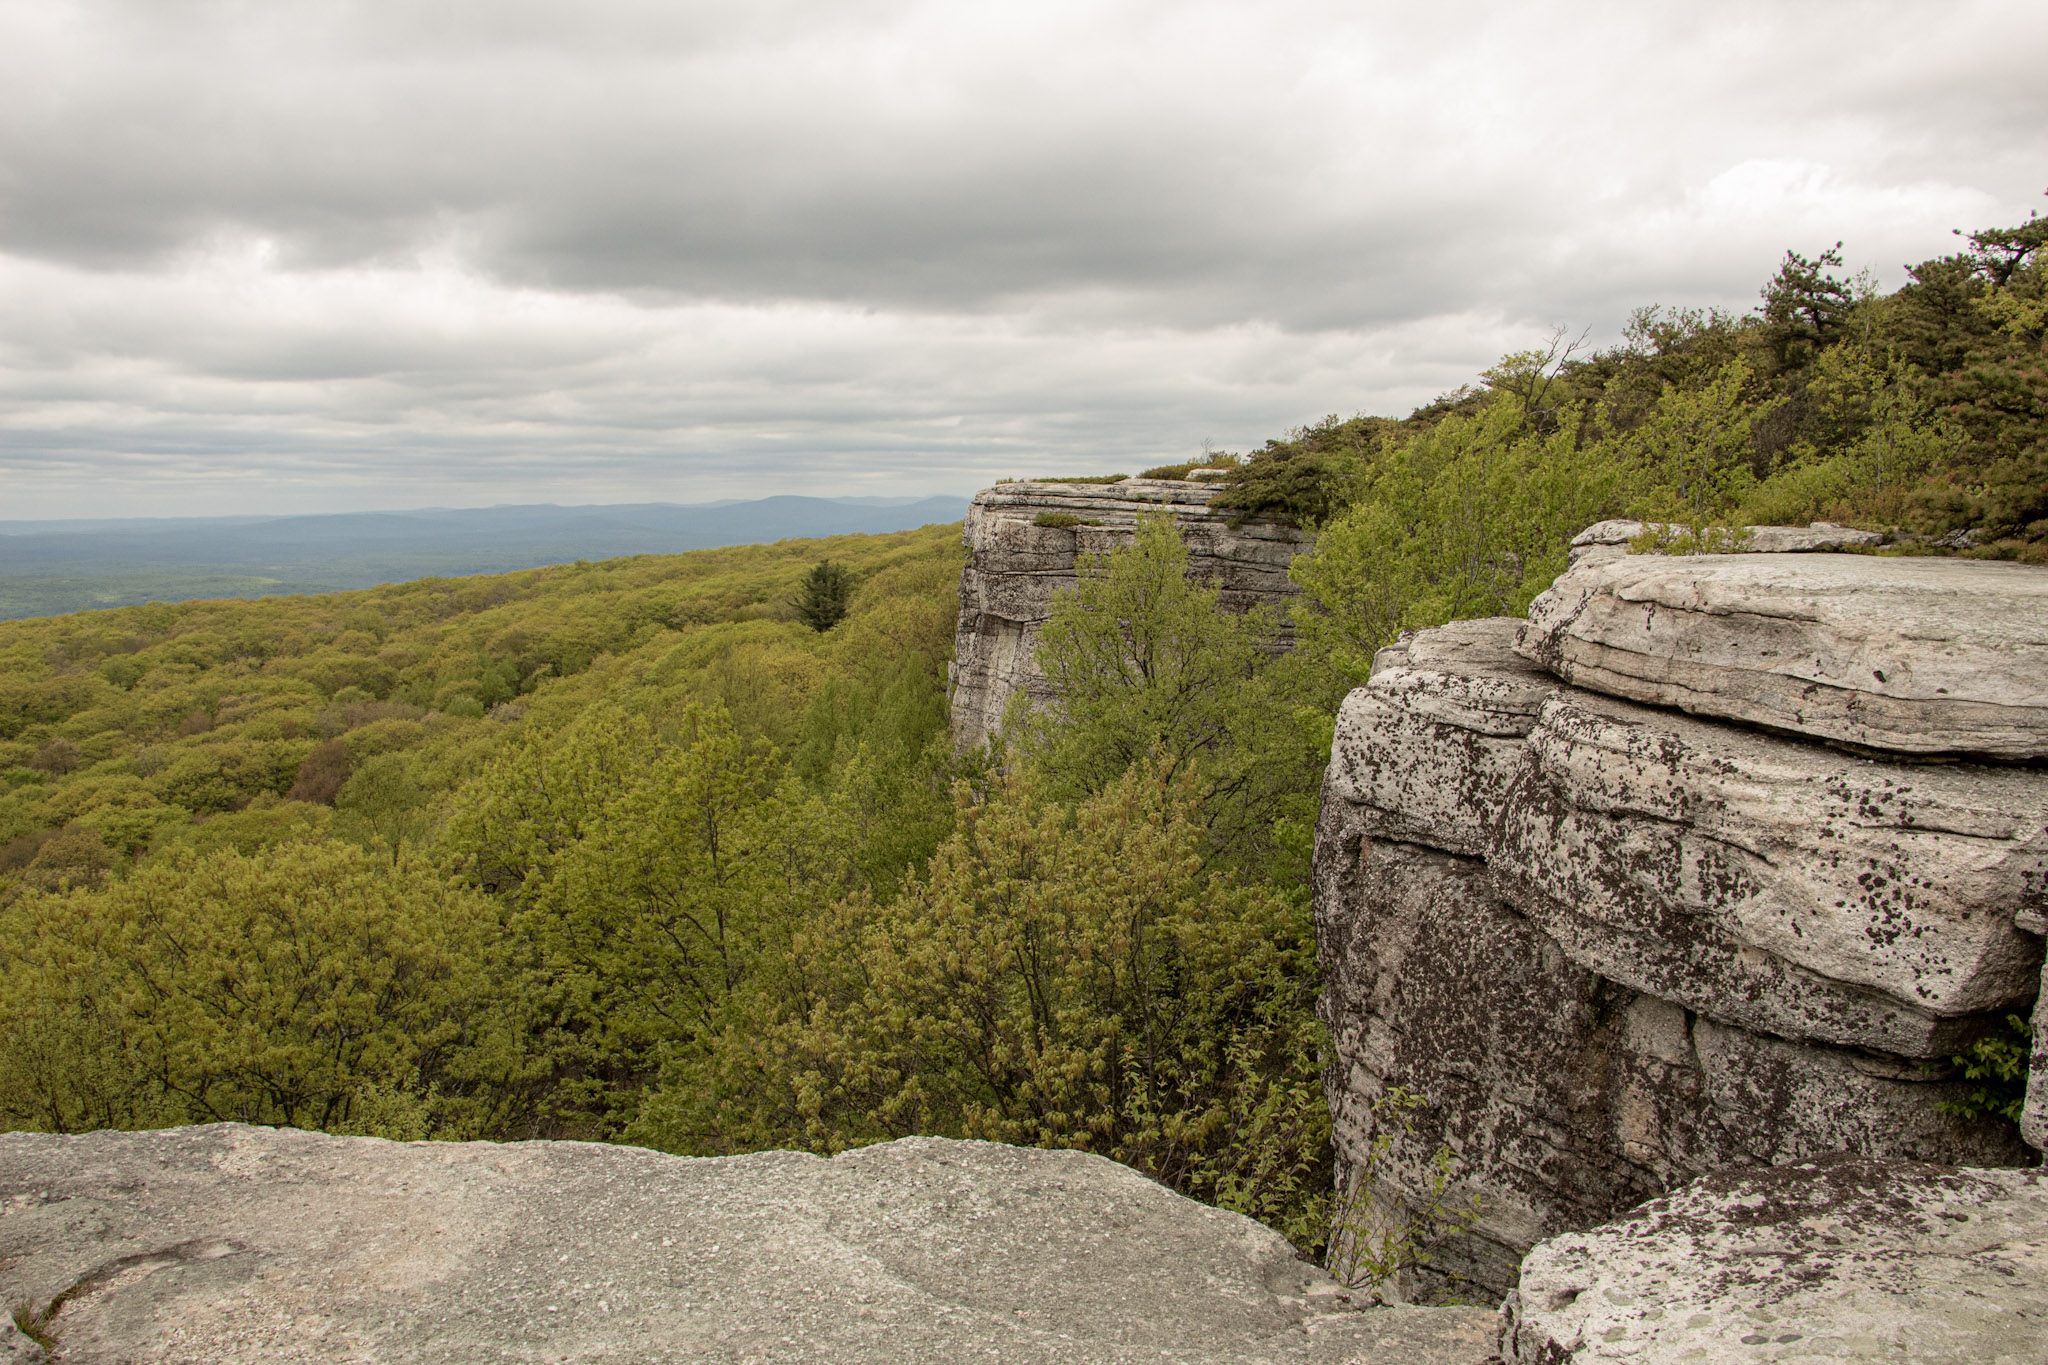
After packing up our gear, we headed toward the trailhead. Walking around the gate took us on the main trail, Loop Road. There is an intersection almost immediately to choose from, veering right will take you to Sam’s Point. The other option is the Huckleberry Pickers’ shacks. Tempting but we will pass on that. Heading up the fragmented road, there is a slight incline as altitude gains up the switchbacks. In short time, we came up to a massive rock with a cliff above, which we learned later is the top of Sam’s Point. At about a half mile, the first view was on our left on top of a rocky platform.
Loop Road will even out and we had an option to keep straight toward the waterfall or turn left toward the short trail to check out the view from Sam’s Point. It was pretty crowded and I just wanted to beat everyone to the waterfall so we saved Sam’s Point for the end. A short distance off Loop Road, we saw signs on our left to head toward Verkeerderkill Falls on the aqua blazed trail. If you wanted to check out the Ice Caves, continue straight from here. We couldn’t fit those in today, so we headed toward the waterfall.
I did not anticipate the cool landscape we would be hiking through on this hike. Strolling along the trail you will the see rare dwarf pine trees offering very unique scenery. In addition, there are wide views of the Northern Shawangunk Ridge along this part of the trail. The trail will head downhill slightly. This isn’t terrible but the fact that it gets rockier, makes it a bit more challenging. As you get closer to the waterfall, there is a steep descend down.
Eventually, we came upon a stream above the falls. Depending how high the water is on a given day, you may have to follow upstream to cross. We made our way to the cliff overlook and we were greeted with a large crowd. Then, I turned around and saw the amazing view of Verkeerderkill Falls! The water was flowing pretty well on this day. This is nice spot to take a break and relax. However with the crowd and popularity of the hike, we absorbed the fall briefly and started retracing our steps back.
We finally made our way over to Sam’s Point. The views are outstanding. From the cliffs, you can see the Shawangunk Ridge and Wallkill Valley. Lots of space to take in all the scenery, grab a snack, or take a selfie. There were lots of selfies going on around us. Before we left, I had one thing left to do. I was waiting for the perfect moment. Mostly, I was waiting out the 20 plus Cub Scout group that were yelling and running around. In addition, there was this one kid (like in his 20s) with his mom who kept taking selfies and would NOT leave until he got the perfect one for Instagram. Come on dude. Once they left, I saw my opening and proposed to my amazing girlfriend! Even though I made her trek 6 miles on her birthday and endure 20 minutes of freezing wind atop Sam’s Point, she said yes. I didn’t realize how packed this overlook would be at all times. Sorta risky move. No backup plan. But in the end, everything went as planned. Then, we joyously made our way back down to the parking lot.
This hike has a lot of meaning for me going forward but this was a dynamite hike. When you can explore different landscapes and come across multiple features that this trail offers, there is not much more you can ask for in a hike. This is a great place to visit to spend the day.
MORE PICTURES BELOW:
HIKING FOR DONUTS
Hi, I’m Mark. I live in Connecticut. I take new trips every change I get. A good trip has a great hike, great food, and something fun to do. My goal is to search out new trips and share them to inspire others to try something new and exciting.
If you are looking for posts in a particular place, search City or State here.
SEE OTHER POSTS IN ARCHIVE
Archive
RECOMMENDED POSTS
RECENT POSTS
See the latest on Instagram and follow @HIKINGFORDONUTS
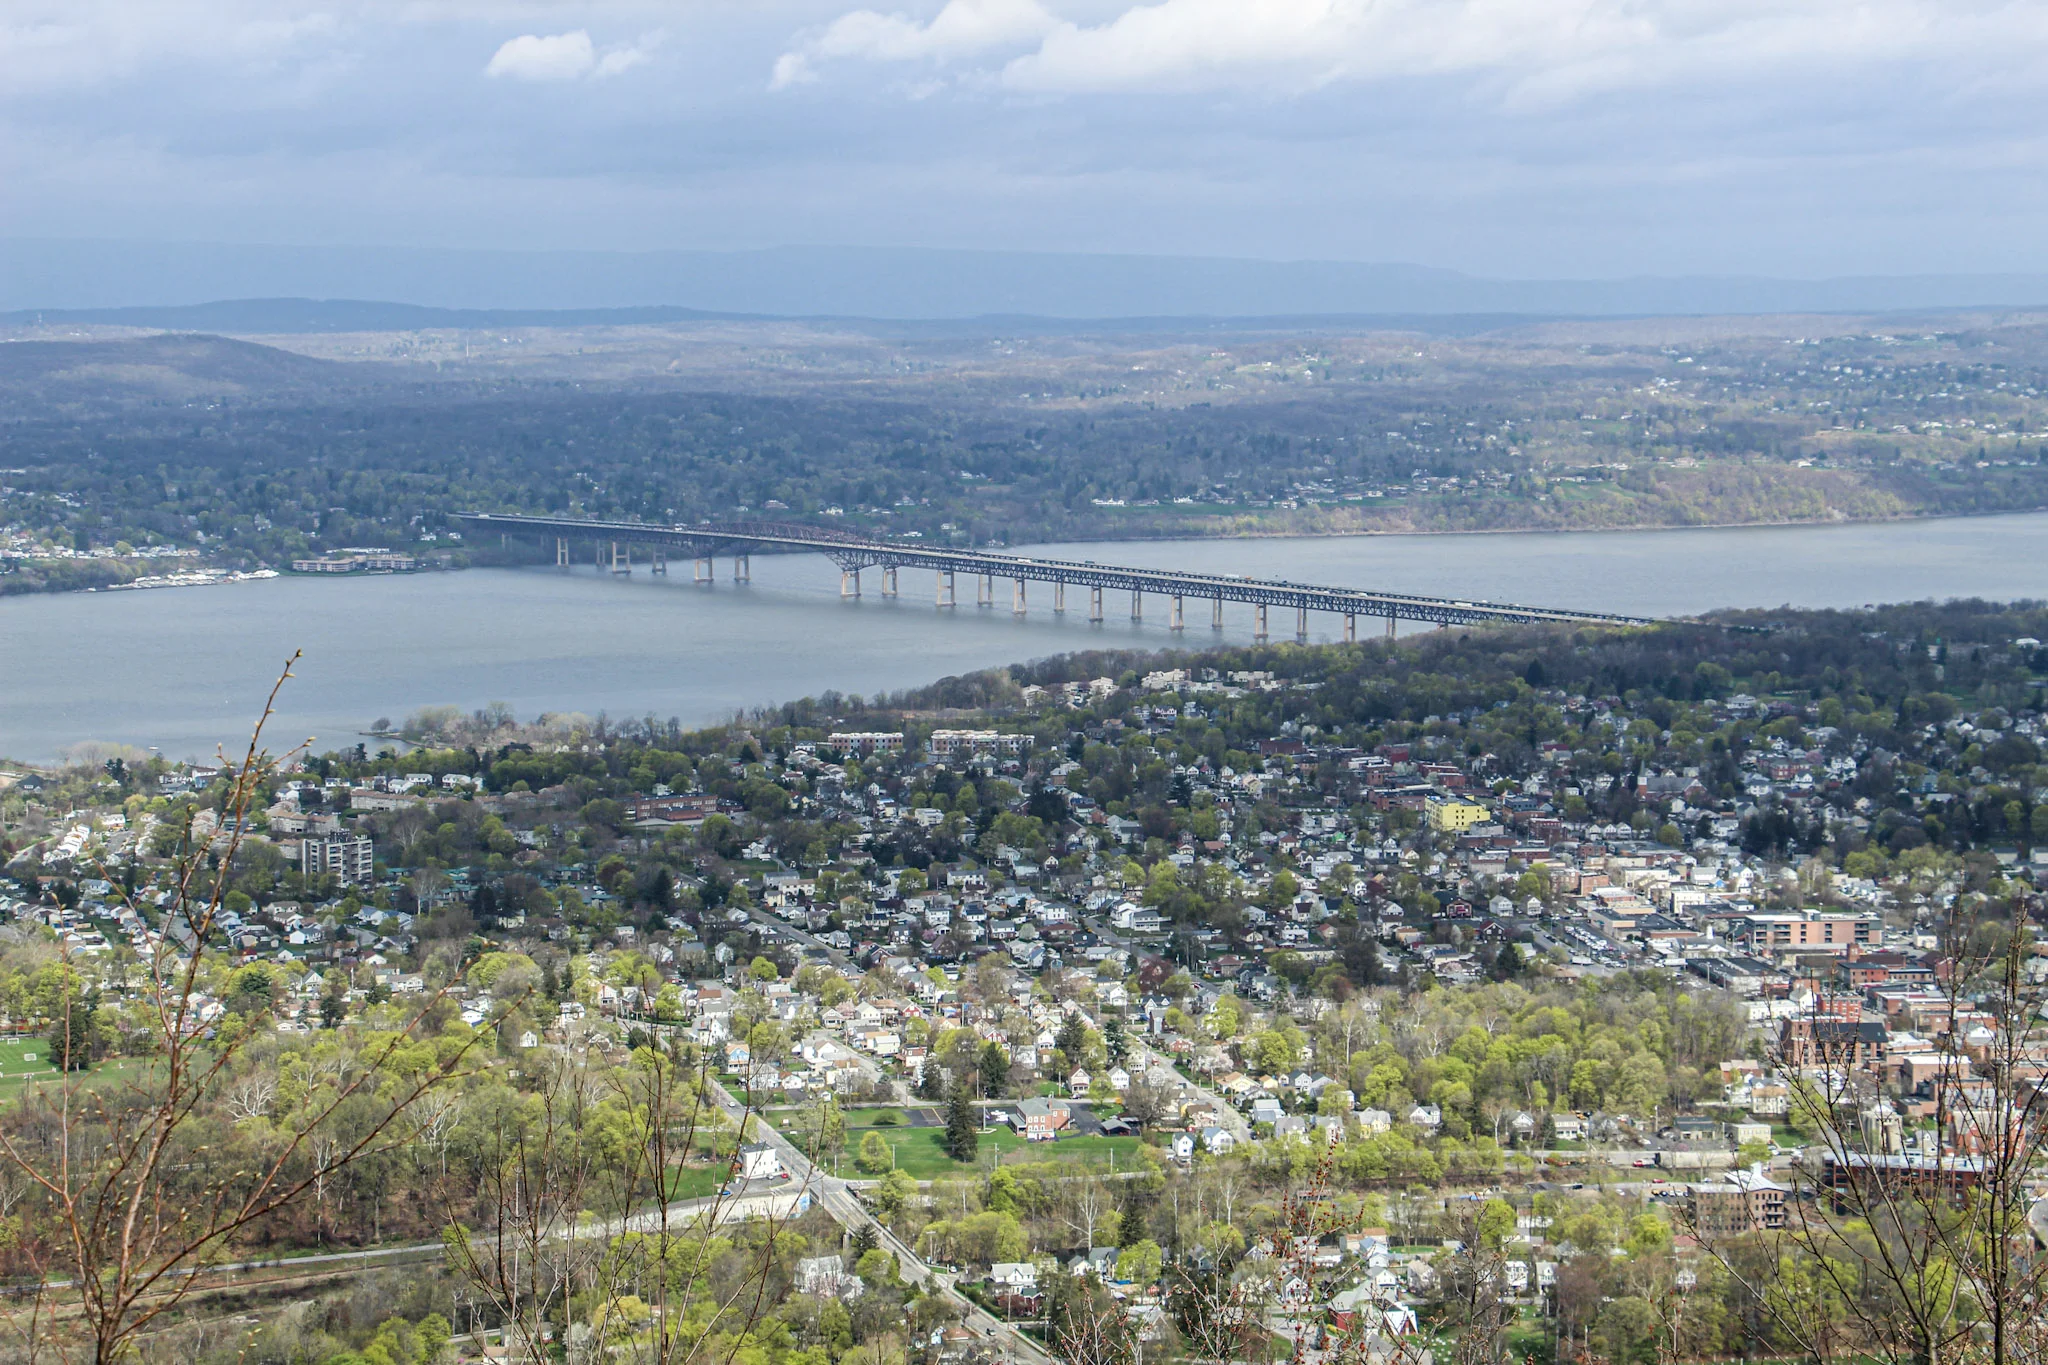
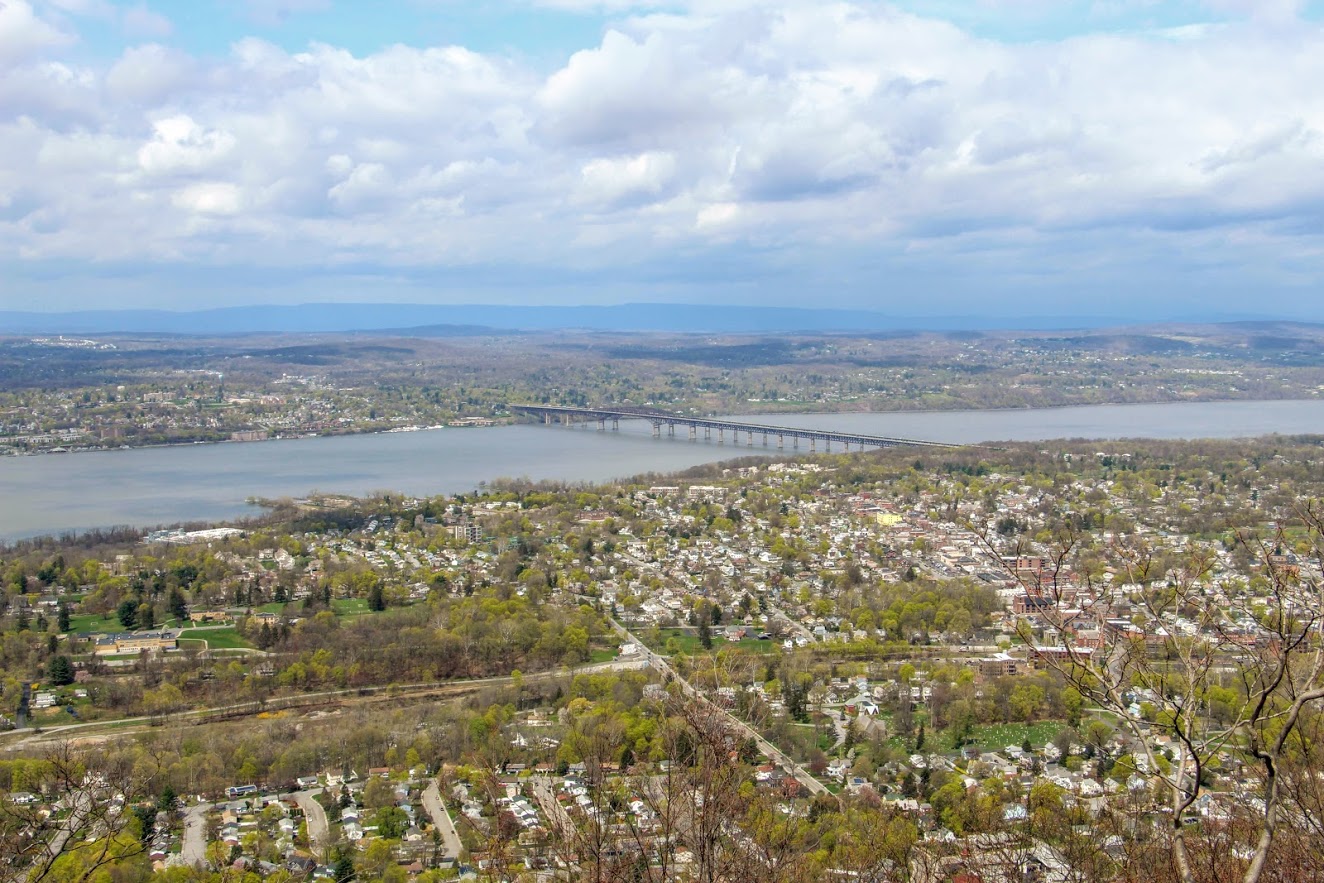
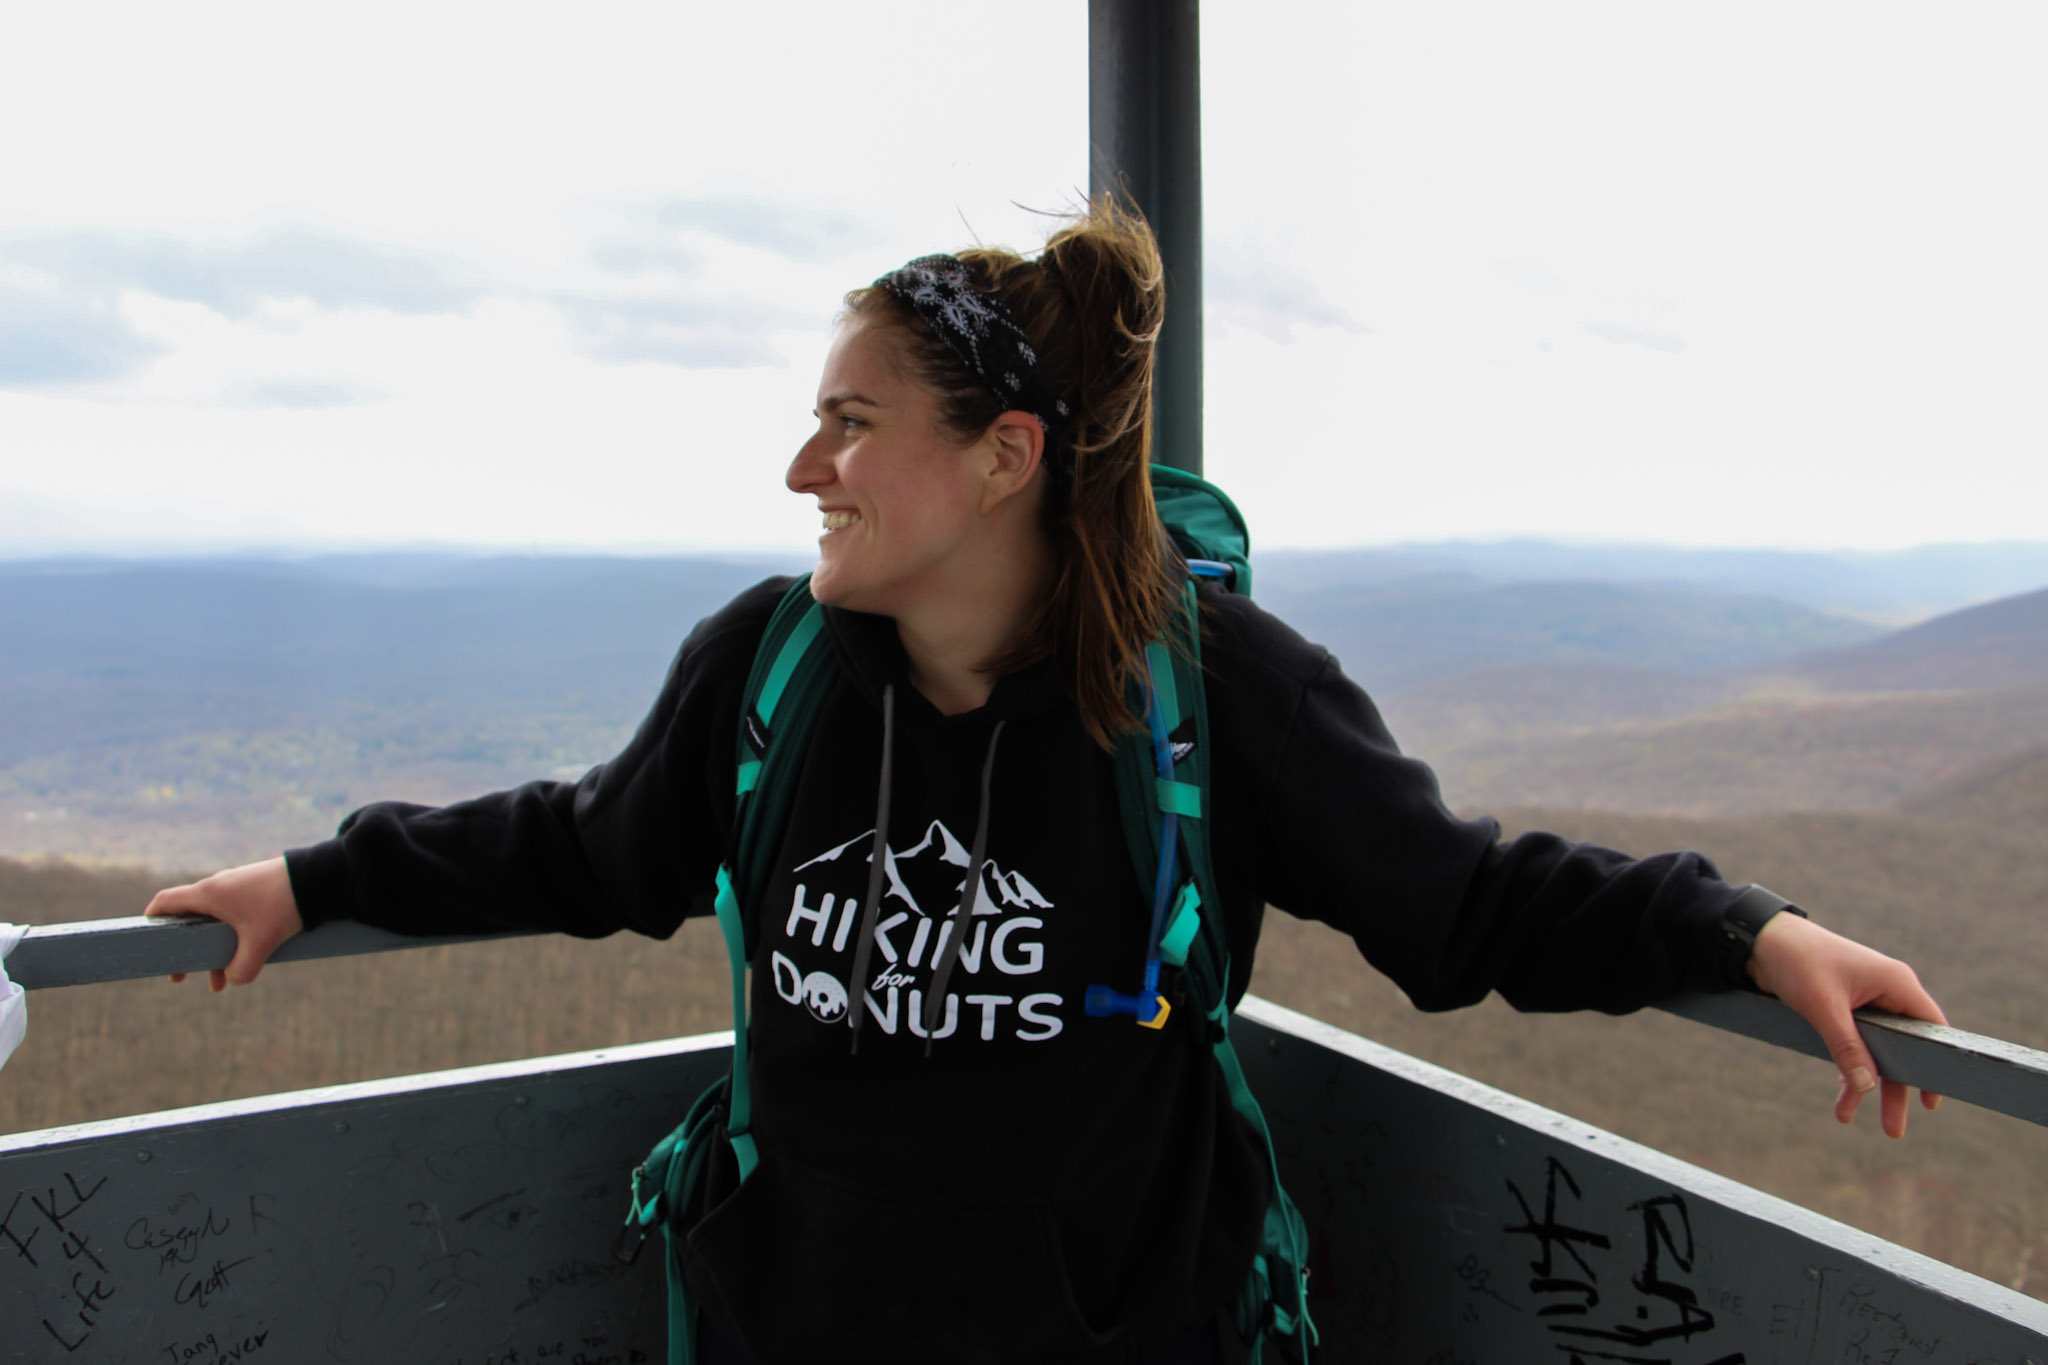
Mount Beacon Fire Tower, Beacon, NY
Mount Beacon is one of the most popular trails along the Hudson River. It offers different terrain for a good workout, old railway landmarks, and incredible views of the Hudson Valley as well as the Catskills and NYC on a clear day. Most people will hike to the top of the mountain overlooking Beacon. However, adding the fire tower to this hike is worth it. Check out the blog for details and pictures!
Trail Description: Mount Beacon offers gorgeous views of the Hudson Valley and you can see as far as NYC and the Catskills from the fire tower.
Trail Info:
Where: Beacon, NY Distance: 4.4 miles (3-3.5 hours) Difficulty: Moderate Trail Type: Out and Back Features: Views, Hudson River, Fire Tower, Mountains, Valley, Reservoir, Railway
How to get there:
788 Wolcott Ave Beacon, NY 12508
You will see the parking lot located the intersection of Route 9D and Howland Avenue in the City of Beacon. Parking can be limited here. For more info, https://www.scenichudson.org/mountbeacon.
Hiking Tips
Get there early for parking on weekends.
First half mile is the toughest. After that, it’s a breeze. Keep going!
Once you reach the white-blazed trail, take that up to fire tower. The White Trail is not marked as well as the Red Trail, look for faded markings on the rocks.
The Hike
Mount Beacon is one of the most popular trails along the Hudson River. It offers different terrain for a good workout, old railway landmarks, and incredible views. The trail head starts at the parking lot where we found the information kiosk. From here, walk past the wooden gate and proceed along the gravel path on the red-blazed Casino Trail. We arrived at the ruins of the Mount Beacon Incline Railway. The railway was used as a tourist attraction for the views of the Hudson River as well as visiting a Casino Hotel at the top of the mountain in the early 1900s. This was the steepest railway in the world during its operation. Pretty wild! If you want to know more historic details, click here. After passing the ruins, we started making our way up the metal staircase continuing onto the red-blaze trail.
The tough part begins here, only for about a half mile. This is where you see happy faces coming down and not so happy faces going up. The hike will slowly begin to ascend up the mountain following the switchbacks. There may be areas that look unmarked but keep your eyes on the red markings. Eventually, the terrain will become rockier and even steeper uphill. Huffing and puffing our way up, the first glimpse of a view appears as we came up on the first landmark. The motor house of the railway has brick walls still standing and there you will find huge rusted gears and the motor. Past the motor house lies the foundation of what used to be the casino, which is where the first scenic view of the hike can be seen. The view from Mount Beacon stretches across the Hudson with stunning views overlooking Beacon. It is awesome that you can get this view only after hiking just over a mile. The hike started with overcast but amazingly the sky started opened up once we reached the overlook.
It was time to head toward the fire tower. We turned around from the look out, walked across the old casino ground toward the tower. Eventually, we noticed a red marking on a tree and followed that dirt road through two metal poles and continued on the red-blaze trail. We passed what looks to be a door or frame of an old car or truck on the trail. Additional steep climbing ensued for about 10-15 minutes until there is a clearing with a view of the fire tower. Shortly after, we arrived to the White trail. Before we reached the White Trail, we did notice an unmarked trail leading up the hill toward the fire tower but thanks to research we did not take that path. About 15 minutes later, we found ourselves making our way up the fire tower. This fire tower is pretty high. I was actually getting a bit nervous going up. By this time, the sky opened up completely and the views were an unbelievable 360 view. From the top, you will see Beacon Reservoir and Catskills to your northwest, the Newburgh-Beacon Bridge and Shawangunk Ridge to the west, and, to the south, the southern Hudson Highlands. Even as far down as NYC. And, probably more stuff I don’t even know! My girlfriend had to pry me off the tower. It was super windy but I just kept saying, “This is awesome”. Very fortunate to be able to have access to great hikes like this in the Hudson Valley. Oh, and there’s a donut shop 5 minutes away that is amazing for post hike donuts (Glazed Over Donuts blog post). I cannot recommend this hike enough!
More pics of the hike:


HIKING FOR DONUTS
Hi, I’m Mark. I live in Connecticut. I take new trips every change I get. A good trip has a great hike, great food, and something fun to do. My goal is to search out new trips and share them to inspire others to try something new and exciting.
If you are looking for posts in a particular place, search City or State here.
SEE OTHER POSTS IN ARCHIVE
Archive
RECOMMENDED POSTS
RECENT POSTS
See the latest on Instagram and follow @HIKINGFORDONUTS

People State Forest, Barkhamsted, CT
Located in Northwest Connecticut, the Jessie Gerard Trail is one of many exciting trails that wander through the 3000-acre Peoples State Forest. This fairly unknown hike is challenging with various terrain and magnificent views of Grand Vista Overlook and Chaugham Lookout. A great hike in the fall for amazing views.
Trail Description: The Jessie Gerard Trail is one of many exciting trails that wander through the 3000-acre Peoples State Forest. This fairly unknown hike is challenging with various terrain and magnificent views of Grand Vista Overlook and Chaugham Lookout.
Trail Info:
Where: People State Forest, Barkhamsted, CT Distance: 3.3 miles (2.5-3 hours) Difficulty: Moderate Trail Type: Loop Features: Waterfall, Valley, Views
How to get there:
Typing in Jessie Gerard Trail in your GPS will lead you to East River Road, Barkhamsted, CT. Once you get onto East River Road, drive a few miles and you will see a small parking lot on your left. The trail starts directly across from the lot.
Hiking Tips:
Take a DEEP People State Forest map at the kiosk in the beginning. This will be very useful.
Start with the Falls Cut Off Trail to your left (blue/red marked trail). Much easier to go up this section (than down). If it rained recently, the first 0.1m will be slippery up the rocks.
Pay attention to the markers changing colors

The Hike
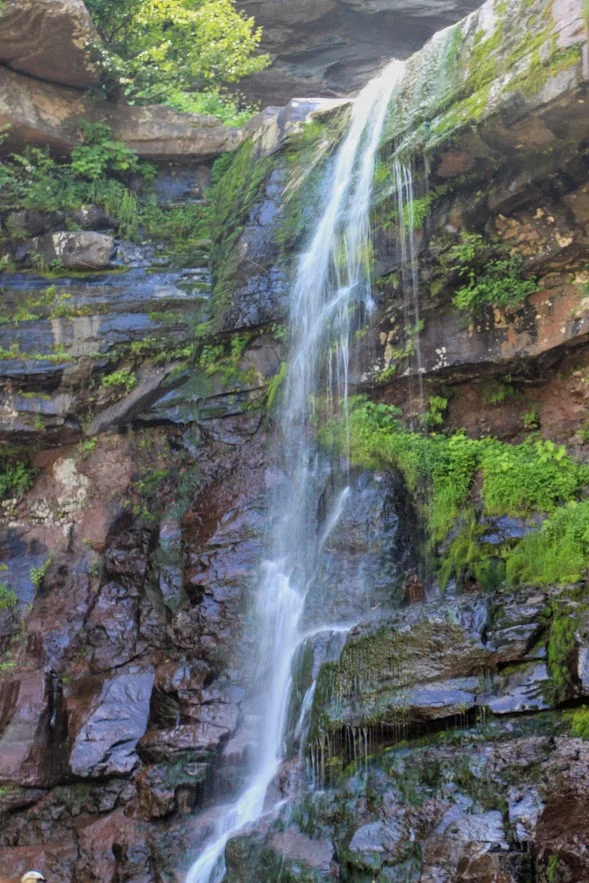
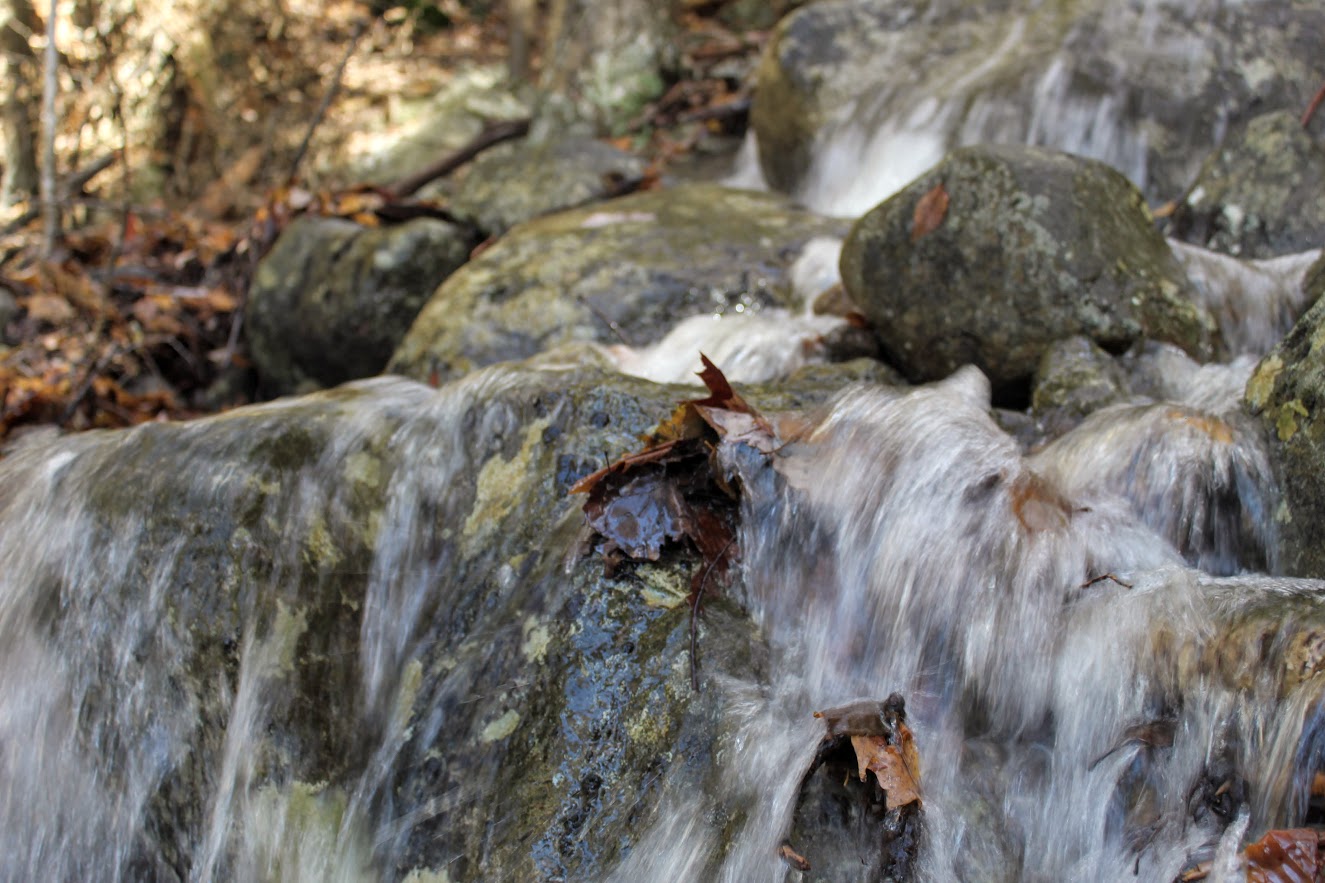
The hike begins up the Falls Cut Off Trail (blue/red markers) on the left. The beginning of the trail is difficult and there is an immediate steep incline up past the falls. The beginning of the trail is difficult and there is an immediate steep incline up past the falls. There was a huge rain storm the day before so the waterfalls were roaring. An awesome visual after 10 minutes into the hike. Though, the rocks were really slippery. Once reaching the top of the falls, turn left on the double marked Blue and Blue/Yellow markers, which is the Jessie Gerard Trail. Continuing straight ahead on the Blue/Yellow,do not veer toward Warner Road. After another half mile, boom shakalaka we emerged into the Grand Vista outlook. Magnificent views with all the fall colors. We continued following the Blue/Yellow for another half mile to the Chaughum Lookout for more awesome views.
From here, stay on the Blue/Yellow Trail. We went between the 2 Veeder glacial erratics aka big boulder rocks. Shortly after, take a right onto Greenwoods Road. This is where the Jessie Gerard Trail ends. Then turn left on the Charles Pack Trail, also Blue/Yellow markings.
Another half mile later, turn onto Beaver Brook Road. This is where things got interesting. Following the road, the map says turn right onto the Blue/Orange, Agnes Bowen Trail, on your right after a half mile. When we came up to this, it was nothing but forest. No sign of a trail. We walked up and down and this was the spot. However, I don’t know where the trail would connect. We decided to keep walking up Beaver Brook Road and take a right up the road. Eventually, we caught up with the Blue/Orange trail where we would have come out to the road.
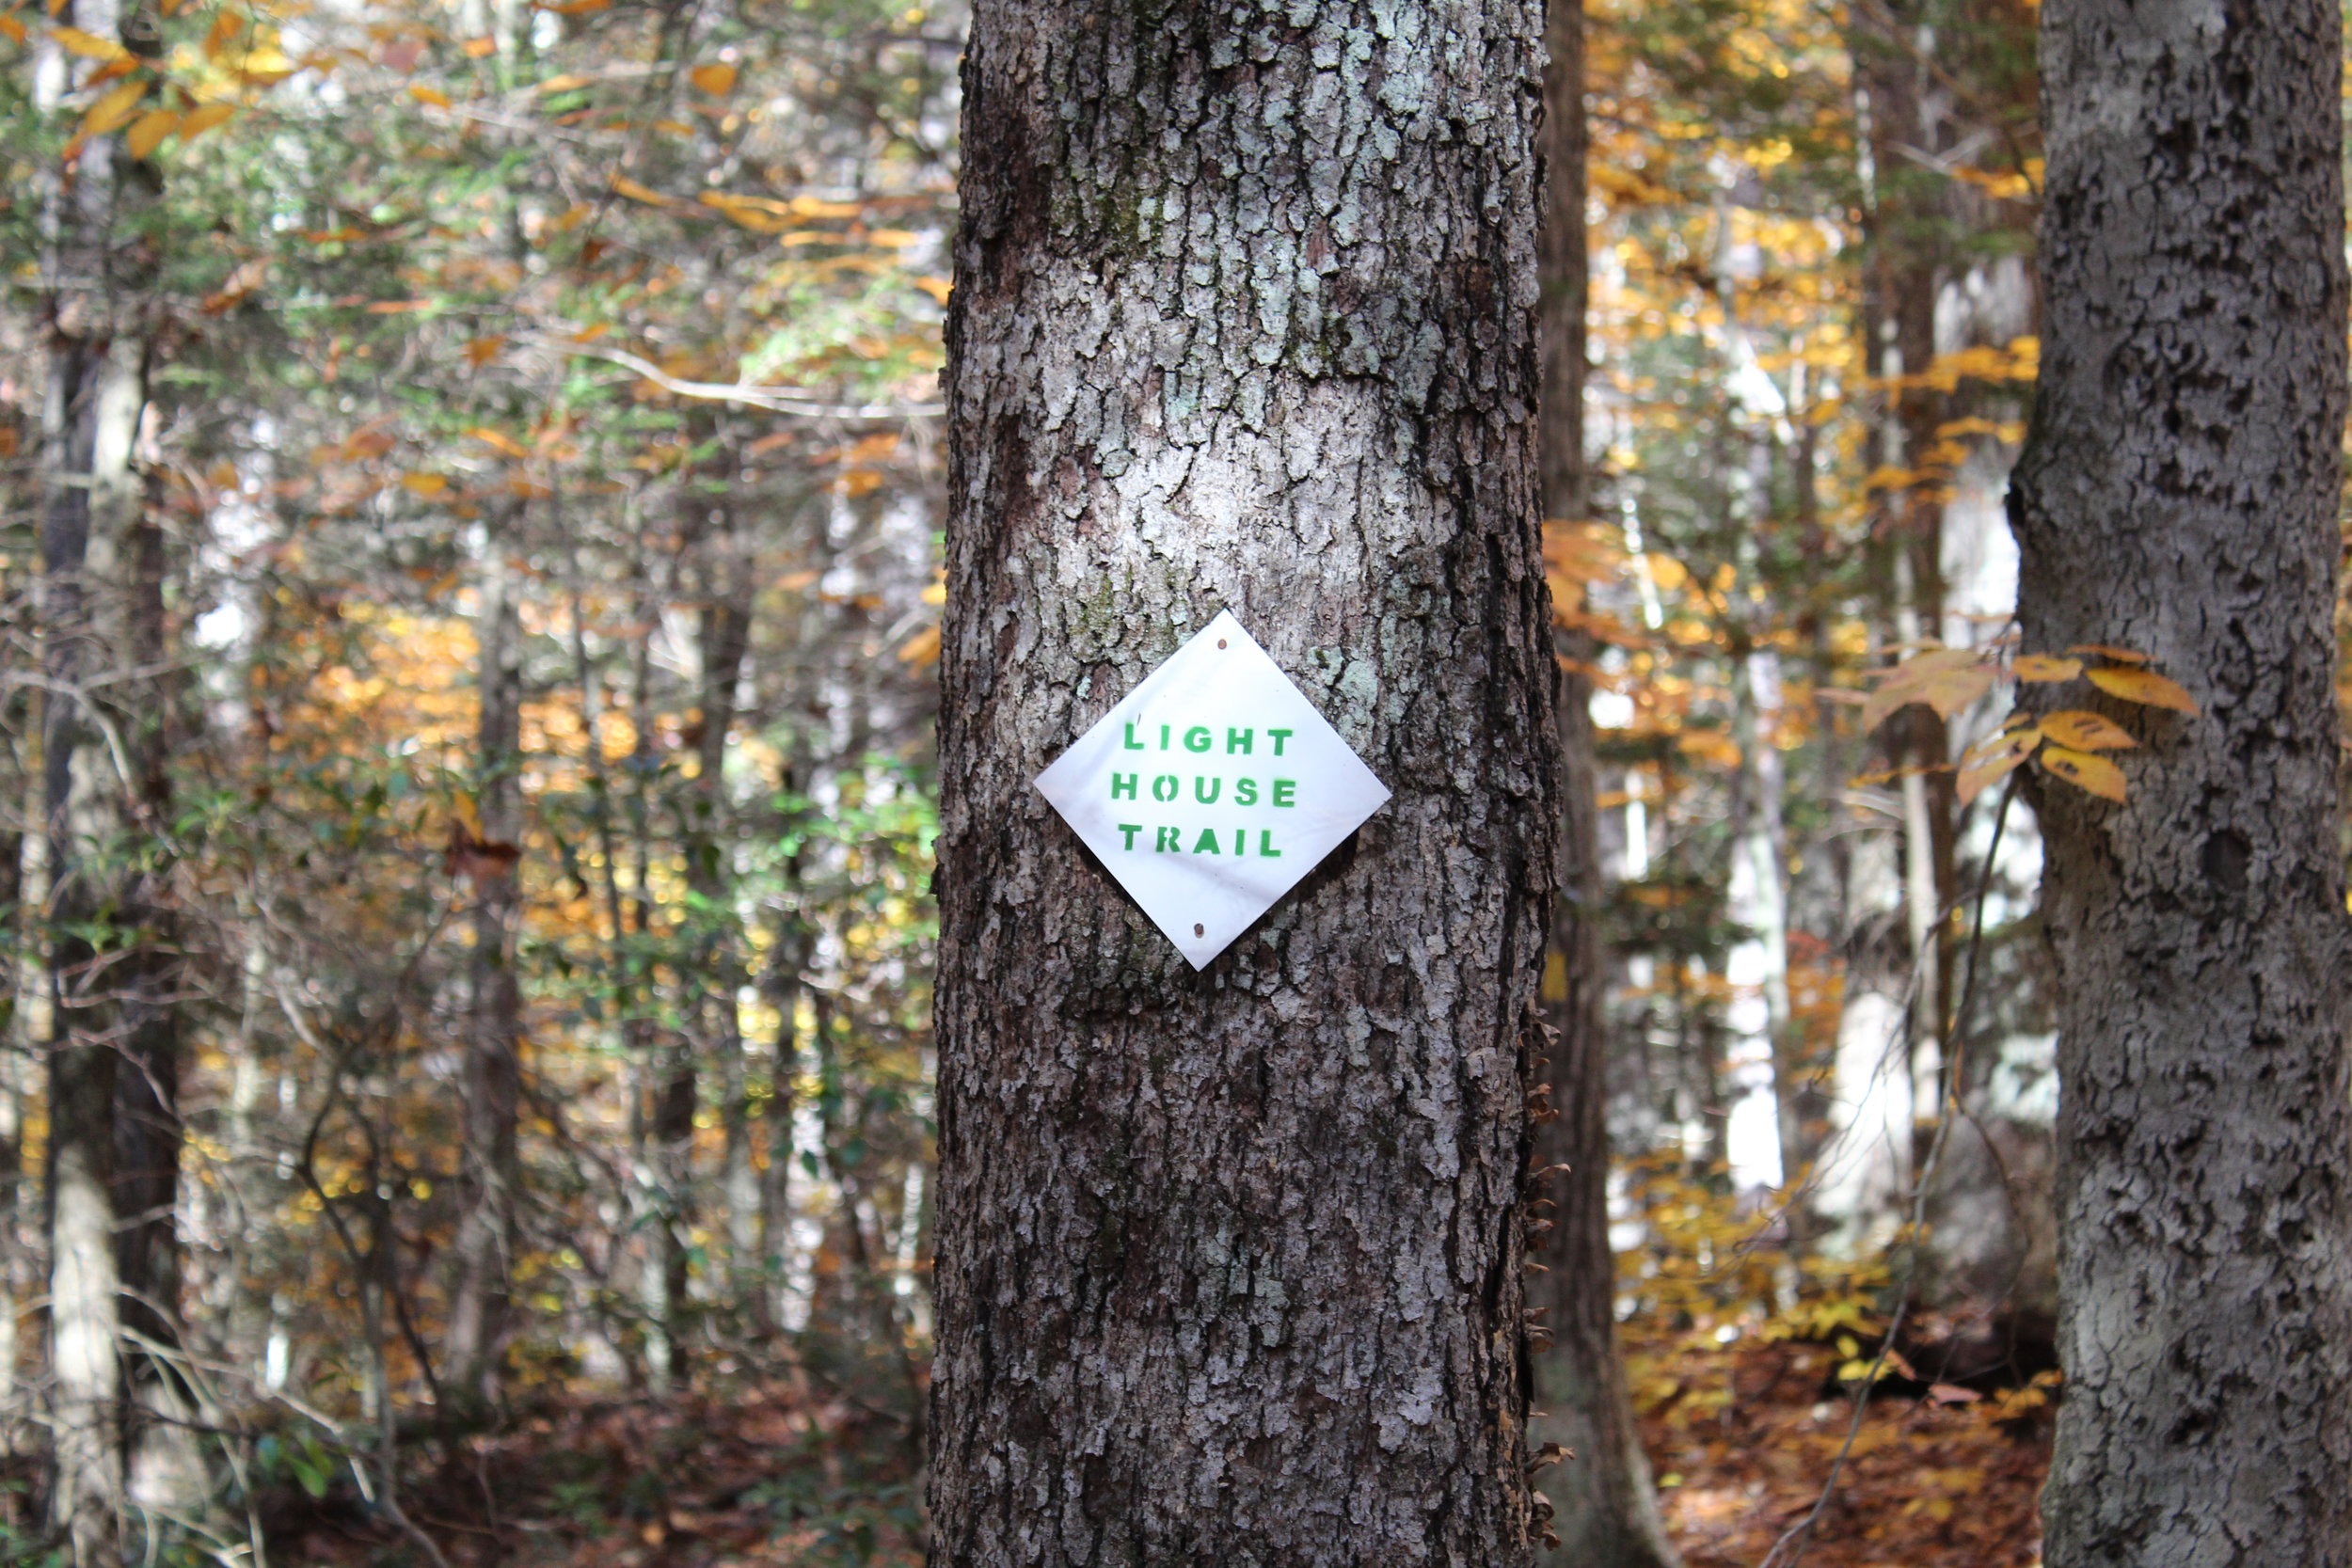
We jumped on the Blue/Orange to the left until we reached the Robert Ross Trail (Blue markers). Turn right here onto the Blue. The trail we will begin to ascend and descend. A tough part of the hike but way better than going down the other way. Keep your eye out on the colors on the trees. We got a little stumped here as the Blue/Yellow connects with the Blue. However, staying straight on the Blue the trail switchbacks downhill to the Lighthouse Trail (Yellow). Of course, another trail. Fortunately, this was the home stretch. We passed a few kiosks with educational info but we were ready for the post hike meal. This will take you back to the Blue/Red and right to the parking lot.


HIKING FOR DONUTS
A blog for the outdoors foodie enthusiast
Hi, I’m Mark. I live in Connecticut. I take new trips every chance I get. A good trip has a great hike, great food, and something fun to do. My goal is to search out new trips and share them to inspire others to try something new and exciting.
If you are looking for posts in a particular place, search by city or state here.
EXPLORE OTHER POSTS IN THE ARCHIVE
Archive
RECOMMENDED POSTS
MOST RECENT POSTS
SEE THE LATEST ON INSTAGRAM AND FOLLOW @HIKINGFORDONUTS

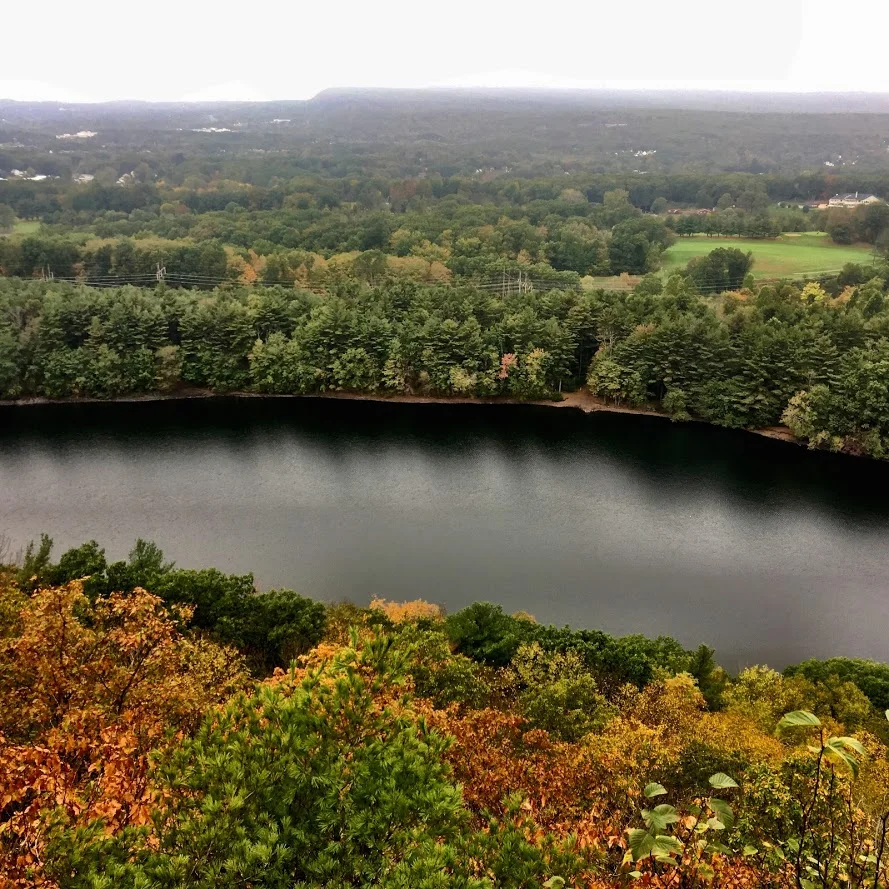
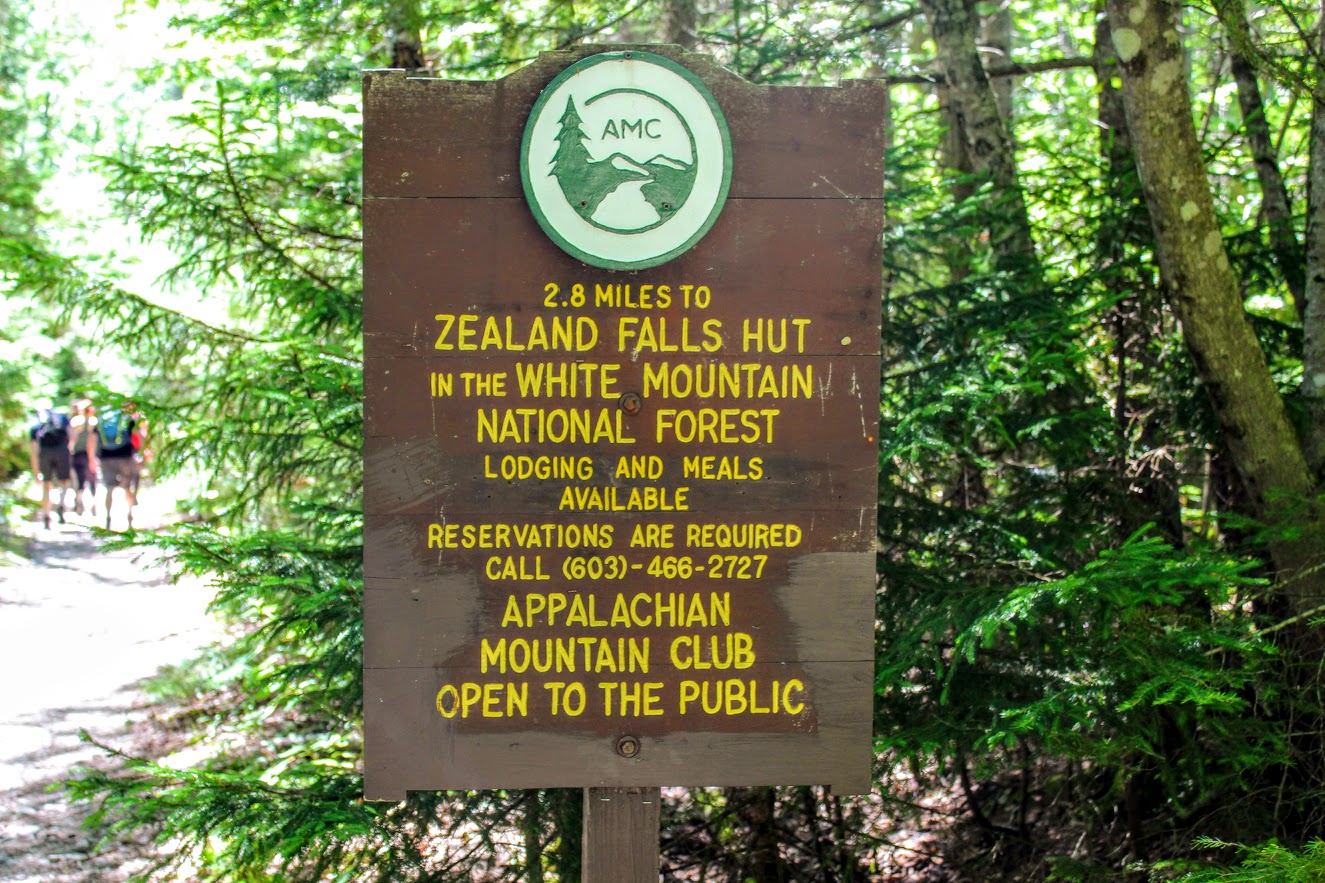
Zealand Falls Hut to Zeacliffs, New Hampshire
Zealand Hut Trail to Zeacliffs Trail Guide (Bethelum, NH)
Check out the new blog post an epic day hike in the White Mountains of New Hampshire. This hike follows the Zealand Trail to the Zealand Fall Hut, and eventually to the Zeacliffs overlook. From here, there are incredible views of Zealand Notch and the Pemigewasset Wilderness.
Trail Description: The Zealand Falls Hut Trail will lead you through the forest up to the AMC hut. Along the way you will pass various wetlands. Hiking beyond the hut to the Zeacliffs, there is a stunning view of the Pemigewasset Wilderness.
Trail Info:
Where: Zealand Trail, Bethlehem, NH Distance: 8.2 miles (5-6 hours) Difficulty: Difficult Trail Type: Out and back Features: Wetlands, River, Brook, Pond, Waterfall, AMC Hut, Zeacliff Outlook, Mountain
How to get there:
Trailhead and parking area are located at the end of Zealand Road, Bethlehem, NH. That is what we put in the GPS. Zealand Road will be off Rt 302. Drive about 3.5 miles all way down the road until you see the parking area on the left. The parking lot is small but there is additional parking off to the right.
Hiking Tips
Be careful hiking on the rocks (may be wet)
Bring lots of water and lunch for the view at the top
The Hike
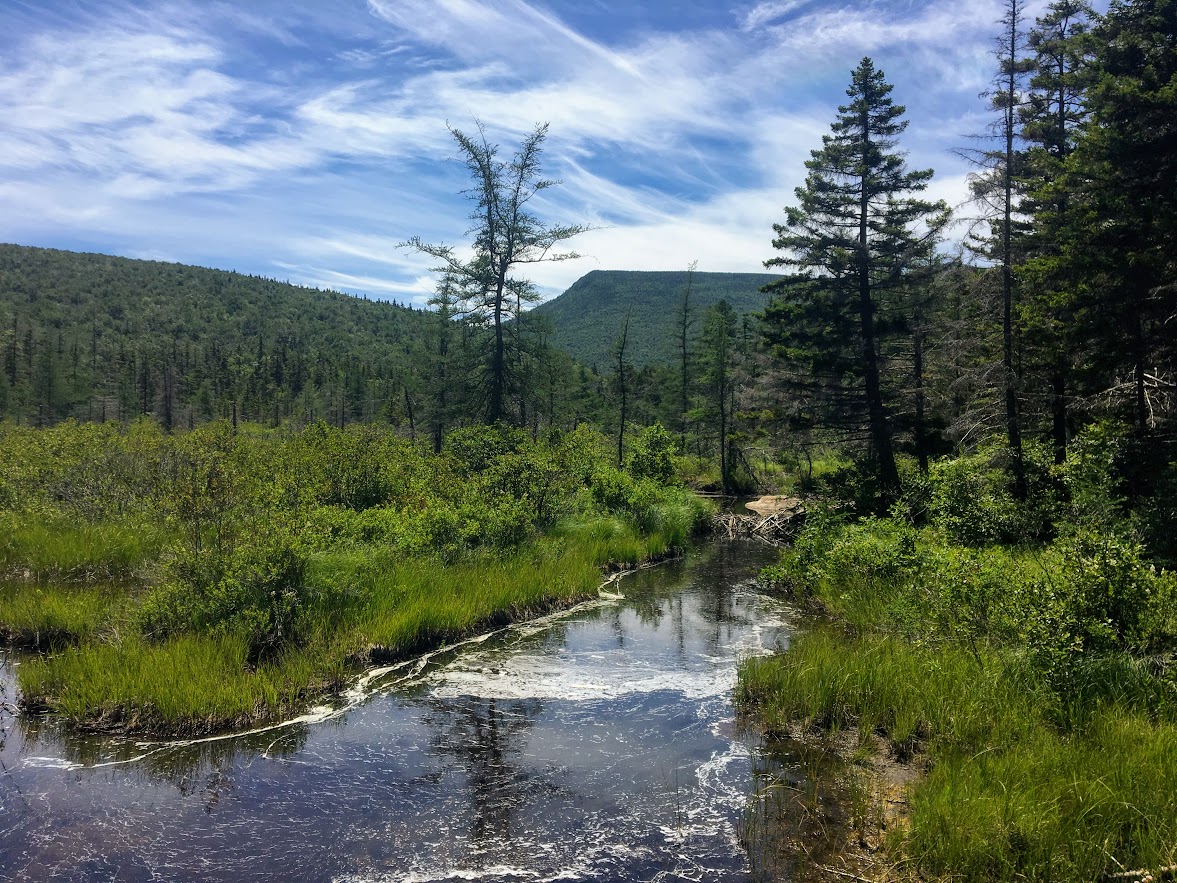
Hiking in New Hampshire is quite an experience. Every time I hike in or around the White Mountains, I never feel like I am in the northeast. The landscape is so unique and breathe taking. The views truly put you in a state of euphoria. I try to hike a few times a year in New Hampshire. One of best friends, Corey, has a place out there now, so that’s pretty convenient. On my last visit, Corey decided to lead a group of our friends on a day hike. Now, I’ve known Corey for almost 15 years. We have hiked all over together. I know when he says 3 miles it will NOT be 3 miles. While discussing our hike options, we decided for a longer hike in the 5-6 mile range. He mentioned reading about the Zealand Trail and how there are awesome views off cliffs right before Zealand Mountain. Although I was skeptical of his mileage number, I knew that Corey would lead us to some great views. Located in Bethlehem, NH, the hike follows the Zealand Trail to the Zealand Fall Hut, and eventually to the Zeacliffs overlook. From here, there are incredible views of Zealand Notch and the Pemigewasset Wilderness.


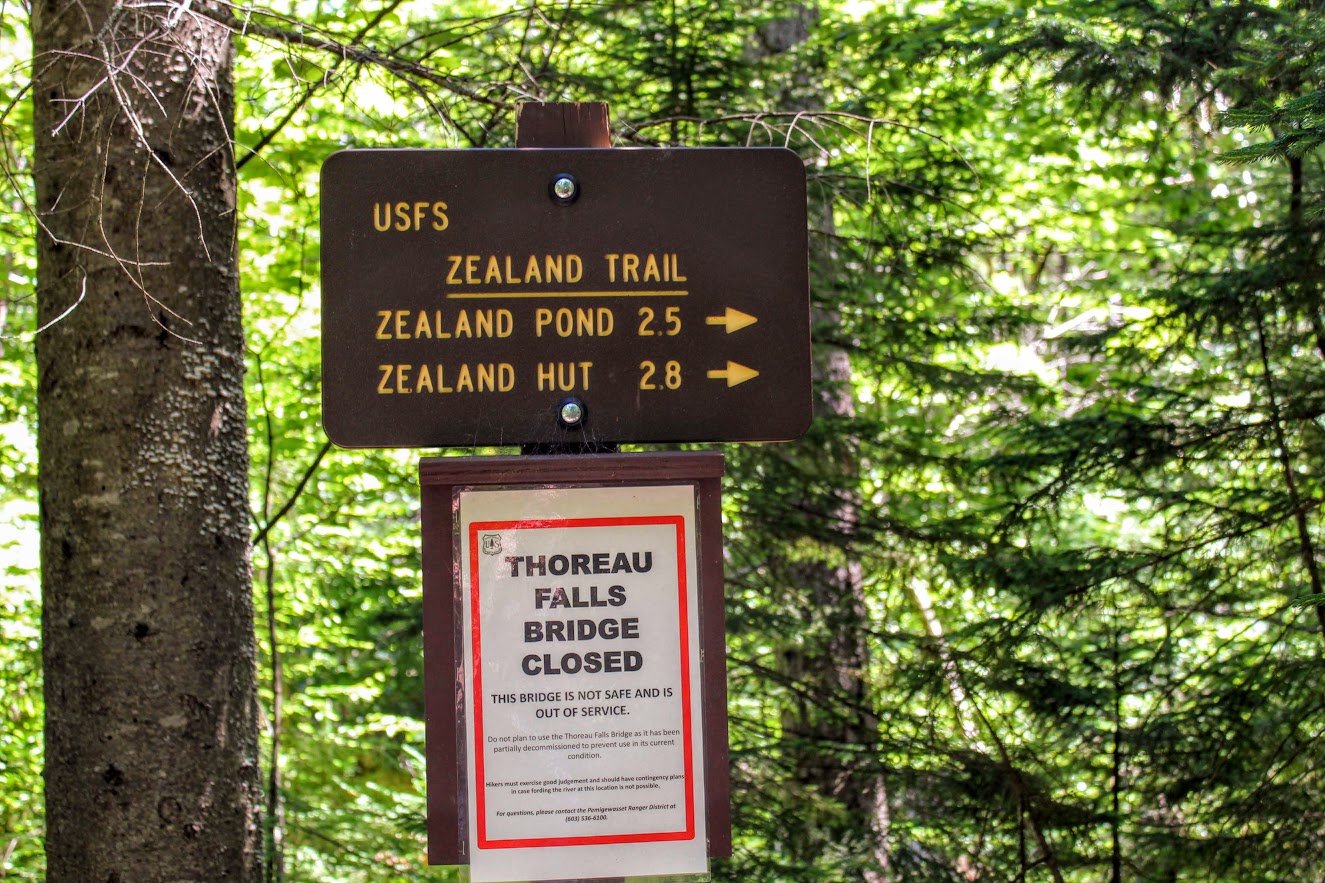
From the parked area, we saw the Zealand Falls Hut sign and began our way up the Zealand Trail using the blue-blazed trail. The trail starts off easy with good footing as it follows an old rail road bed. Soon after, we were thrown into the forest and the terrain became extremely rocky. Ah, those New Hampshire trails.
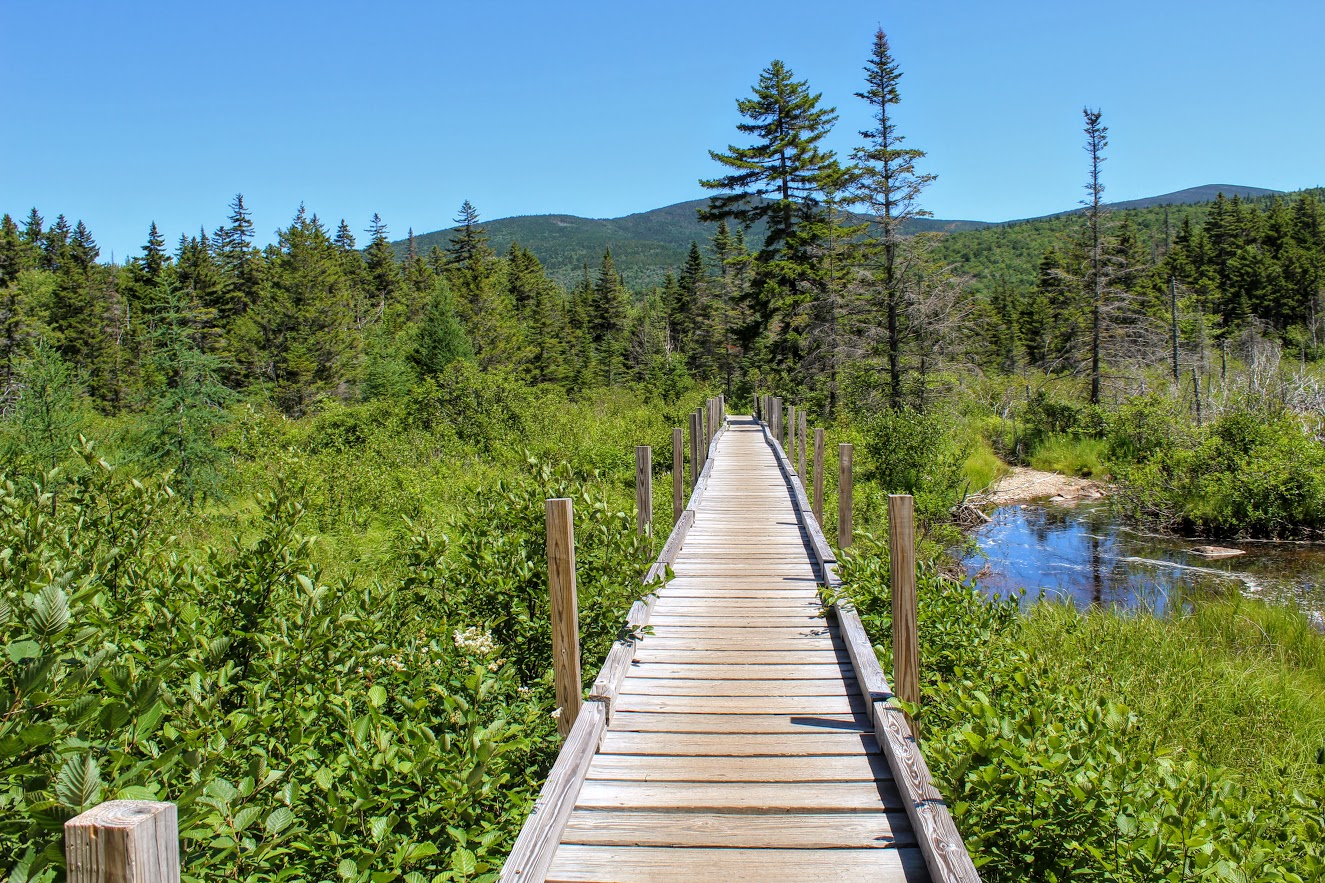
The first mile or so offers a few brooks and streams to cross leading up to the Zealand River. The trail is a gradual climb from the woods to a beaver pond and marsh area. This where we reached a sturdy wooded boardwalk (formerly known as the Z-bridge) crossing the wetland area.
A half-mile after this section, the trail veers to the left; continuing on the Zealand Trail. The trail flattens out and we crossed another footbridge over Zealand Pond. After a few paces, the trail brought us to the shoreline of the pond at a small opening in the trees.

I lost my friends as I typically do to stop for pictures. I was marching along by myself and I saw a white creature appear from the grassy meadow. Of course, my only reaction was that’s definitely a dire wolf from Game of Thrones. Unfortunately, I was incorrect. Two big dogs were ahead of their group. I was like “Cool dogs” and they were “Hey, cool shirt. We love donuts.” This was the first hike I wore my Hiking for Donuts shirt and I got a lot of reactions to it. The shirt is a great conversation starter. Lots of fun banter. My friends actually had a pretty serious donut debate for 30 minutes at one point in the hike. If you see my shirt on the trails, say hello!

tell me you don’t think that’s ghost from Game of thrones at a quick glance!
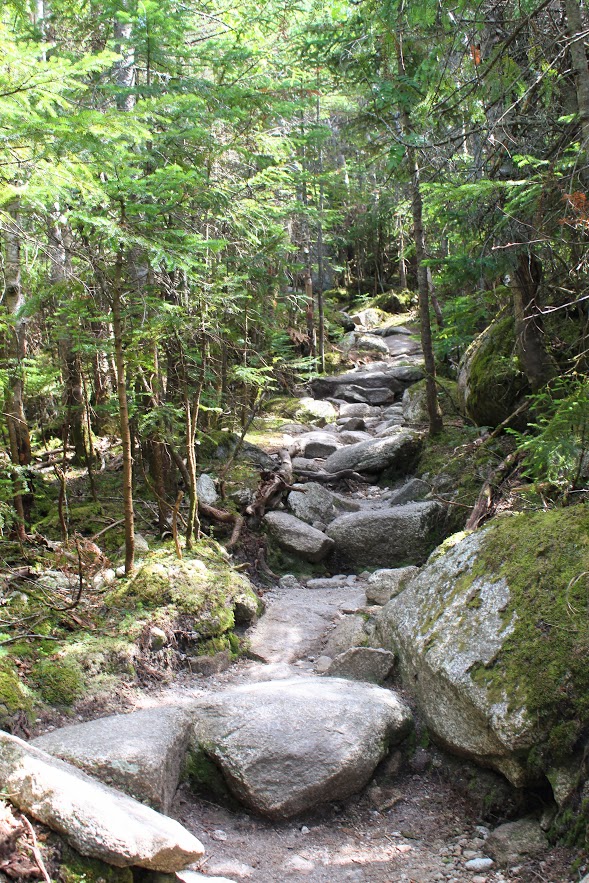
Hiking further just beyond this point, the Zealand Trail ends as it becomes the Twinway Trail (part of the Appalachian Trail). This was around 2.5 miles into the hike. And, now the really tough stuff begins. The ascent is real. The terrain will kick it up a notch. It was a pretty hot day and I haven’t hiked in this terrain in a while. I was struggling a bit. However, I like the challenge. And, I had goals of amazing views so I pushed ahead slow and steady. I could hear the falls. Five minutes later, I saw the sign for the Zealand Falls. This detour will be on your left and I highly suggest taking a view of the 25 foot falls. Given this was during the summer, the falls didn’t have much water but still impressive.
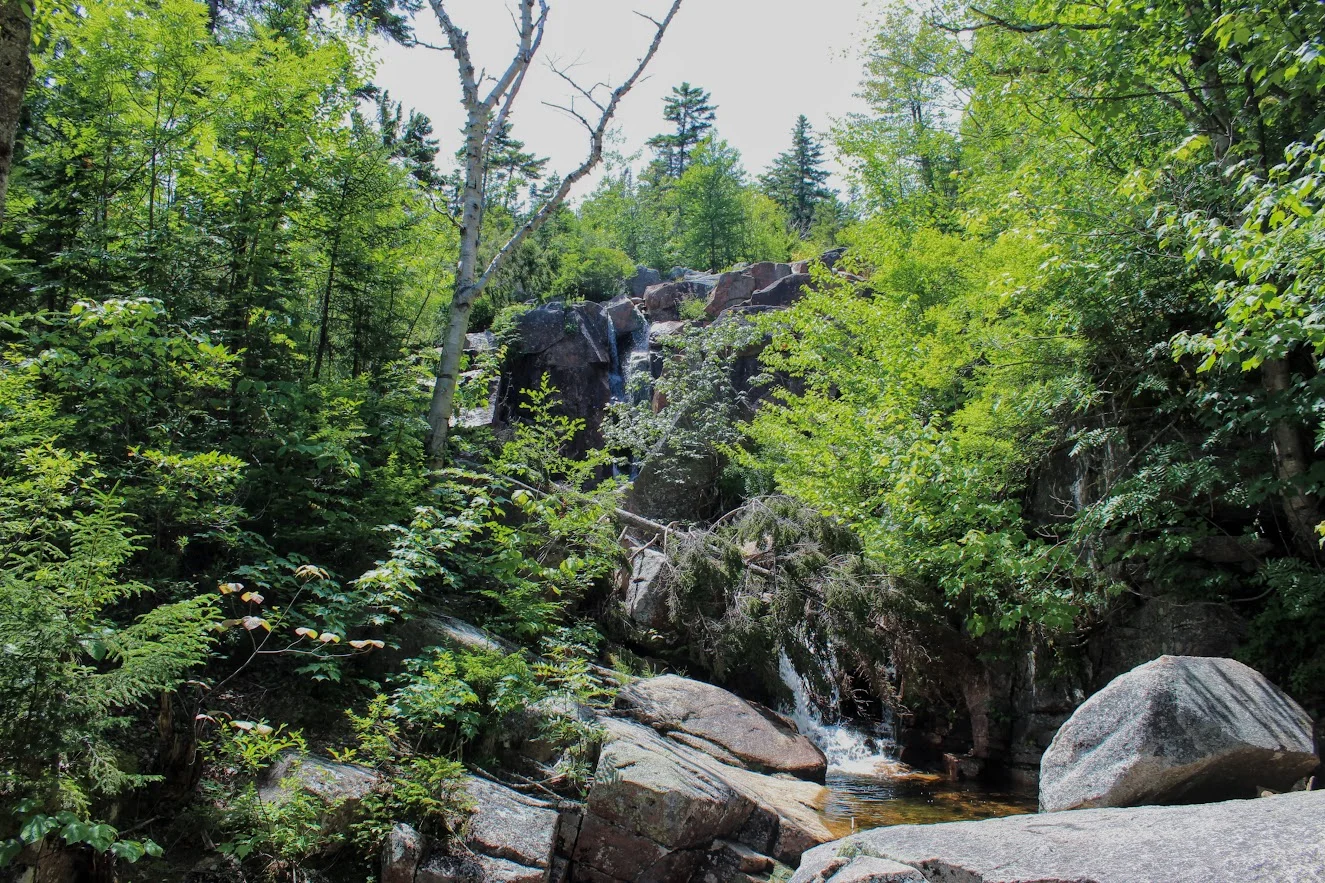
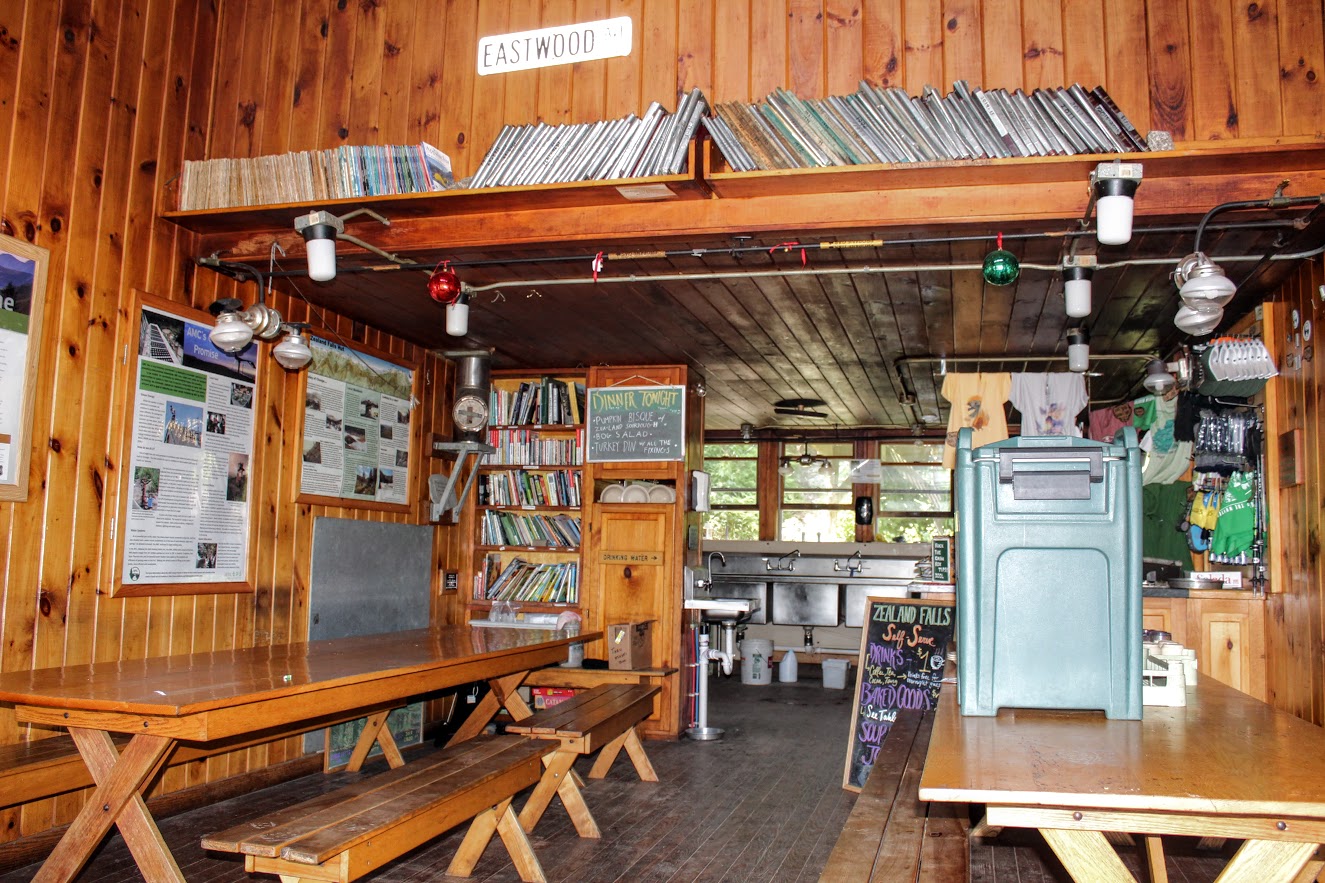
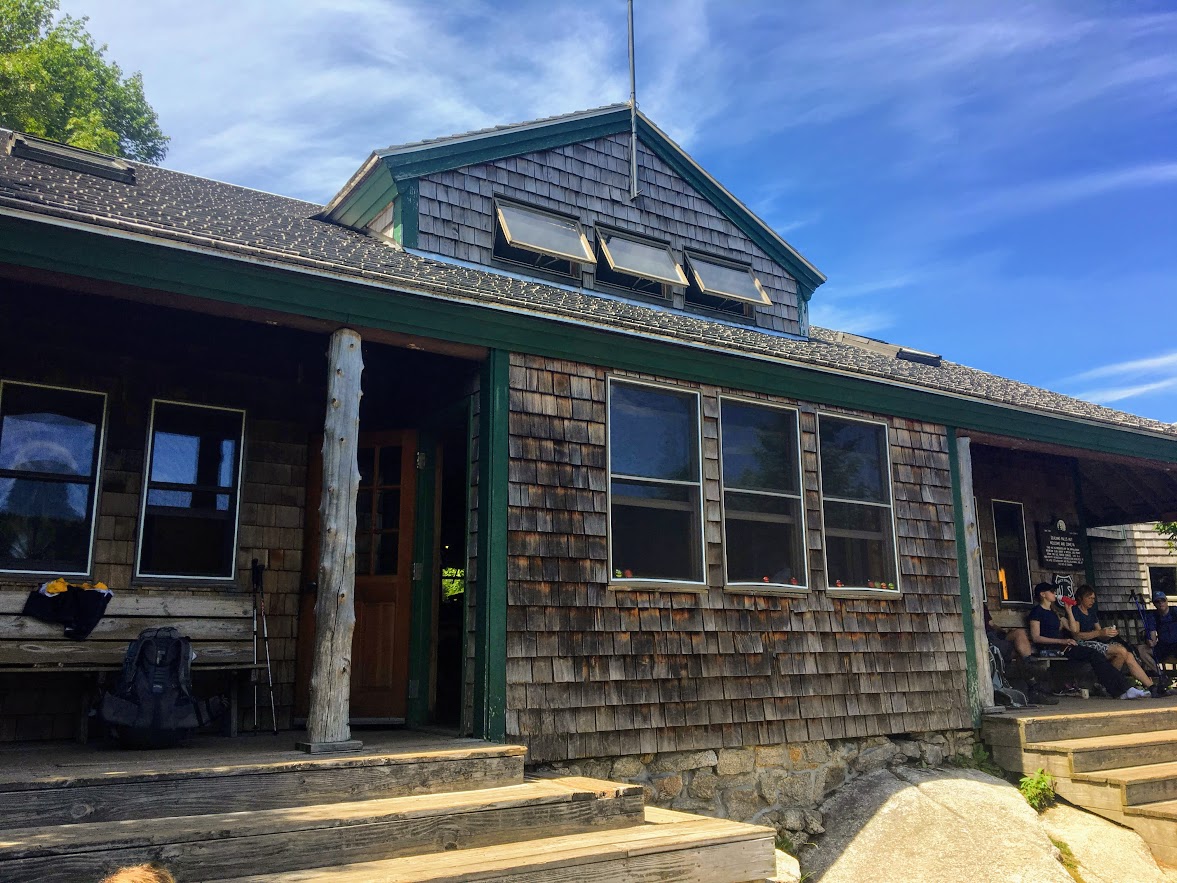
Not long after, I followed main path up the stone steps and caught up with my group at the hut. The hut is hidden by the woods. Once I reached the top, the hut just appeared. I can see my friends sitting on steps. I turned around and was welcomed with panoramic views. As with most AMC huts, this one is pretty cool. This hut sits hillside with a medium size stream bedside it that flows down to the falls. The inside is nice and can accommodate 36 people year round. This was a nice little break to enjoy the views from all angles.
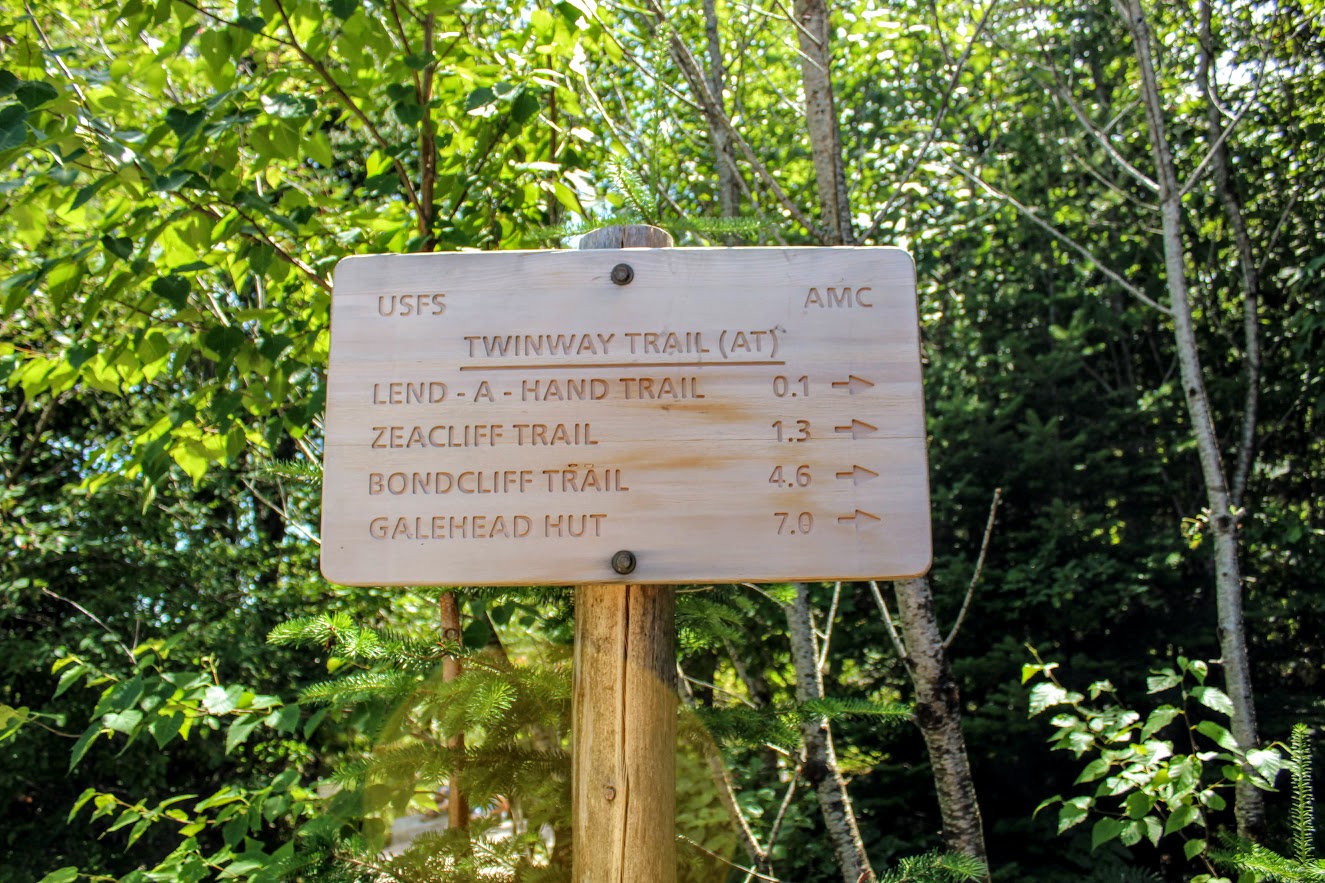
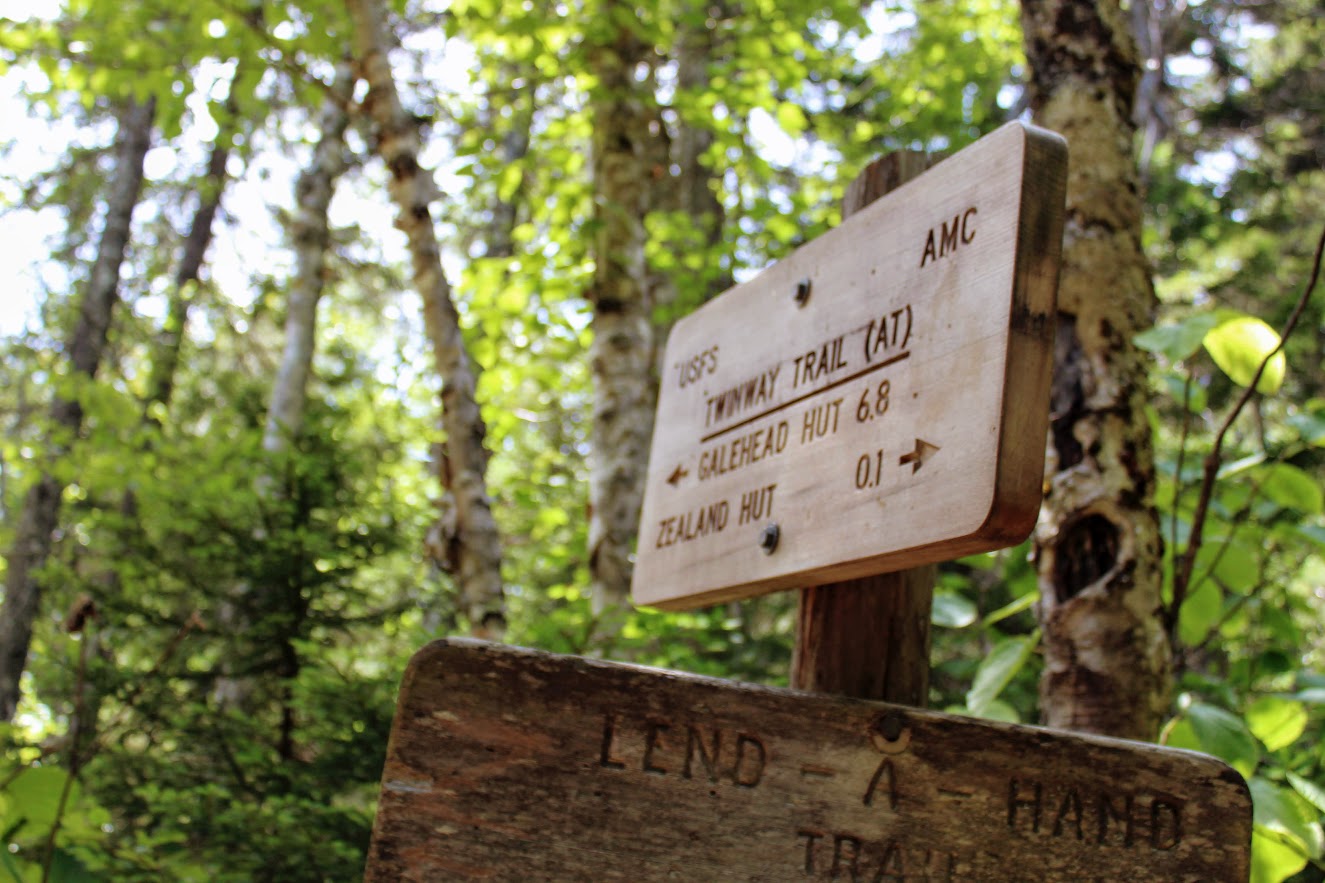
here is a sign by the stream that shows another 1.3 miles to the Zeacliffs. And, accordingly to my calculations, the hike will be 8.2 miles long. I was duped again by Corey. Heading away from the hut, turn left when arriving at the Lend-A-Hand Trail junction to stay on the Twinway Trail. The steep ascend continues from the Zealand Hut. We heard some odd noise ahead about 100 yards from the hut. We discovered the noise was from a water pump that drew water from the Whitewall Brook down to the hut.
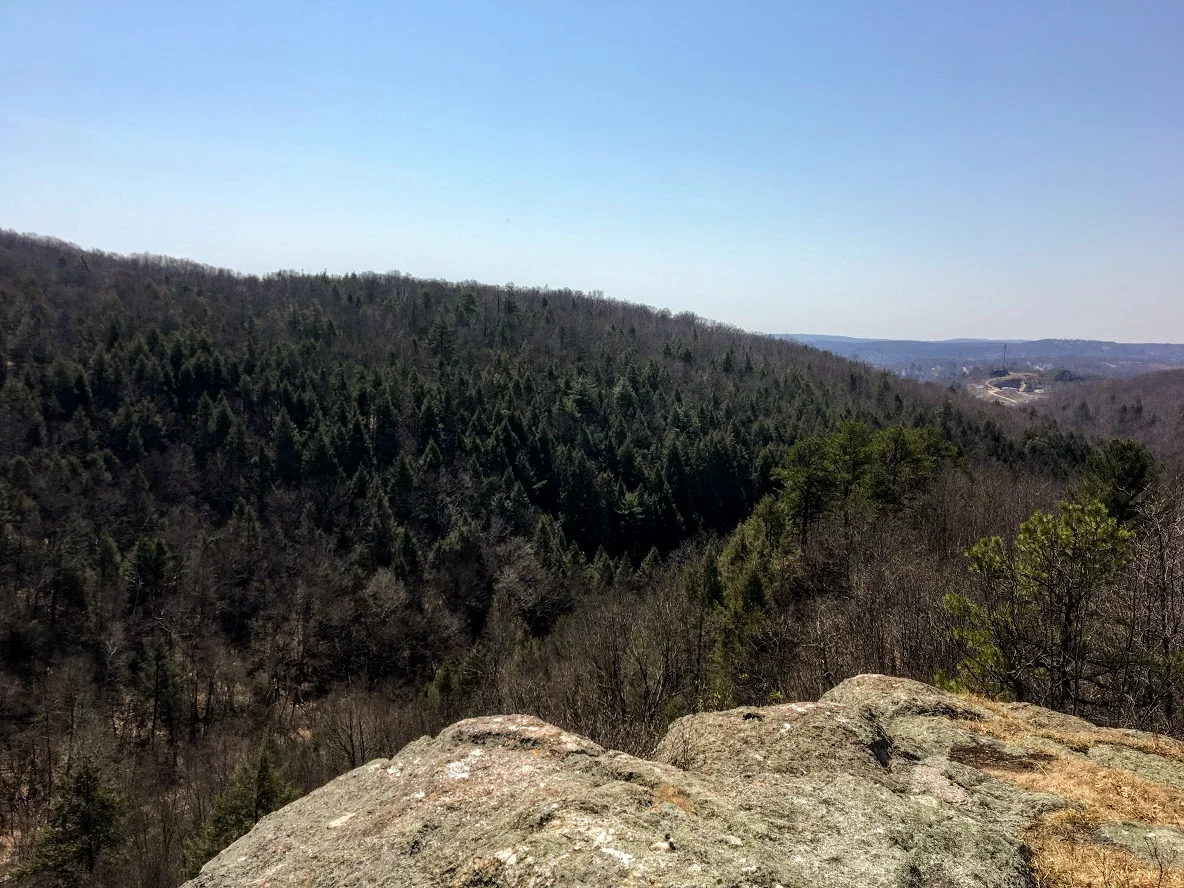
As the 1.3 mileage got closer, we all were urgently asking, “Are we there yet?” Finally, the trail leveled off and we saw a small sign on the left labeled , “View”. We made it! And, boy was it completely worth it. The sweeping vista over the Pemigewasset Wilderness was spectacular. The area was pretty crowded but we waited out for the prime spot to take pictures and take a lunch break. I was truly in awe and the skies were clear as day.
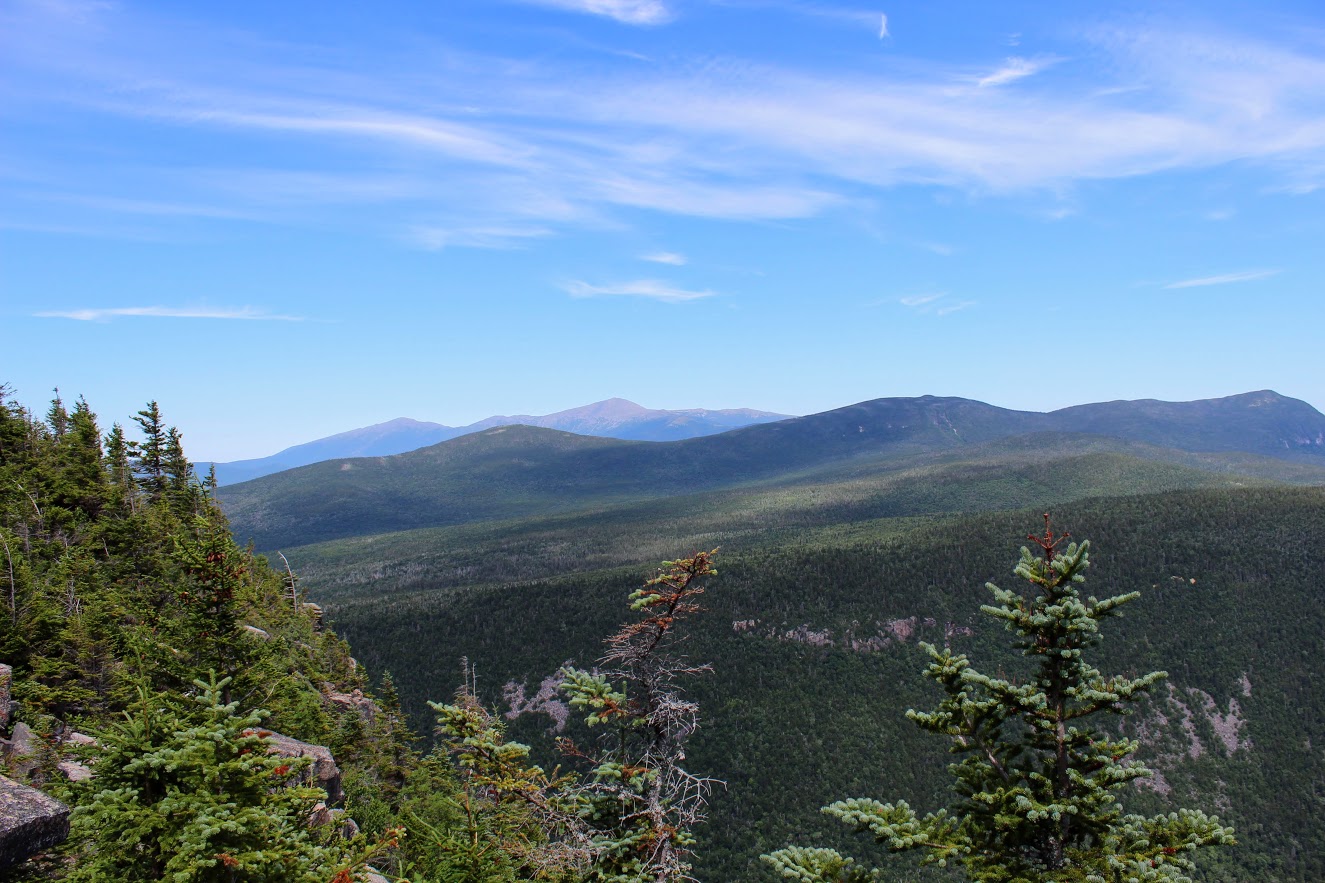

The Zeacliffs are the best views I have seen in the White Mountains to date. After soaking in all the views, it was time to go. We had another 4.1 miles to get back to the cars. If you wanted to reach the summit of Zealand Mountain, that would be another 1.6 miles from this spot. I read the views there are not as good but it would count towards the 48 4K footers. We were all ready to head back.

The descent on the way down was difficult until the path evened out. I took a tumble myself, fell right on my right buttocks, and my camera went flying. No one happened to catch that Kodak moment. Some rocks were very slippery. Always be cautious with a rocky environment. I would bring hiking poles for this hike and wear your best boots. And, keep a mental note of your surroundings. I was in the back of the group mostly on this hike by myself. A few times I came across some decisions that were questionable, but here I am writing this post today. Toward the very end, you will need to decide between two paths. I did not remember which one we took going up. Fortunately, they both take you to the parking lot.

The Zealand Trail to the Zeacliffs offers many types of scenery such as brooks, ponds, waterfalls, AMC hut, marshes, and some outstanding mountain views. Definitely one of my favorite New Hampshire hikes. The round trip took us about 6 hours. The trail was definitely crowded. But, the trails were wide enough where you wouldn’t be on top of other hikers. As I mentioned, this particular hike is 7.8 miles. Corey hoodwinked us yet again on the mileage but he did not disappoint with the hike. I would do it over again in a heartbeat. The challenging hikes stand out more and offer the best memories.

HIKING FOR DONUTS
A blog for the outdoors foodie enthusiast
Hi, I’m Mark. I live in Connecticut. I take new trips every chance I get. A good trip has a great hike, great food, and something fun to do. My goal is to search out new trips and share them to inspire others to try something new and exciting.
If you are looking for posts in a particular place, search by city or state here.
EXPLORE OTHER POSTS IN THE ARCHIVE
Archive
RECOMMENDED POSTS
MOST RECENT POSTS
See where I have been recently on Instagram. Follow @HIKINGFORDONUTS

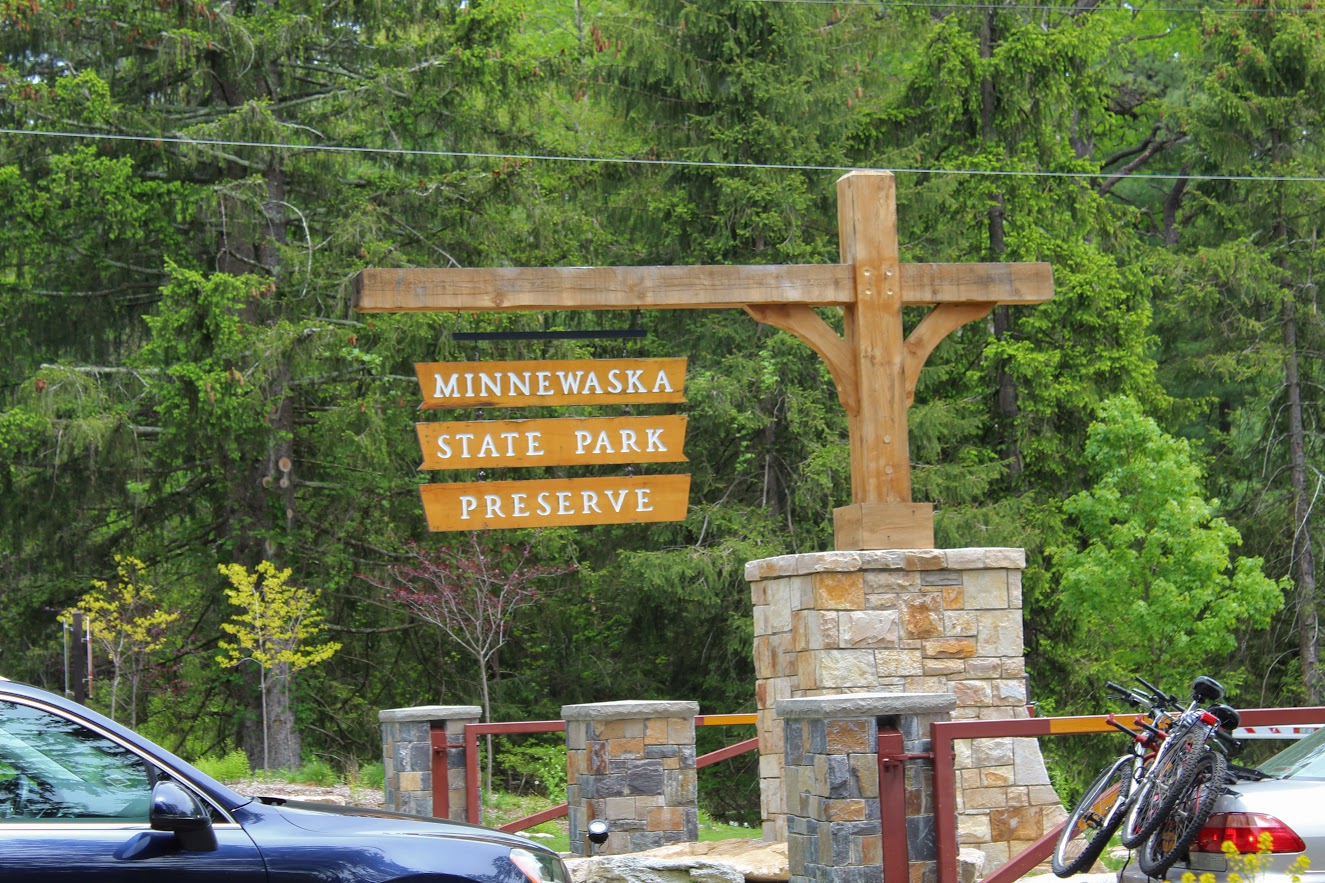
Minnewaska State Park Reserve
Minnewaska State Park Reserve Trail Guide (Kerhonkson, NY)
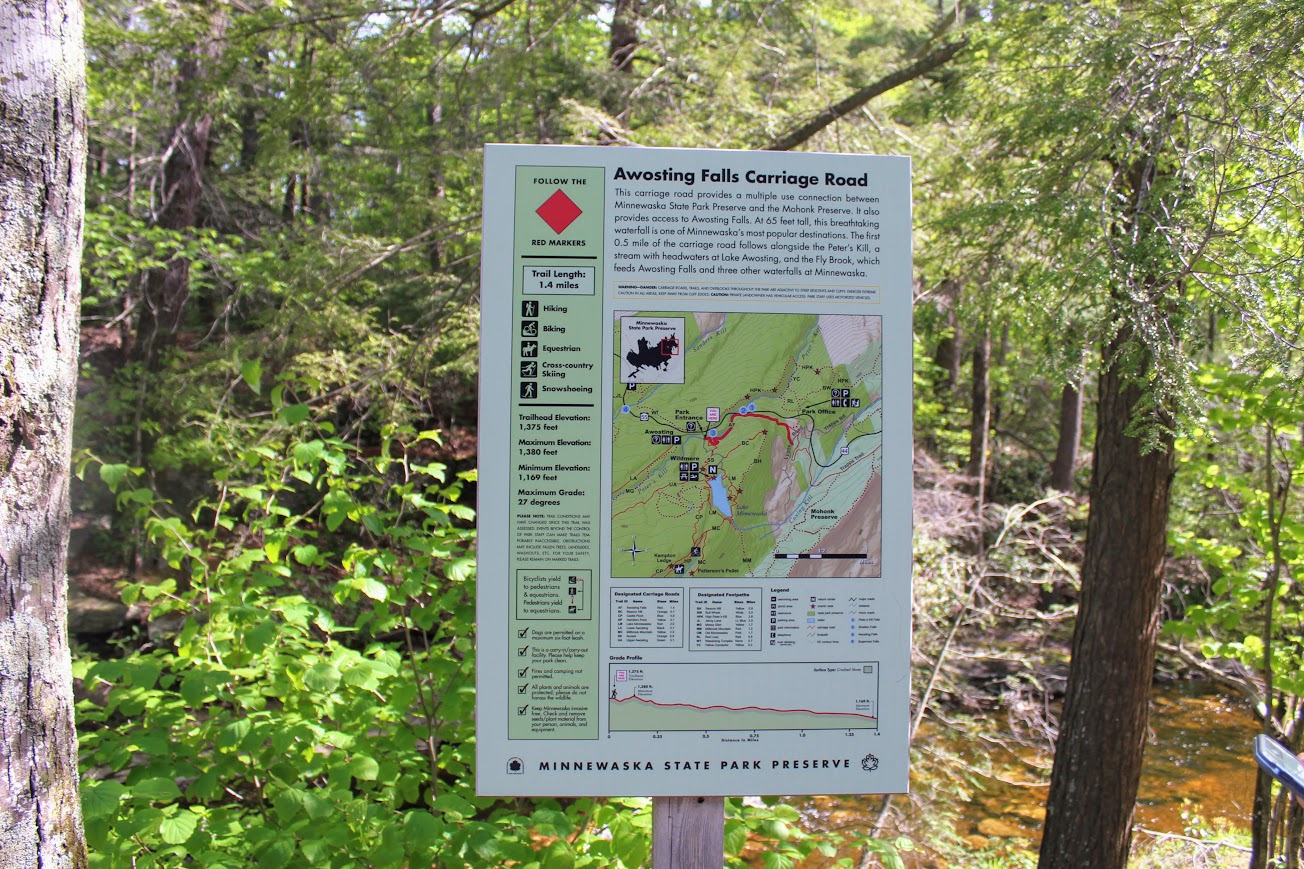
Minnewaska State Park Reserve is located in Kerhonkson, NY on the Shawangunk Ridge. The park is full of numerous awesome hiking trails to spend hours exploring. This post will cover Awosting Falls, Lake Minnewaska, and Kempton Ledge. Great picturesque views through out the hiking trails. A great visit visit to Minnewaska State Park reserve. Hiking for Donuts approved.
Trail Description: Minnewaska State Park Preserve is situated on the Shawangunk Mountain ridge. This park offers a variety of intersecting hiking trails that offer magnificent views. A great day hike consists of capturing Awosting Falls to cliff views off Kempton Ledge and back around Lake Minnewaska. This will offer best landscapes of the park.
Trail Info:
Where: Minnewaska State Park Reserve, Kerhonkson, NY Distance: 5.5 miles (4 hours) Difficulty: Moderate Trail Type: Loop Features: Views, Waterfall, Mountains, Lake, Cliffs, Views
How to get there:
The park is easy to find and it’s a cool drive. The address for the GPS is:
5281 Route 44-55, Kerhonkson, NY 12446
Once entering the park, you will pay the $10 parking fee at the guard shack. For this hike, pull straight ahead into the Awosting Falls parking lot.
Hiking Tips:
Get there early for a less crowded trail. It can be chaos.
There are no signs for the Kempton Ledge but there will be a big opening off the cliff ledge with a big open view. If you keep your eyes out, you won’t pass it.
The trails are well marked but there are areas that are not as obvious. Having a map will be handy.
The Hike
Finally getting around to some hikes I did in the summer! I have seen amazing pictures online of Lake Minnewaska. My girlfriend has told me memories of her hiking in this park and how much there is to offer. On this past Memorial Day Weekend, we decided to head to Minnewaska State Park Reserve in Kerhonkson, NY located on the Shawangunk Ridge. The park is full of many trails and provides some spectacular views of Lake Minnewaska and overlooks the Catskill Mountains. You can spend hours exploring or just come for a quick hike. The one downfall I was warned about it how unbelievably crowded this park can be. And, that was definitely the case. There are many parking lots in walking distance to pretty nice views and picnic table areas hence there will be lots of families. And, the trails are not that difficult. They are mostly carriage roads and can be flat. As one blog I read on this hike stated, you will find more peace and quiet at Walmart. However, the exploring of this park is completely worth it and there are many trails that are less trafficked.

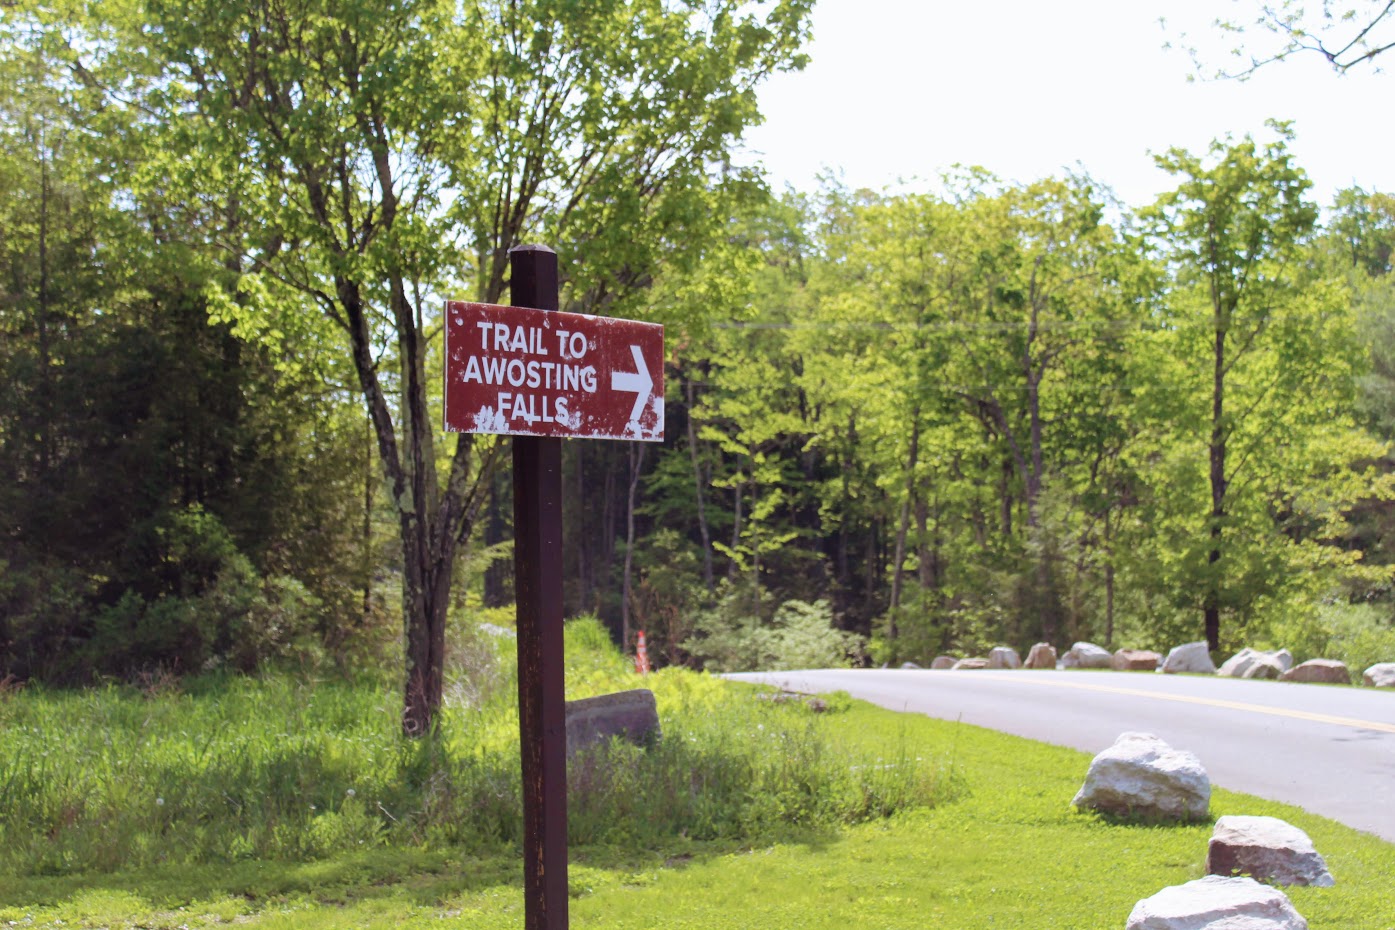
Given the knowledge of the potential crowds, we started our drive toward Minnewaska early and got there as the park opened at 9am. Note, parking will cost $10 inside the park. Not bad in my opinion. Once you enter the park, you will pay at the guard shack. There are many lots to park. Since there weren’t many people there yet, we pulled straight ahead into the Awosting Falls parking lot. The busier it gets, the further you will have to park from the guard shack. Our agenda for this day was to check out Awosting Falls, Kempton Ledge, and finish with trail around Lake Minnewaska. Once parked, we followed the signs to the Awosting Falls Trail.
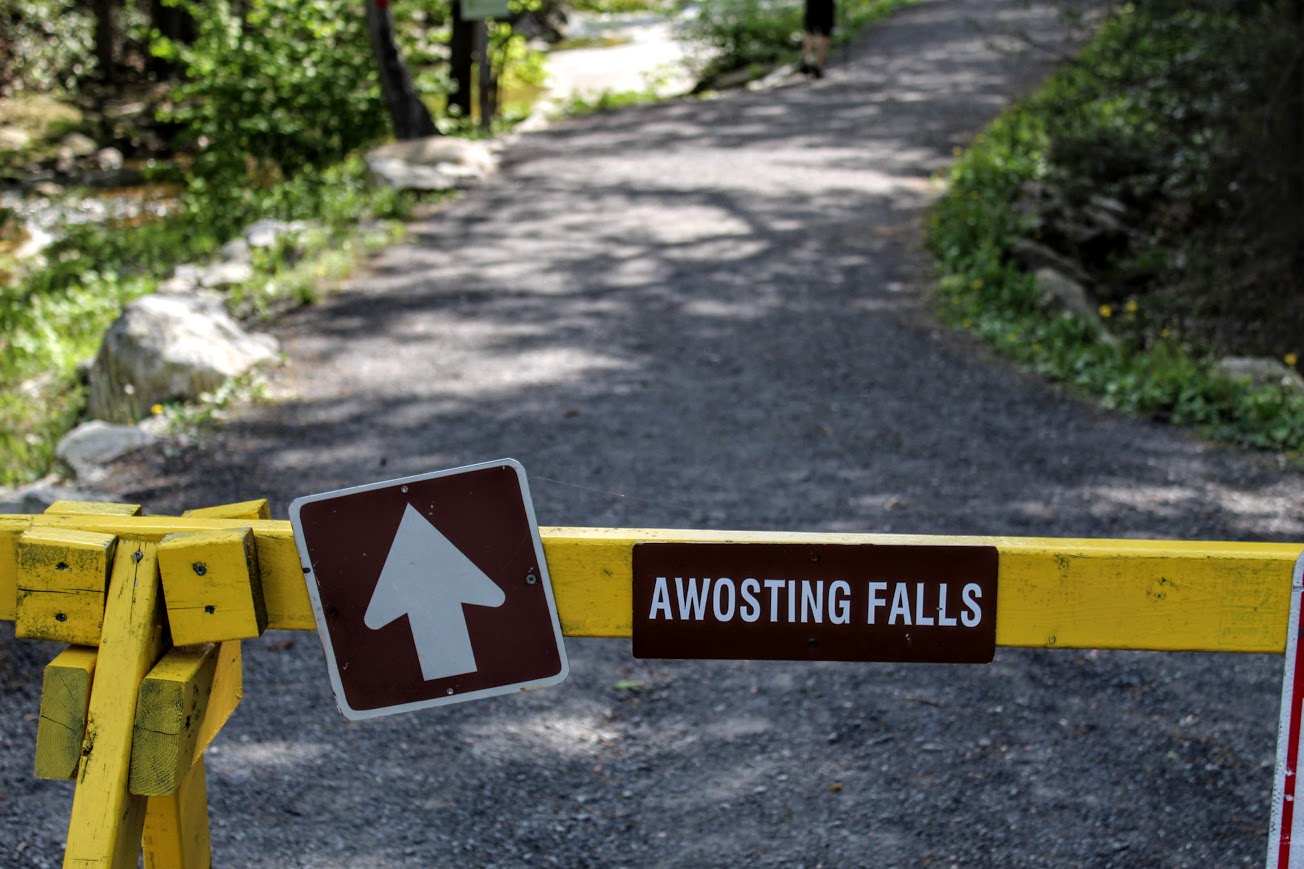
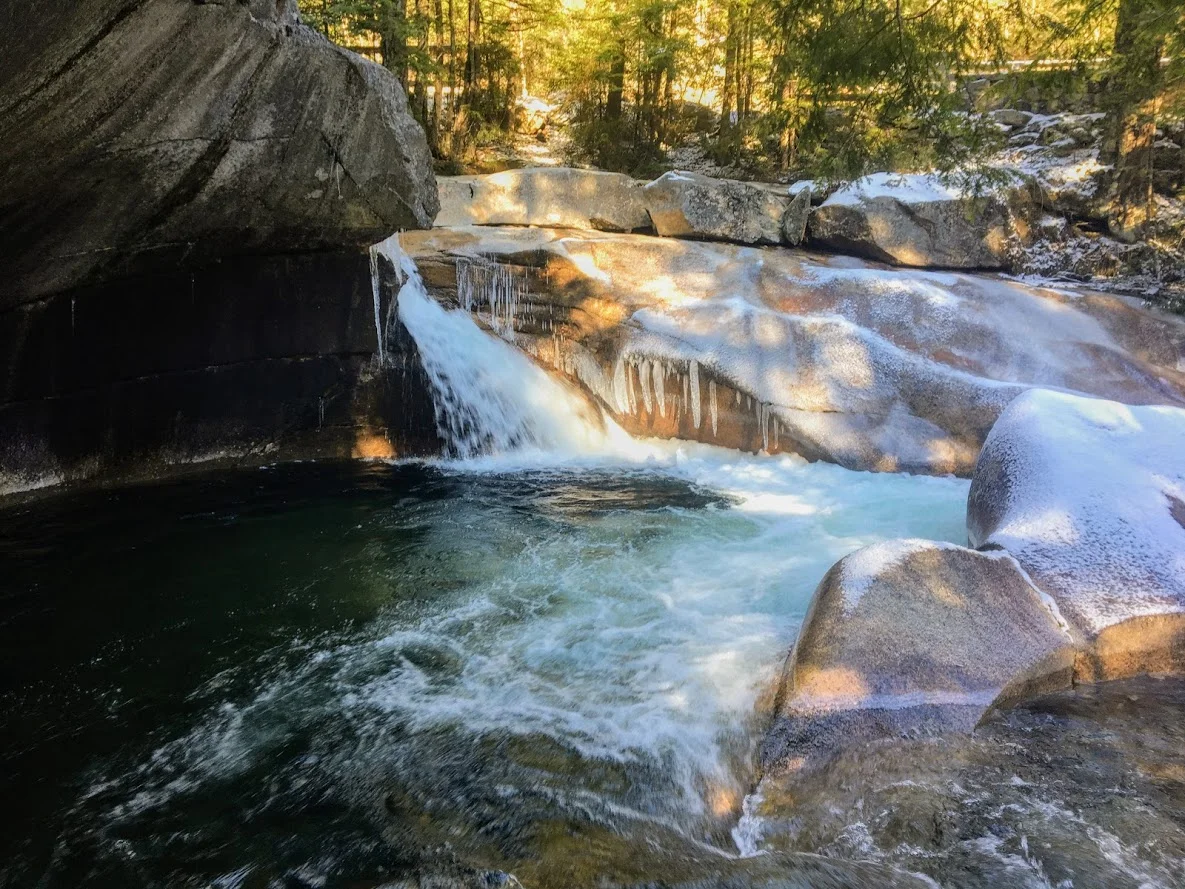
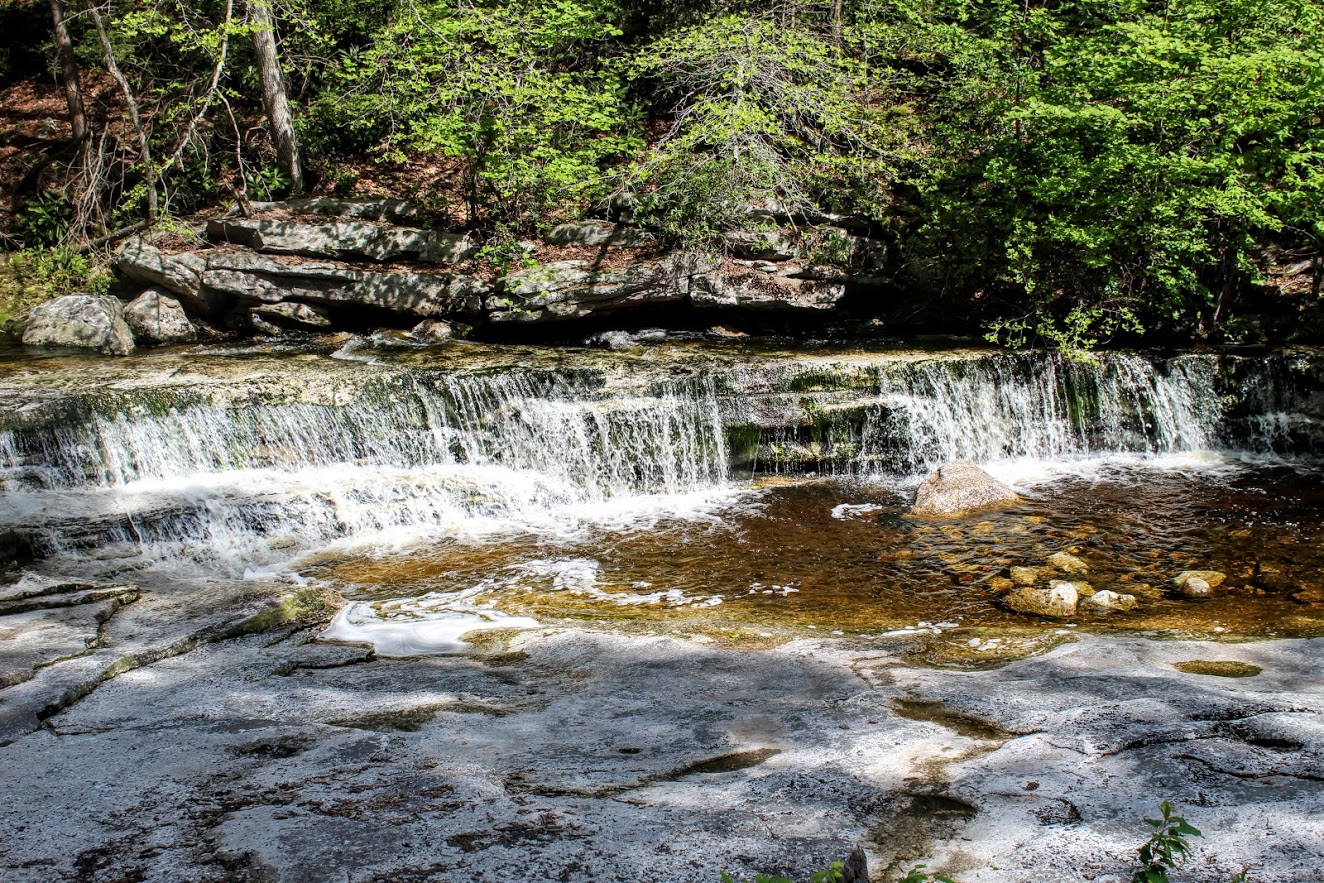
About a half mile from the parking lot, we found ourselves descending 60 feet into a wide open view of the falls. This is actually a decent size waterfall and there are multiple different viewpoints. You can climb the rocks up on the side of it and get close like I did. Meanwhile, Nichole got stuck videoing an engagement proposal. She was like did you see that? Not a chance, there was a waterfall in front of me!


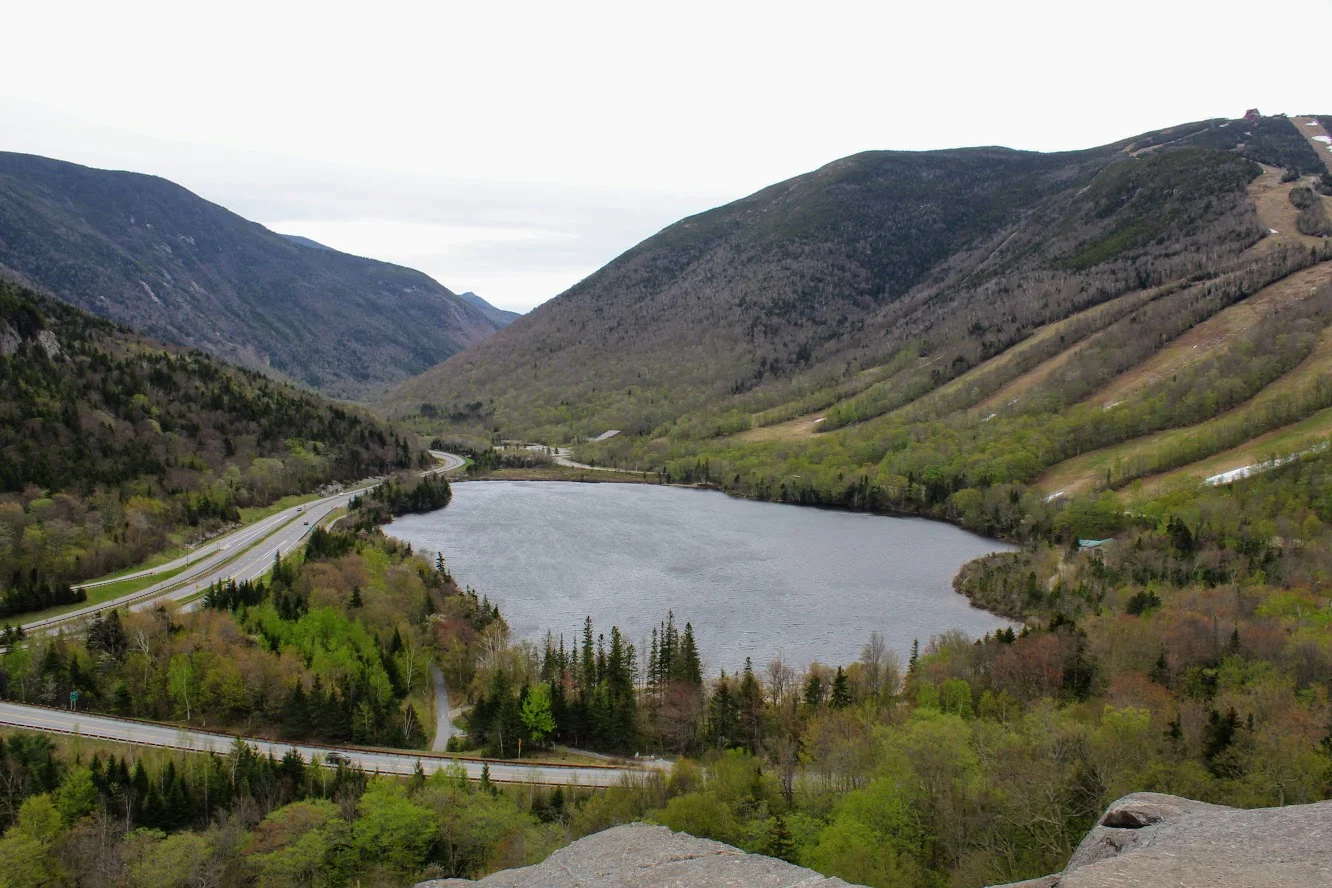
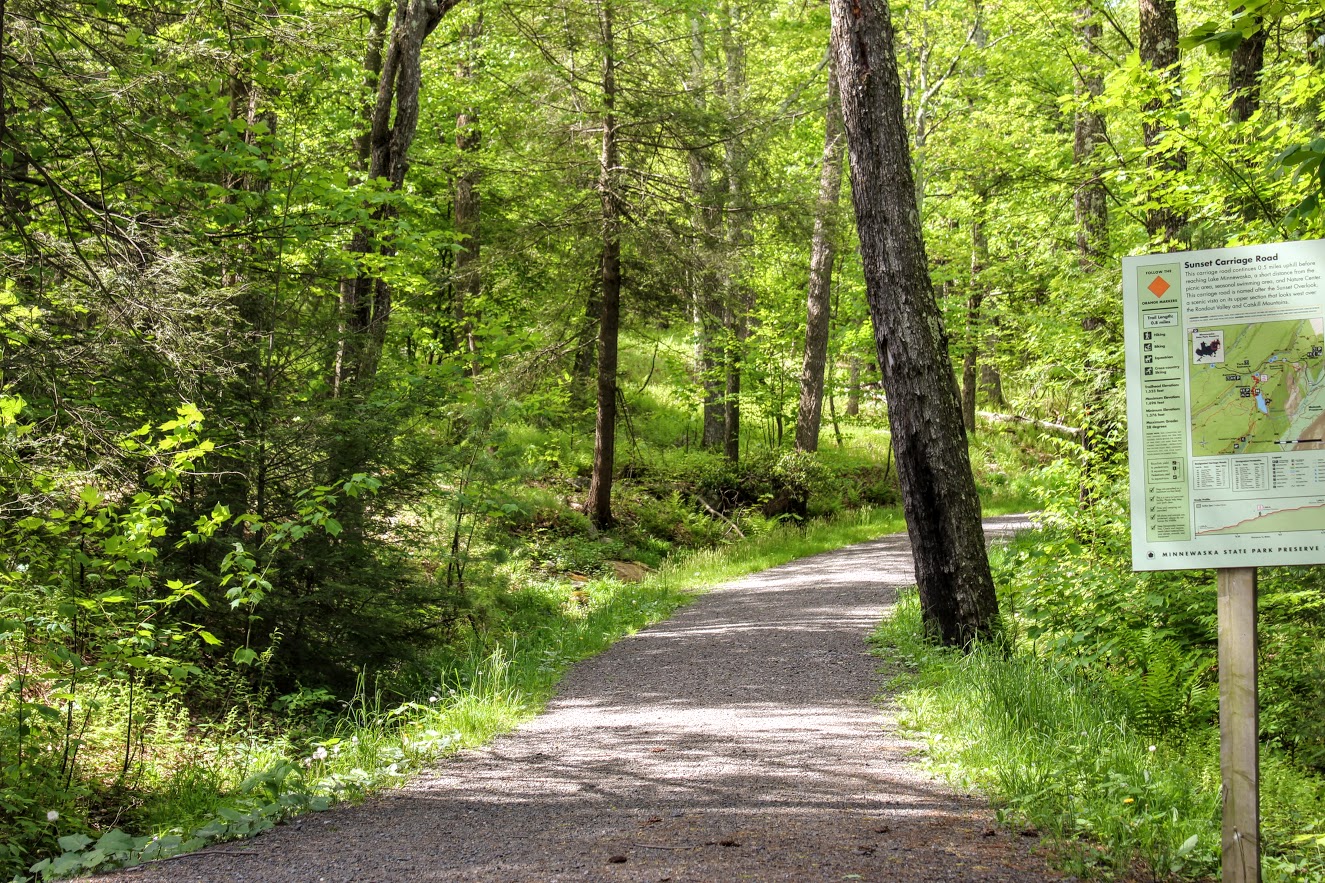
At this time, there was no one really at the falls so I took advantage of it. After taking a half hour of pics, Nichole was ready to get this hike moving along. We headed back the same way we came. We found the orange blazed Sunset Carriageway on our left as we approached the road. We started taking the trail up the switchbacks. As we got closer to Lake Minnewaska, we noticed the parking lot to our left. This is where you would park if you didn’t want to hike the fun way. We kept on the trail and started following the red blazed trail labeled “Minnewaska Lake Loop.” There is a pretty awesome lookout right away of the lake and the cliffs.

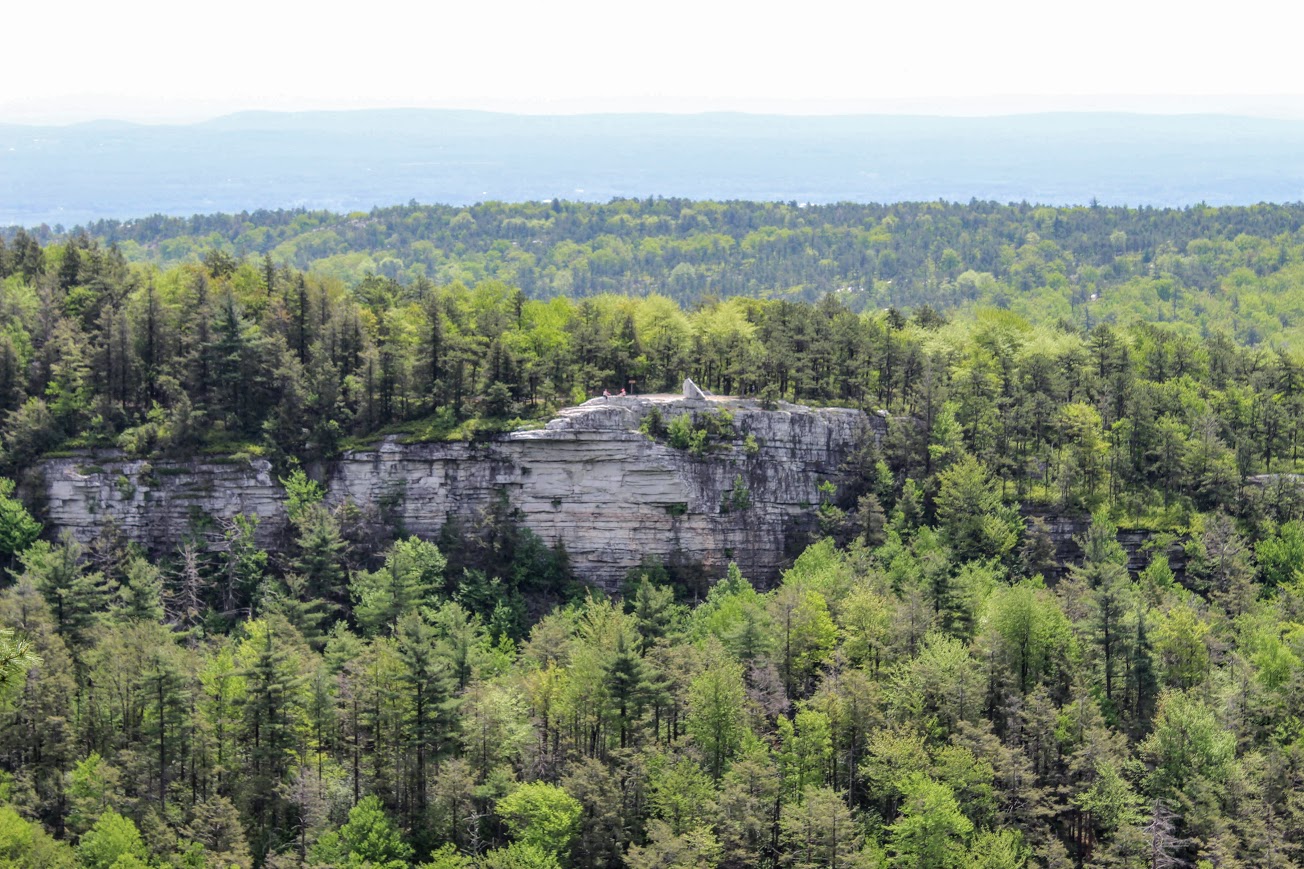
Continuing on the red trail, we passed the swimming beach that gave another gorgeous view of the lake. After that, we came up to the bathroom facility. Then we noticed the sign for the blue blazed Castle Point Carriageway on our right. That is what we needed to get to Kempton Ledge. After about 30 minutes, you will arrive at Kempton Ledge. There is no sign for it but once you see the ledge, you will know. There is an amazing view.


We headed back the way we came and took the first right you can to the Hamilton Carriage Road (will see sign). We kept going straight ignoring the merging trails. Eventually, this road led us back onto the red blazed Lake Minnewaska Loop and right down to the edge of the water. Here you will get great views across the lake. This is where you find all those who parked at the top. This can be a crowded section on a busy day.


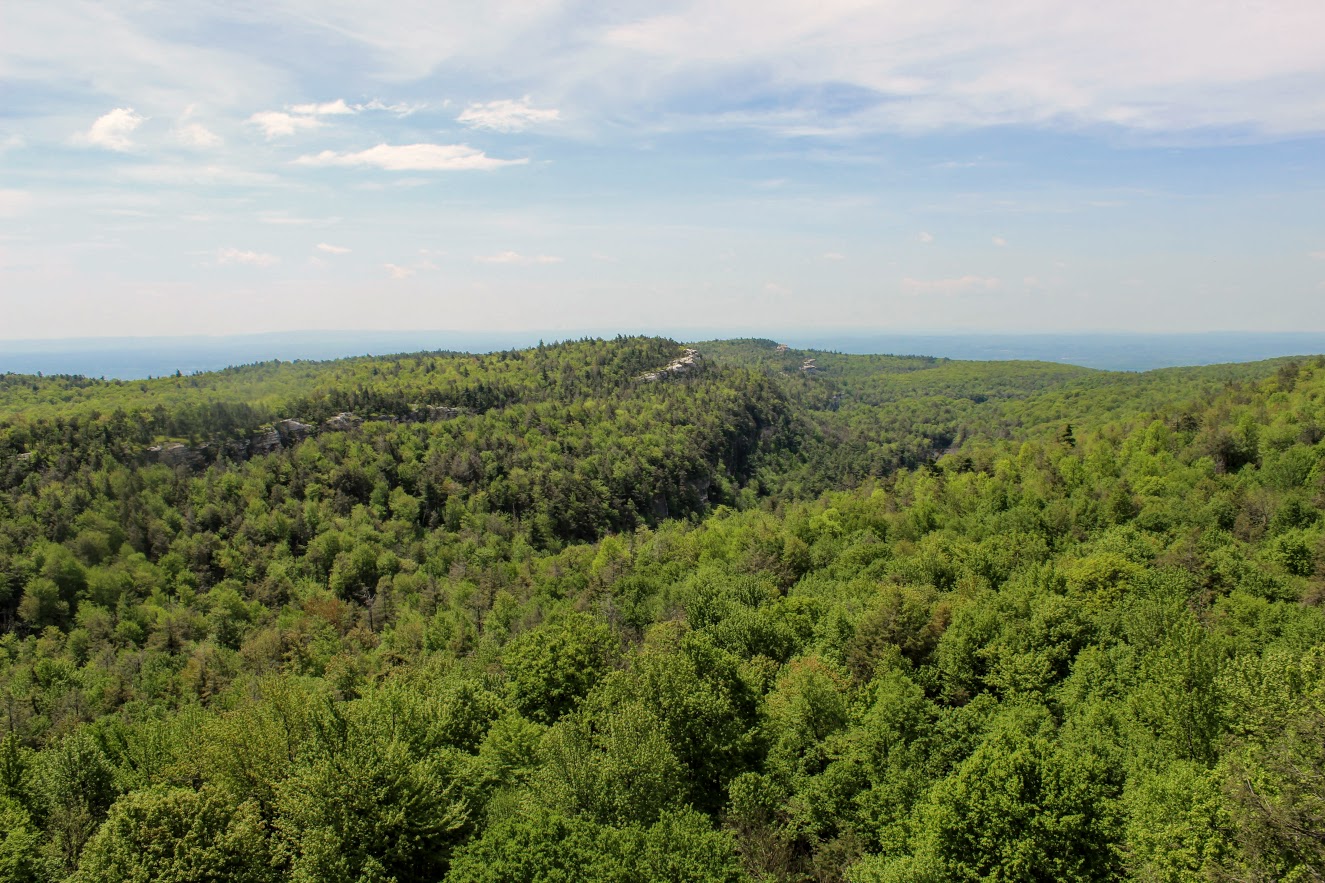
The red trail continues and becomes a little steeper. We noticed a viewpoint to our right that will display the Skytop Tower at Mohonk Mountain House. The skies weren’t as clear as we hoped this day but still a great view. After this, we kept climbing at the fork toward the white cliffs.

There was a wide open picnic area as we approached the top. We walked across the grass toward the cliffs and views of the lake. We decided to take a quick lunch as the views were beautiful. And, there was some solitude at this particular time.


After absorbing the views, we headed back around the lake staying as close to the lake as we could. The trails become less marked around this area. Looking for more red markings, we passed some private property and porto-potties. Taking the middle road to the left of the porto-potties, we walked by an open field of many picnic tables and families. This path gave us one last look of Lake Minnewaska before we reached the parking lot again. The orange trial (Sunset Carriageway) was on our right and we took that the same way we came up down the hill back out to the road. Following the signs to Awosting Falls parking lot, we made our way back to the car.


I had a blast on this hike. Minnewaska State Park Reserve has so much to offer. You can choose your trail and go as far as you like. There are so many awesome views to see. Yes, it can be crowded but I would just plan accordingly. I suggest going early because we didn’t hit the crowds much. And, you will know which trails will have more traffic, closer to the lake and the waterfall. The hiking paths are really wide and flat. Our hike on this day was just around 5.5 miles. This took us about 4 hours but I also was a photo whore so you can knock off 30-45 min from that. I would say it was easy to moderate only because of the mileage. I look forward to coming back to this park. Afterwards, we drove into the downtown area of New Paltz, NY that was about 10 minutes away from the park. And there were cool shops, restaurants, donuts, and a brewery. That is what I’m talking about! Hopefully I will be exploring more of what the Hudson Valley has to offer.


HIKING FOR DONUTS
A blog for the outdoors foodie enthusiast
Hi, I’m Mark. I live in Connecticut. I take new trips every chance I get. A good trip has a great hike, great food, and something fun to do. My goal is to search out new trips and share them to inspire others to try something new and exciting.
If you are looking for posts in a particular place, search by city or state here.
EXPLORE OTHER POSTS IN THE ARCHIVE
Archive
RECOMMENDED POSTS
MOST RECENT POSTS
See where I have been recently on Instagram. Follow @HIKINGFORDONUTS
Ninham Mountain Fire Tower Hike
Ninham Mountain Fire Tower Trail Guide (Carmel Hamlet, NY)
Hiking Ninham Mountain Fire Tower in NY. Another great Hudson Valley, NY hike. Easy hike, beautiful views.
Trail Description: Ninham Mountain Fire Tower is a short hike that provides an amazing 360 view of rolling hills, lakes, and reservoirs from the top. A glimpse of the Catskills can be visible with clear skies.
Trail Info:
Where: Ninham Mountain Fire Tower, Kent, NY Distance: 1.3 miles (1 hour) Difficulty: Easy Trail Type: Out and Back Features: Fire Tower, Lake, Views, Rolling Hills, Reservoir
How to get there:
As always, do your research on hikes. I read that finding the trail parking was an issue for some hikers. Luckily, I saw that and made sure we had the right directions. We found it pretty easy. It is in the middle of nowhere. The GPS I would enter is Mount Nimham Ct, Carmel Hamlet, NY 10512. This took us on the Taconic State Parkway. Once we were on Gypsy Trail Road, we made another right onto Mt. Nimham Ct. You will see a sign for Ninham Mountain Multiple Use Area. Follow this all the way down until you see the parking lot.
Hiking Tips
Finding the parking lot can be tricky.
The old stone chambers are directly across the parking area. This may be covered by bushes.
The Hike
Traveling through the Hudson Valley area once again, I was in search of a shorter hike. Always need to walk off the beer and donuts from weekend activities. I have a huge list of hikes to do in the area, but my girlfriend and I had some time constraints driving back to CT. Thankful for other hiking bloggers, I came across Ninham Mountain Fire Tower in Kent, NY. The hike was more of a walk with an incline, but the views were fantastic from the fire tower.
Wonder Lake.
Look for these signs at the entrance.
Where the Trail head starts. Parking area is to your left.
The trail head will start behind the gate. Before you even start, don’t miss the old stone chambers directly across the parking lot behind you like we did. We didn’t notice until we were ready to leave. The only reason we had these on our mind was that we read this area was full of paranormal activity. I took my pictures and walked away. I’m no ghost hunter.
Old stone chamber.
Now, onto the hike. Just continue up the gravel road. The trail is uphill but it’s not bad at all. Nothing too difficult but still a good workout. This seemed to be a popular trail for mountain bikers as well. It took us about 15-20 minutes to reach the fire tower.
pretty easy gravel road.
all the way up.
Ninham Mountain FIre Tower
The 360-degree view at the top of the tower was amazing. It was beautiful weather and a clearly visible day. You will see rolling hills, lakes, and reservoirs. The Catskills are also visible in the distance. After you have soaked it all in, you will come back down and walk the same path to your car. Pretty quick and easy. There are some trails you will see off the path but I can’t speak to those.
clear skies and rolling hills.
the money view.

Rolling hills a little closer.
Little overcast on this side of the tower.
Round trip and going up & down the fire tower, this is a total of 1.3 miles. This took us less than a hour. I am glad I came across this spot in my research. If you want the most bang for your buck, this jaunt checks all the boxes including a spectacular view.
HIking for donuts models.

HIKING FOR DONUTS
A blog for the outdoors foodie enthusiast
Hi, I’m Mark. I live in Connecticut. I take new trips every chance I get. A good trip has a great hike, great food, and something fun to do. My goal is to search out new trips and share them to inspire others to try something new and exciting.
If you are looking for posts in a particular place, search by city or state here.
EXPLORE OTHER POSTS IN THE ARCHIVE
Archive
RECOMMENDED POSTS
MOST RECENT POSTS
See where I have been recently on Instagram. Follow @HIKINGFORDONUTS
Elephant Rocks State Park
Elephant Rock State Park
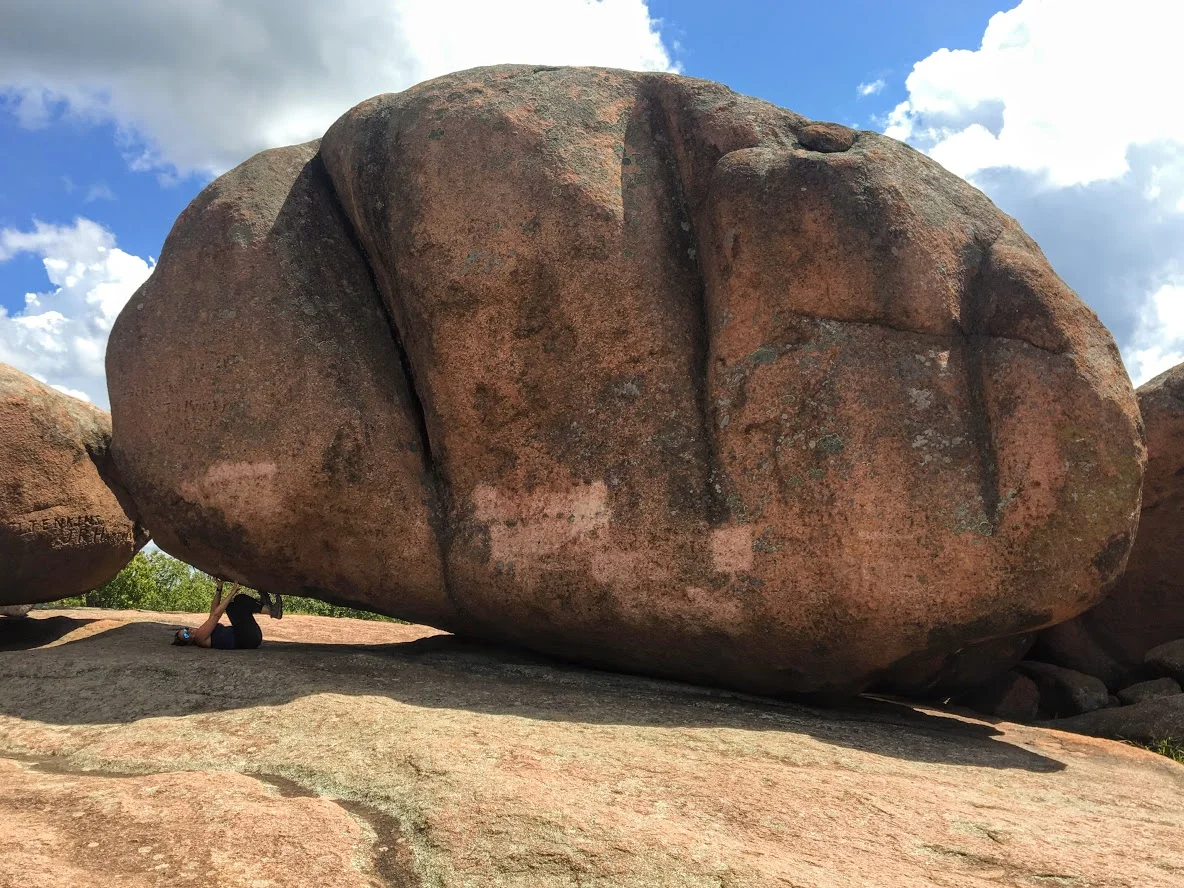
Trail Description: Located in Southeast Missouri, Elephants Rocks State Park has a unique attraction. The trail will lead you to large granite boulders which resemble a train of pink circus elephants.
Trail Info:
Where: Elephant Rocks State Park, Belleview, MO Distance: 1.4 miles (1 hour or until you are done exploring) Difficulty: Easy Trail Type: Out and Back Features: Boulders, Water, Quarry
How to get there:
The park was easy to find via GPS. However, you may lose cell signal nearby so make sure your map is up already. Here’s the address to put in your GPS:
7406 MO-21, Belleview, MO 63623
Hiking Tips:
This is a very popular destination. Prepare for crowds.
The Engine House Ruins Trail is less crowded and worth hiking.
The Hike
My trip to Missouri continued to mystify my original thoughts of the state. Prior to my visit to St. Louis, I stumbled upon online Elephant Rocks State Park. The main attraction for this park is there is the line of giant, 1.5 billion year old granite boulders that stand end-to-end, like a train of circus elephants. The pics looked intriguing online.This is a 2 hour drive south from St. Louis. I wasn’t sure if it was worth the drive. However, it just so happens, I chose another hike nearby and figured why not throw this in afterwards. Smart decision, always go all in on exploring in new areas. This park did not disappoint me.
Park entrance sign.
Elephant Rocks State Park is located in the St. Francois Mountains in Belleview, Missouri. The park was easy to find via GPS. Being labor day weekend, the park was packed. There is ample parking for lots of people. Picnic tables are scattered before the trail begins. There are bathroom facilities. Families can have picnics, enjoy the outside, and take their kids for some fun exploring the boulders. This is definitely a tourist hotspot.
Parking area , Boulders, And aMerica.
There are two trails to explore through the park. The main trail is called the Braille Trail. This is a self-guiding trail that winds among the rocks and takes you throughout the park. This is paved and accessible for people with disabilities, physical or visual. At different areas of the trail, we noticed interpretive signage with information of the landscape and the history of the park. The trail is one mile and marked as red. There are various viewpoints and we kept walking off the trail to explore more of the boulders.
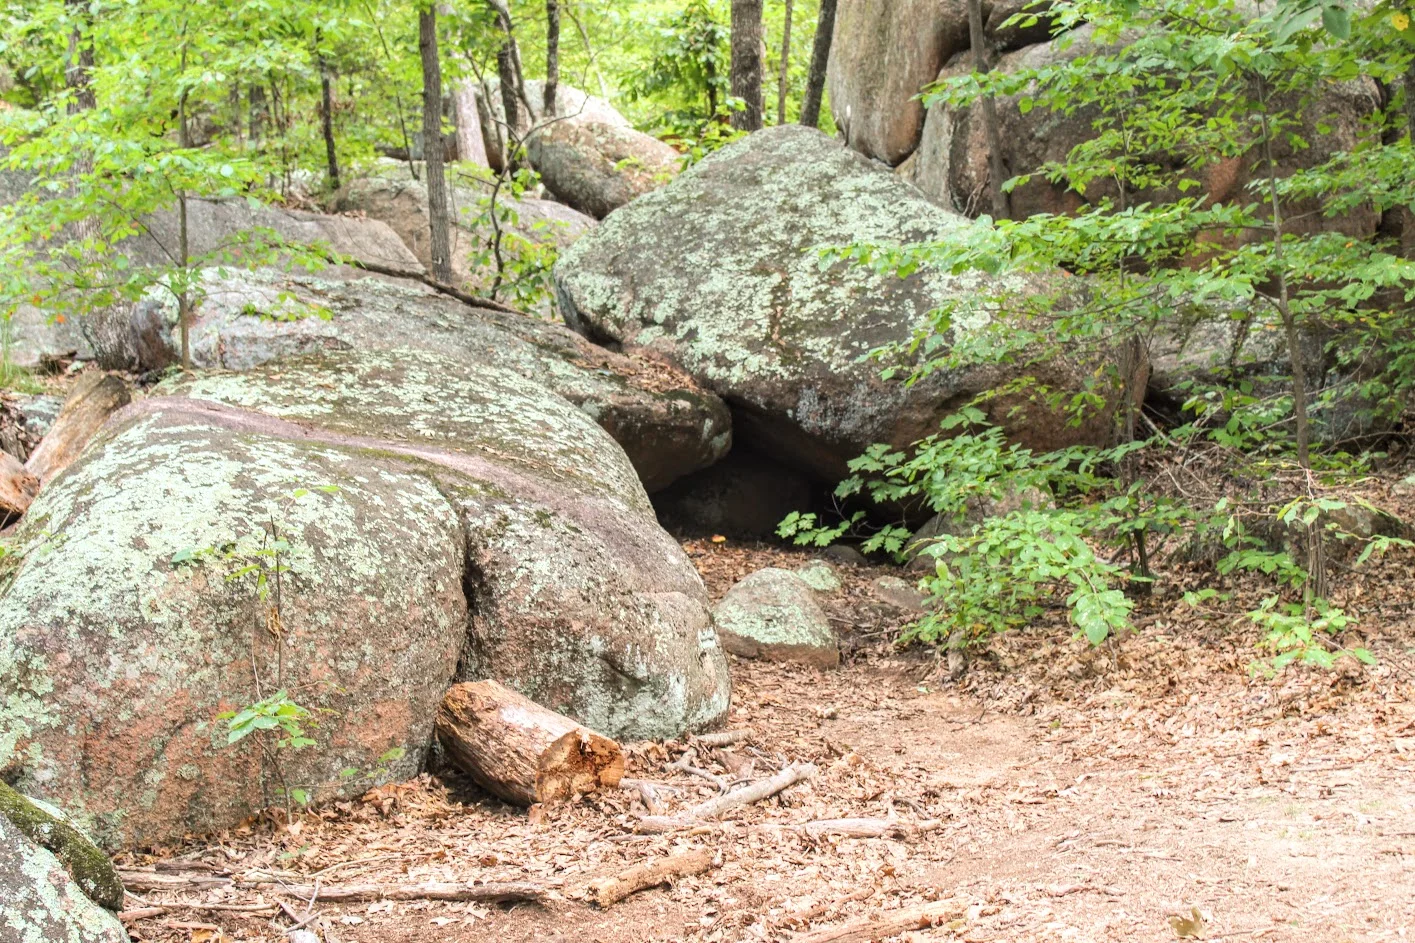


Once we reached the old engine ruin house, we noticed the blue marker trail to our left for the Engine House Ruins Trail. The terrain is more rugged but still easy. This added another 0.4 miles, which leads around the back side of the old quarry that connected us back to the Braille Trail. We followed the blue arrows on the trees and did our thing. There is some fun climbing that can be done on this section. Along with views beyond the bluff. Not many people tend to add this section of the hike so it was a nice break from the crowd.
old engine ruin house


pretty cool, this is in the middle of the park.
views from the top.
taking it all in. the best part.
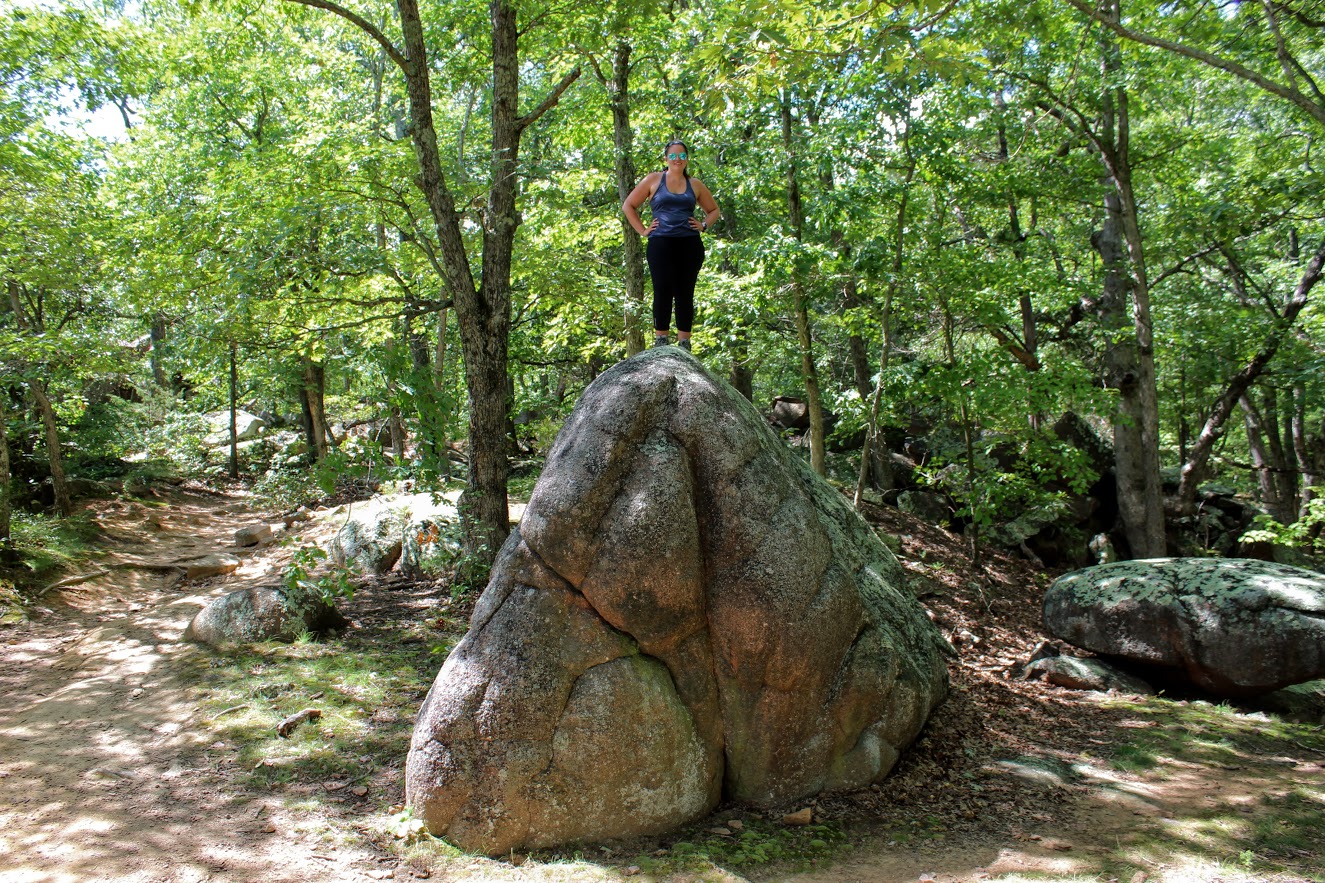
After connecting back to the Braille Trail, we slithered through the rocks and made our way to the giant boulders. Once I got the full view, I understood where the name of the park was derived. I could see the elephant like figure. Due to the crowd, it was tough to capture how breathtaking it was in person. Everyone was climbing between the boulder and snapping selfies. Children are fascinated by the size of the boulders as they enjoyed climbing. I found myself scaling the boulders and didn’t want to leave!


Trying to get a good picture amongst the crowd.
The elephant’s trunk rock.
rocks.
more exploring.
We ended up spending about an hour and half enjoying the park. That is about all you need. Very easy, go at your own pace and enjoy type of hike. And, if you want, you can throw in some climbing. When I booked a trip to St. Louis, did I anticipate incredible landscapes and geological boulders in the heart of Missouri? Heck no. But I am sure glad I got to experience them. The fun part about traveling is finding gems like Elephant Rock State Park.
Wow so strong!
Well….hello there. Just doin’ some climbing.

HIKING FOR DONUTS
A blog for the outdoors foodie enthusiast
Hi, I’m Mark. I live in Connecticut. I take new trips every chance I get. A good trip has a great hike, great food, and something fun to do. My goal is to search out new trips and share them to inspire others to try something new and exciting.
If you are looking for posts in a particular place, search by city or state here.
EXPLORE OTHER POSTS IN THE ARCHIVE
Archive
RECOMMENDED POSTS
MOST RECENT POSTS
See where I have been recently on Instagram. Follow @HIKINGFORDONUTS
Lone Elk Park, St. Louis County, Missouri
Lone Elk Park is located in St. Louis County, Missouri. This park is only 35 minutes from downtown St. Louis and is a must visit bucket list. This park offers you a great nature adventure without needing to get out of your car. I never thought I would find elks and bison roaming in Missouri. This was an fun and exciting adventure. Read more about this in my latest blog!
I bet if I were to tell you, within a 35 minute drive from downtown St. Louis you would find a park that was reminiscent of Yellowstone National Park; you would think I am out of my mind. Lone Elk Park gives you that type of experience. Don’t get me wrong, it is nowhere near the size of Yellowstone, it is pretty small in comparison (only 2600 acres). Nor does it offer any of the landscape of Yellowstone. However, being able to drive among wild animals in nature from your car is a very cool experience that reminded me of when I was in Yellowstone. Again, at a very smaller scale. But come on, this is in Missouri!!! Who would of thought? As the name of the park states, you will see a huge elk population roaming. In addition, you will see bison, wild turkey, waterfowl, and deer. Essentially, you drive a loop around the park that takes about 30 minutes and hope to see some animals walking around. And, the park is totally free!
Entrance to the park. Veer left.
The park is tucked away in Valley Park, around Hwy 44 and Hwy 141. It is very easy to get to via gps. The park opens around 7am in the summer and *am in the winter. After doing some research online, I read the best time to see animals out is early in the morning or late at night before the park closes (sunset). Pretty good advice.
ELk butt.
We drove in from our hotel and got there around 8am. We pulled up to the park entrance. There is a bird sanctuary to your right if that is what you like. You will see the caution signs to stay in your car. Within the first 20 seconds of driving in, Nichole says to me, “Umm…is that fake?” And I responded, “Oh snap. That is as real as it gets”. The first animal we see in the middle of the road was a massive male elk with huge antlers. It honestly did look like a statue from far away. We crawled slowly past the elk and it was almost arm’s length away from the car. We made sure not to make to make it angry. We had a small rental car and this guy would tear it up.
this is real. First Elk we saw. Massive.


Great view of the lake and ELk.
As we proceeded, we saw more elk in the woods and a herd to our left as we saw a full view of the lake. We continued to drive along the loop and we started seeing more deer and wild turkeys. The deer here were big guys. We passed the lake and once that was behind us, we started to enter the bison area. You we see more signs here as they want to make sure no one gets out of the car. On this morning, we did catch a few bison out in the fields but they were further away. Not as close as the elks. After that, there isn’t much to the drive and the exit was upon us.


The great thing about this park is you can keep driving around as many times as you want. We wanted to take one more loop to see if more animals came out. Unfortunately, they moved further away the second time. But worth a shot. Also, the park does have hiking trails where you can be out in the open and potentially cross paths with the animals. On your feet or in your car, be careful. Bison and elk will gore you or your car.
Second time around the elk went to down the water. The model stayed put.
That’s where they went.
MOre of the big elk in the lake.
This was first time Nichole has seen wildlife like this so close. It was a cool experience. Note, if you want pictures, make sure you are driver side. I went in the back seat. No way was I driving, too excited! Definitely glad we came across this place in our research and made the drive. If you are visiting, this is a must add to your list. It is a great opportunity to get in touch with nature and you don’t even have to leave your car.
Lake views from the top of the hill.
I don’t trust turkeys.

HIKING FOR DONUTS
A blog for the outdoors foodie enthusiast
Hi, I’m Mark. I live in Connecticut. I take new trips every chance I get. A good trip has a great hike, great food, and something fun to do. My goal is to search out new trips and share them to inspire others to try something new and exciting.
If you are looking for posts in a particular place, search by city or state here.
EXPLORE OTHER POSTS IN THE ARCHIVE
Archive
RECOMMENDED POSTS
MOST RECENT POSTS
See where I have been recently on Instagram. Follow @HIKINGFORDONUTS
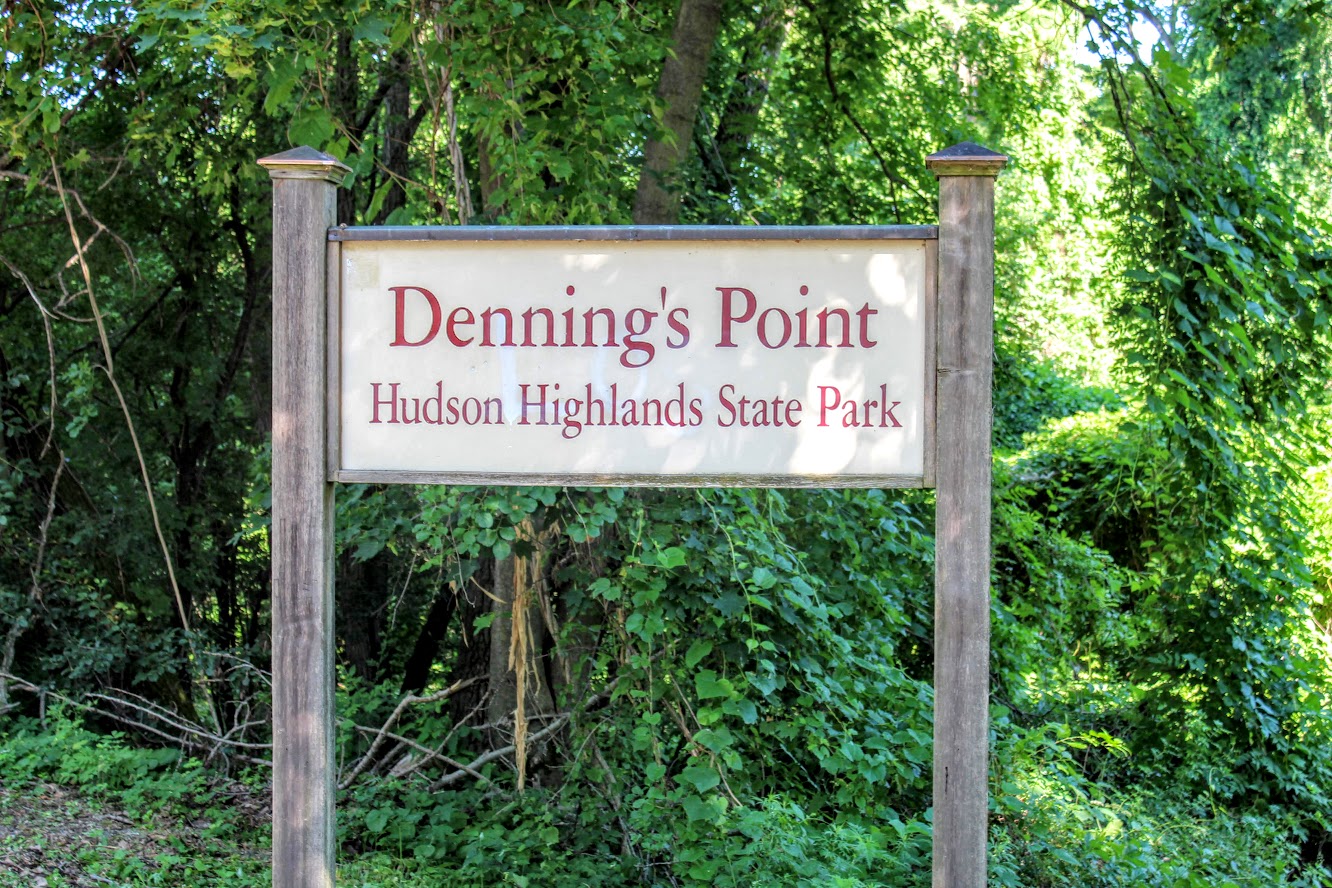
Dennings Point, Long Dock Park, Beacon, NY
Lock Dock Park Beacon, New York: Klara Sauer Trail to Dennings Point Trail
Trail Description: The Klara Sauer Trail is a flat walk until you meet up with the Dennings Point Trail along the shoreline. There are short access trails for views of the Hudson River and a beach with mountainous lookouts, where kayakers will often stop by onshore.
Trail Info:
Where: Long Dock Park, Beacon, NY Distance: 2.8 miles (1.5-2 hrs) Difficulty: Easy Trail Type: Out and Back Features: Bridge, Water, Mountains, Beach, River
How to get there:
GPS this address below. Easy to find.
23 Long Dock Rd Beacon, NY 12508
Hiking Tips:
At the time of my hike, storm damage caused trees to block the trail paths. If this is the case, turn around and go back the same way.
Make sure to stop at all access trails for additional views. Including the beach!
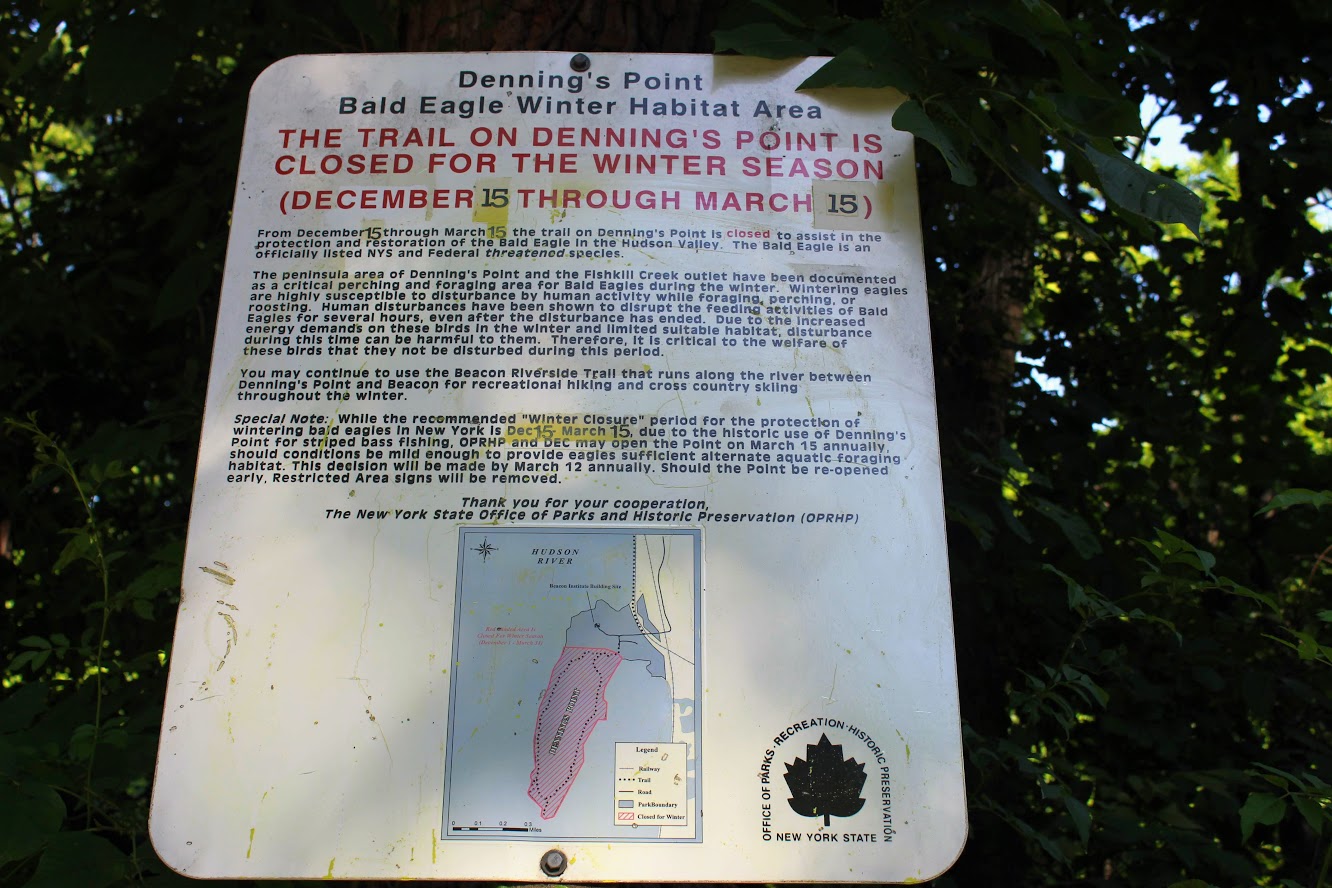
Denning’s Point Trail is closed December 15th to March 18th.
The Hike
Sometimes it is good to go for a nice leisurely walk, with an awesome view. The Hudson Valley is full of satisfying and challenging hiking trails with beautiful views. I am learning more and more about the area. There is a lot to offer if you are looking for outdoor activities. Short on time and looking for something easy, my girlfriend introduced me to a very cool spot located in Beacon, NY, called Long Dock Park.
path from the parking lot to the pier.
Upon arriving, I could see the fantastic view of the Hudson River as we parked. There is a good amount of parking but I can see this area being very busy. As we walked toward the pier, you will see trail maps within the park. Many people we saw were jogging, bike riding, and walking their dogs on the trails. You can also rent a kayak or paddleboard for the day. We walked out to the dock which is to the right of the parking lot. There are stools and fishing rod holders. A few fishermen were out bright and early on this day. From the dock, you get a fantastic view of the town across the river, including the bridge Beacon to Newburgh. This would be a good location to see the sunrise or sunset. The park has a very relaxing atmosphere.

Newburgh bridge from beacon.

View from the pier across the river.
Long Dock Park is connected to the Hudson Highlands State Park by a train track turned trail. Dennings Point is the northernmost area of the Hudson Highlands State Park, and is a peninsula that extends out in the Hudson River. That was our goal destination of the day. After checking out the views from the dock, we started our walk on the Klara Sauer Trail. This flat and easy trail will lead along the shoreline of Dennings Point. There are access trails to venture and see better views of the river along the way. Some lookouts were muddy so I am glad I had my hiking boots on.
Views from some of the access point along the klara sauer trail.
Ducklings going for a swim.
Hudson river view with some mountains.
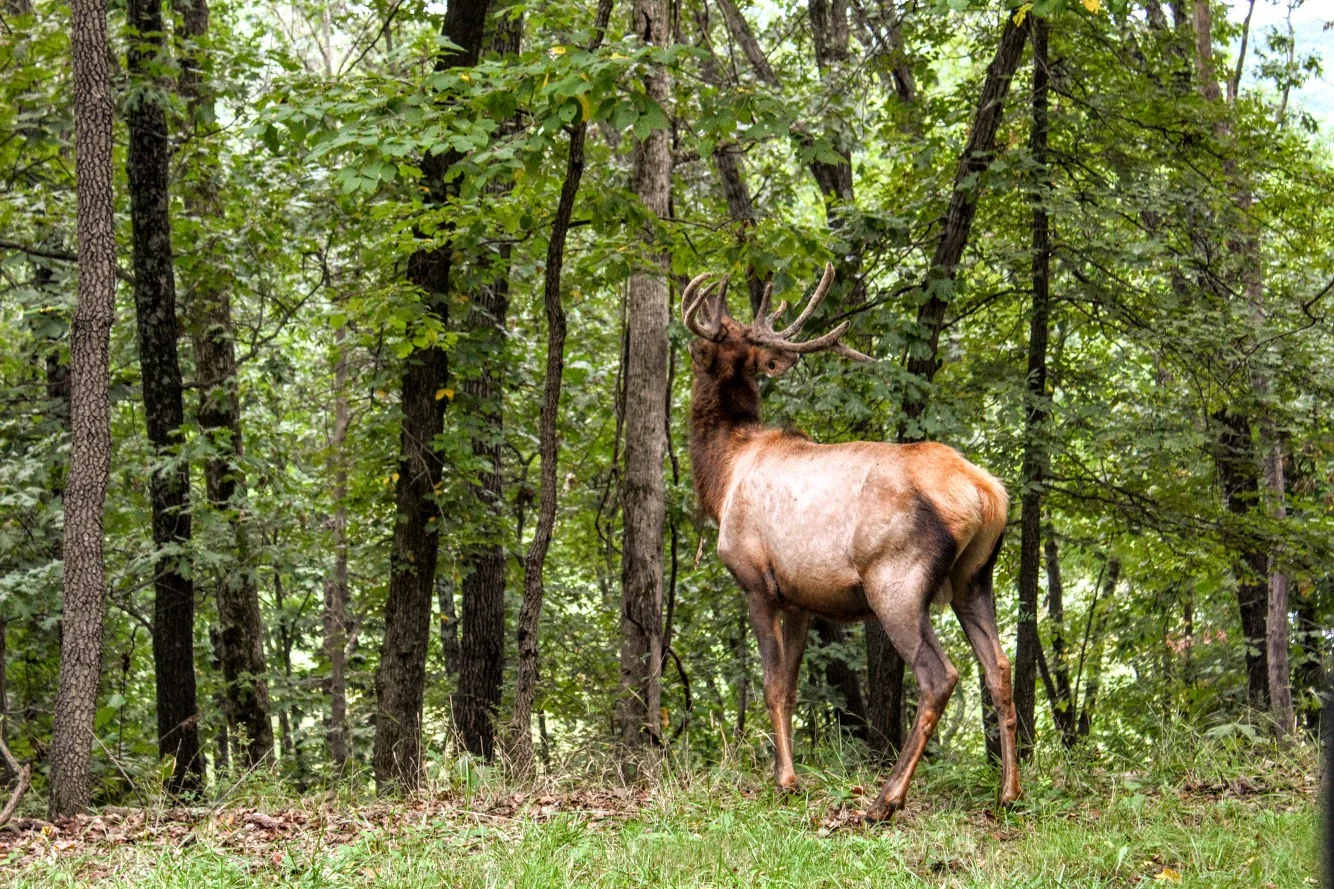
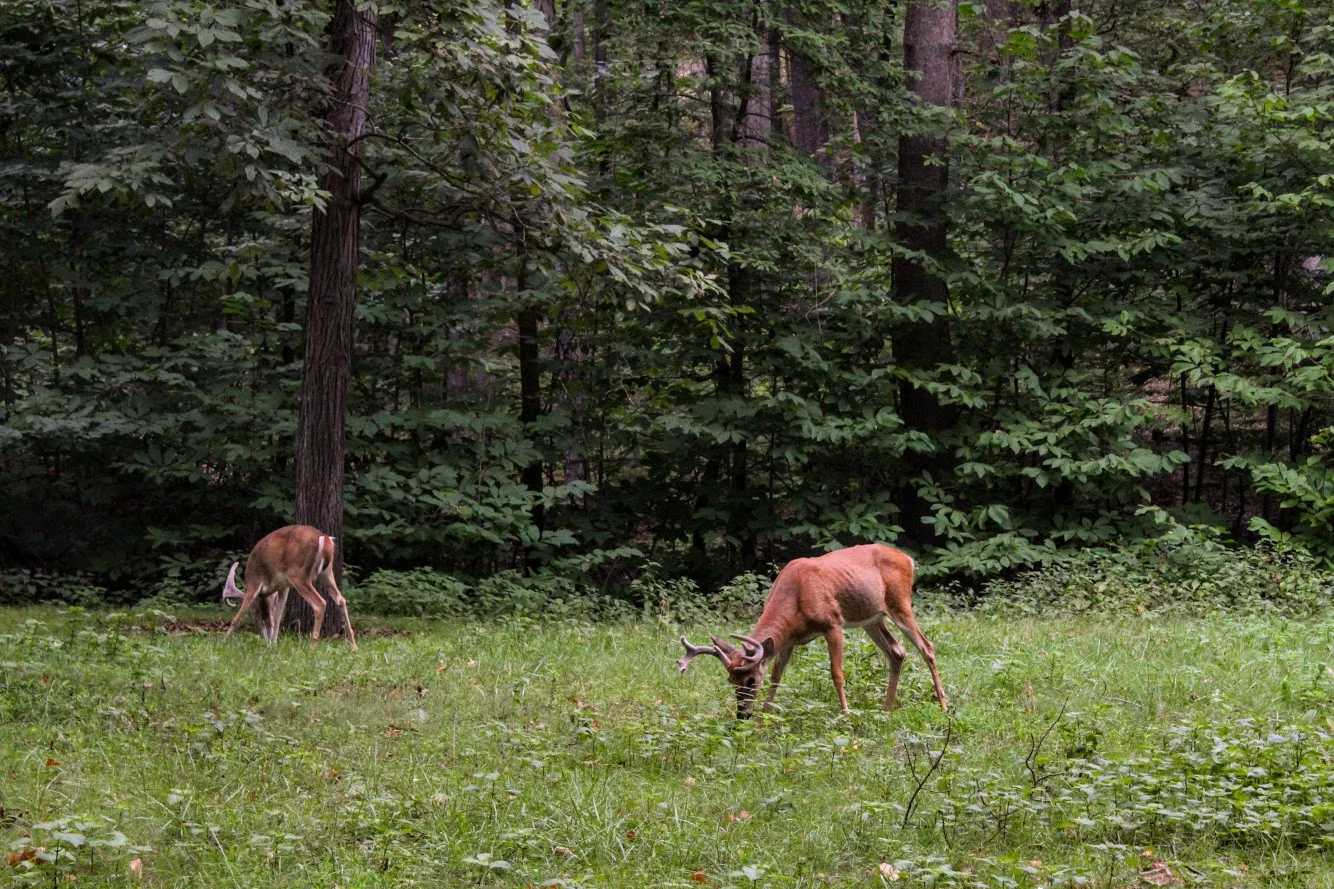
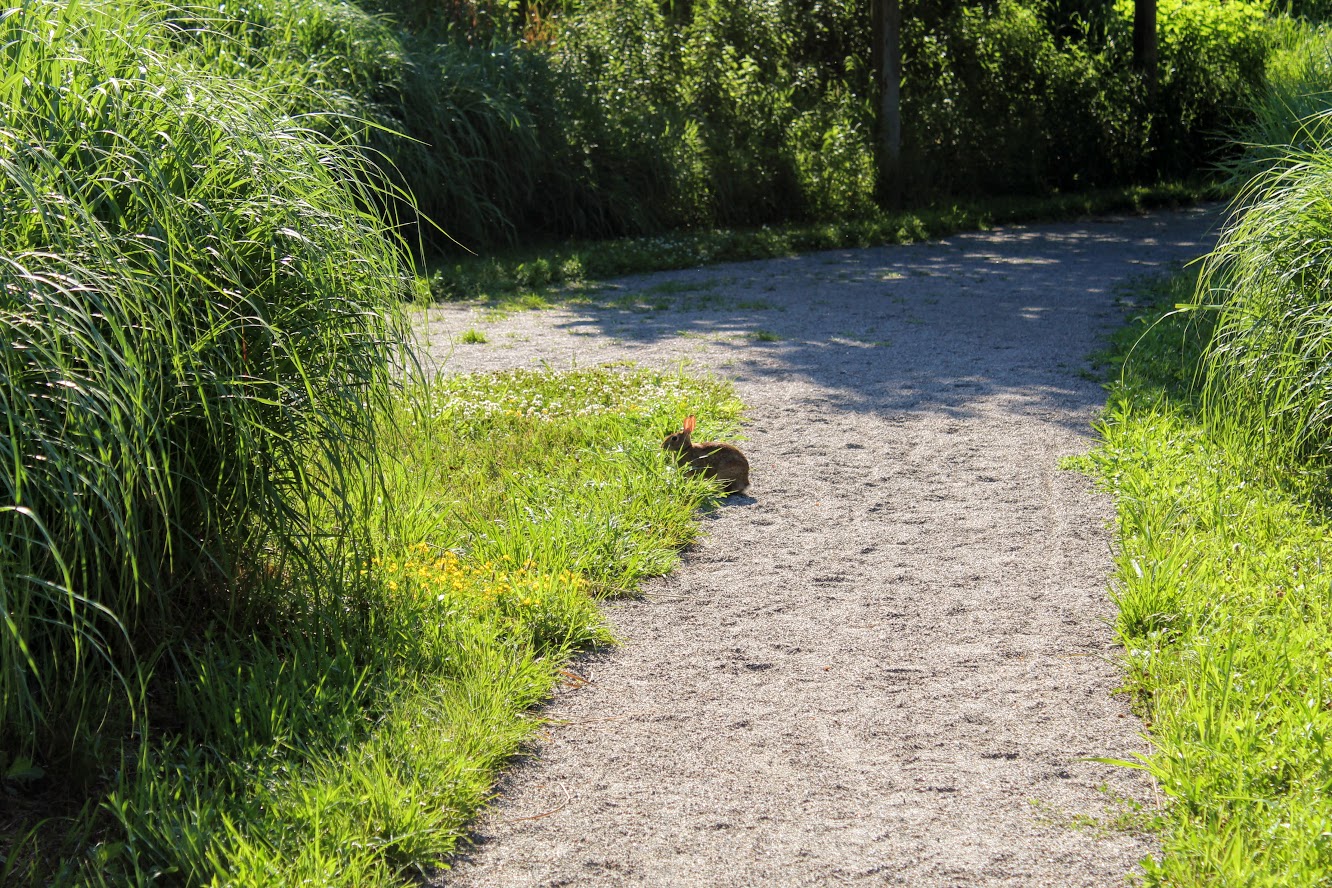
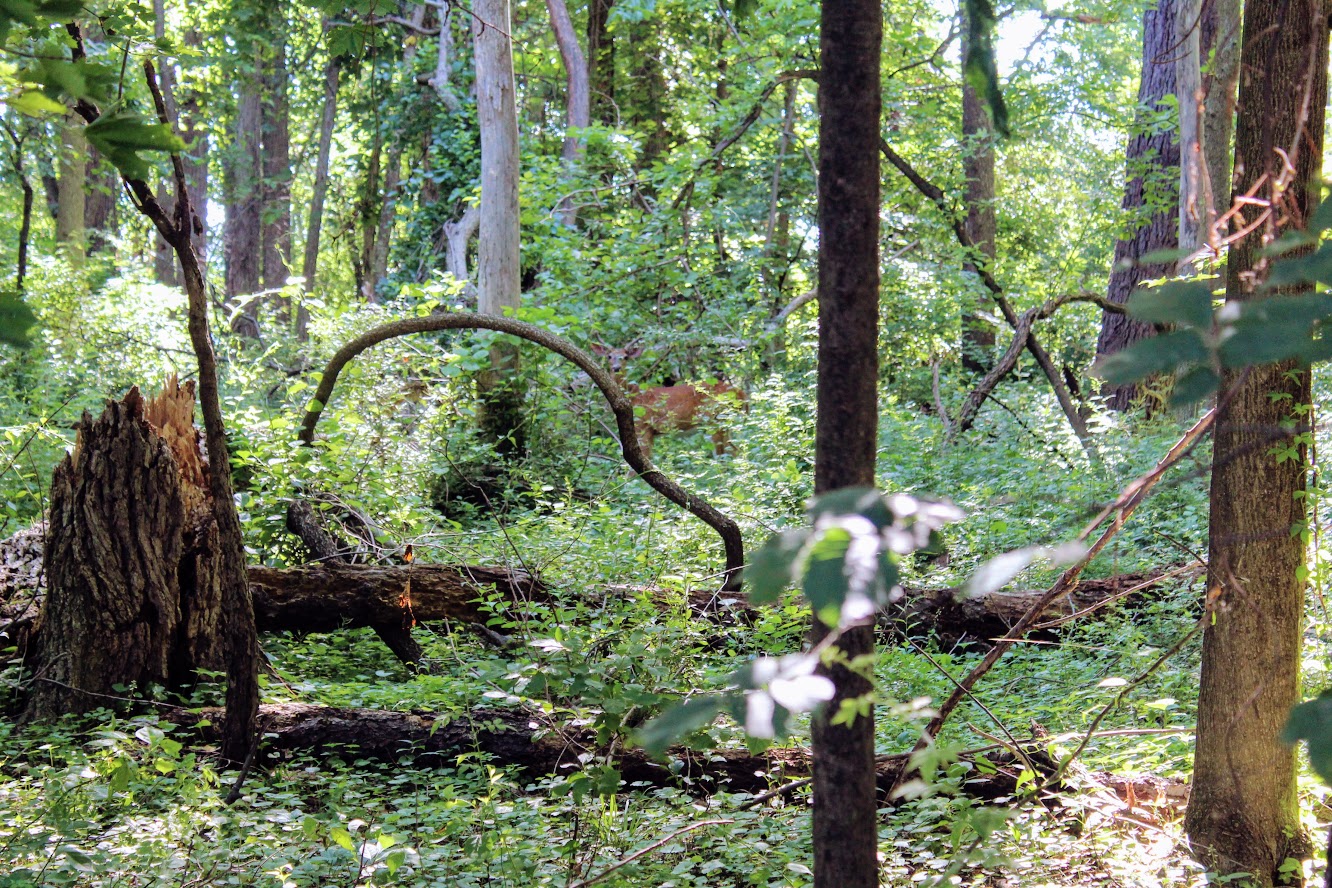
Unexpectedly, we did see more wildlife than anticipated. Peter Rabbit and Bambi made appearances.
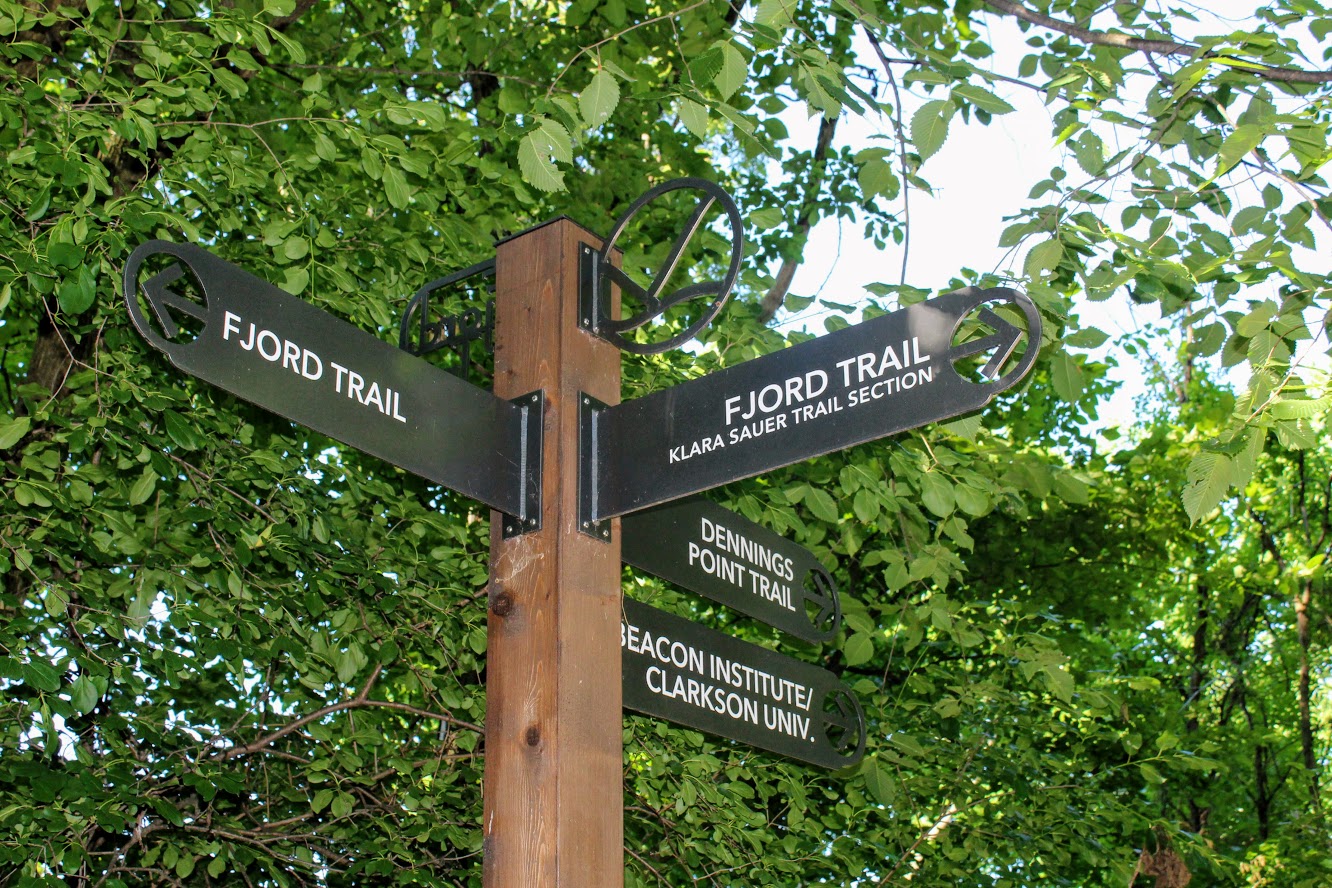
At the end of the Klara Sauer trail, we saw signs for the Dennings Point trail at the T intersection. Dennings Point trail was to our right. We did take a detour to our left on the Fjord trail to see the railroads tracks and caught a train going by under the bridge.
Railroads track if you veer on the trail to look for a train passing.
We circled back to follow the Dennings Point trail into the woods. We passed an abandoned building covered in tree branches where there was a brick factory many years ago. There will be a beach area path, where kayakers will stop for breaks, on your right. The beach front offered some impressive mountain views. Note, this trail is typically a loop but we reached an area that says to turn around due to the recent storm damage. We just turned around went back the same way.
when you run into this turn around the way you came!
views of kayakers and mOuntains.
views from the beach area of dennings point.
Great views.
This was a nice break from intense hiking. This was still great exercise. I would definitely come back. We walked about 2.8 miles and took us under 90 minutes. We got to see some great views. Long Dock Park is a great spot to kayak the Hudson River, do some fishing (may need a license), or just picnic with the friends and family.
love the views of the woods. trees down from storms on Dennings Point trail.

HIKING FOR DONUTS
A blog for the outdoors foodie enthusiast
Hi, I’m Mark. I live in Connecticut. I take new trips every chance I get. A good trip has a great hike, great food, and something fun to do. My goal is to search out new trips and share them to inspire others to try something new and exciting.
If you are looking for posts in a particular place, search by city or state here.
EXPLORE OTHER POSTS IN THE ARCHIVE
Archive
RECOMMENDED POSTS
MOST RECENT POSTS
See where I have been recently on Instagram. Follow @HIKINGFORDONUTS
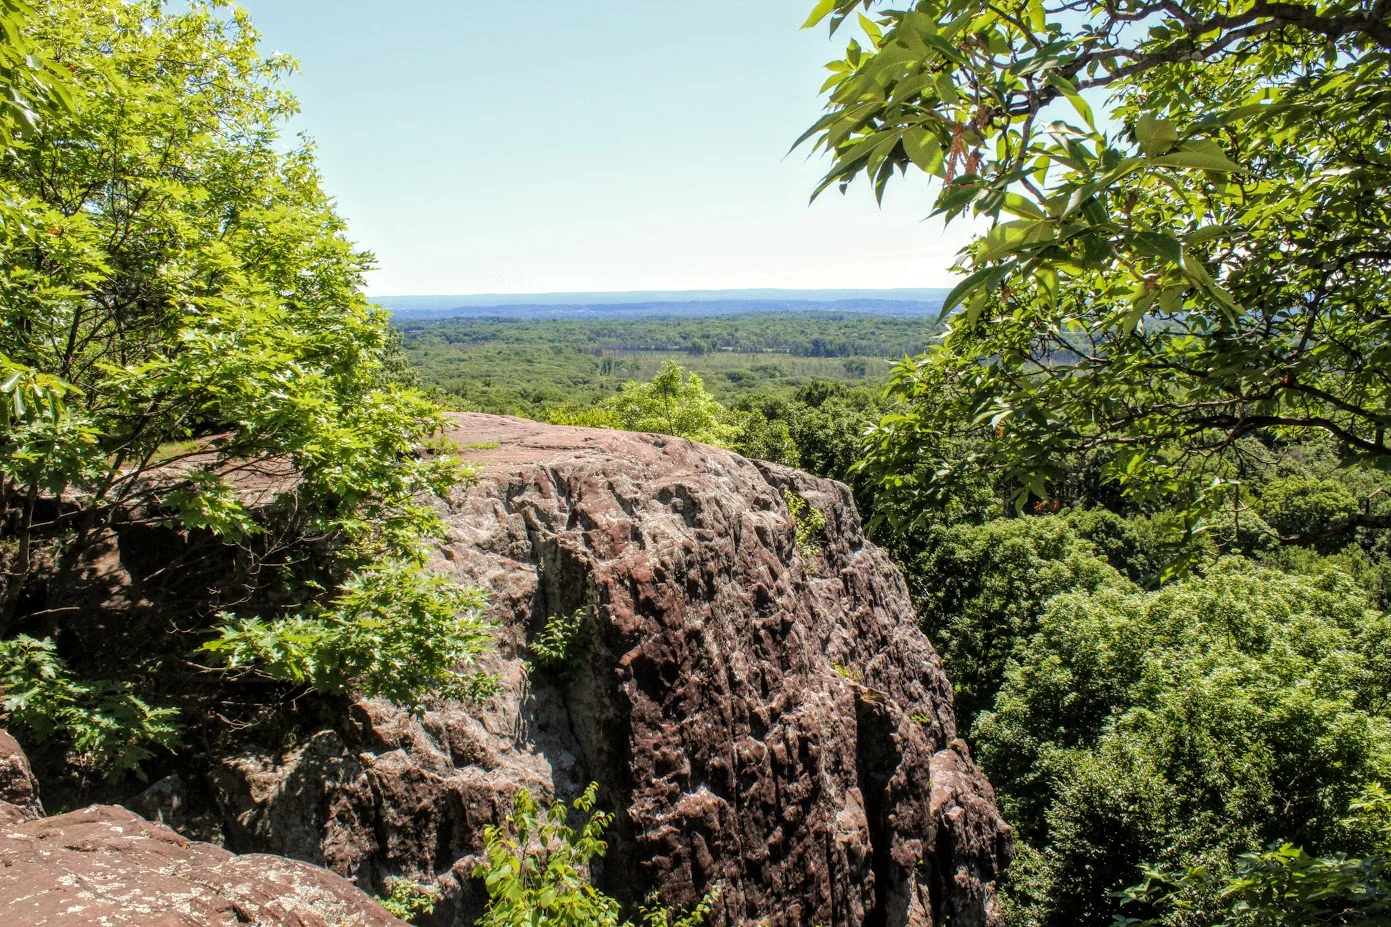
Rattlesnake Mountain to Pinnacle Rock via Metacomet Trail, Farmington, CT
We headed on the trail to our left toward the Rattlesnake Cliffs. The trail starts out flat then begins to switchback up the side of the mountain. After a half mile in, the trail will ascend uphill and the terrain is rockier. We passed lots of large rock boulders as we got closer to the cliffs. This particular trail was very well-marked. We eventually came across the boulder rock cave known as Will Warren’s Den, which I later found out was a historical site.
Looking for a good hike in Connecticut? Well, I stumbled upon a hidden gem right under my nose. Rattlesnake Mountain to Pinnacle Rock trails are located in Farmington, CT and crosses over to Plainville, CT. This is part of the New England/Metacomet Trail. Finding the parking area can be tricky. There are 2 areas where you could start. Blue trail markers can be accessed from Pinnacle Street in Plainville. The GPS wasn’t picking this option up so my girlfriend and I chose to drive on RT 6 in Farmington. There is a small parking area on your right where the trail starts. If you GPS 200 Colt Hwy Farmington, CT 06032, that should find it.


Parking area off route 6.
From here, you can hike to the Rattlesnake Cliffs, which is a 2.6m out and back loop. Or you can continue to hike another 2 miles out and back to Pinnacle Rock. Thus, it will be 4.6m total for this hike.
HIKING FOR DONUTS
A blog for the outdoors foodie enthusiast
Hi, I’m Mark. I live in Connecticut. I take new trips every chance I get. A good trip has a great hike, great food, and something fun to do. My goal is to search new trips and share them to inspire others to try something new and exciting.
If you are looking for posts in a particular place, search by City or State here.
Explore other posts in the archive.
Archive
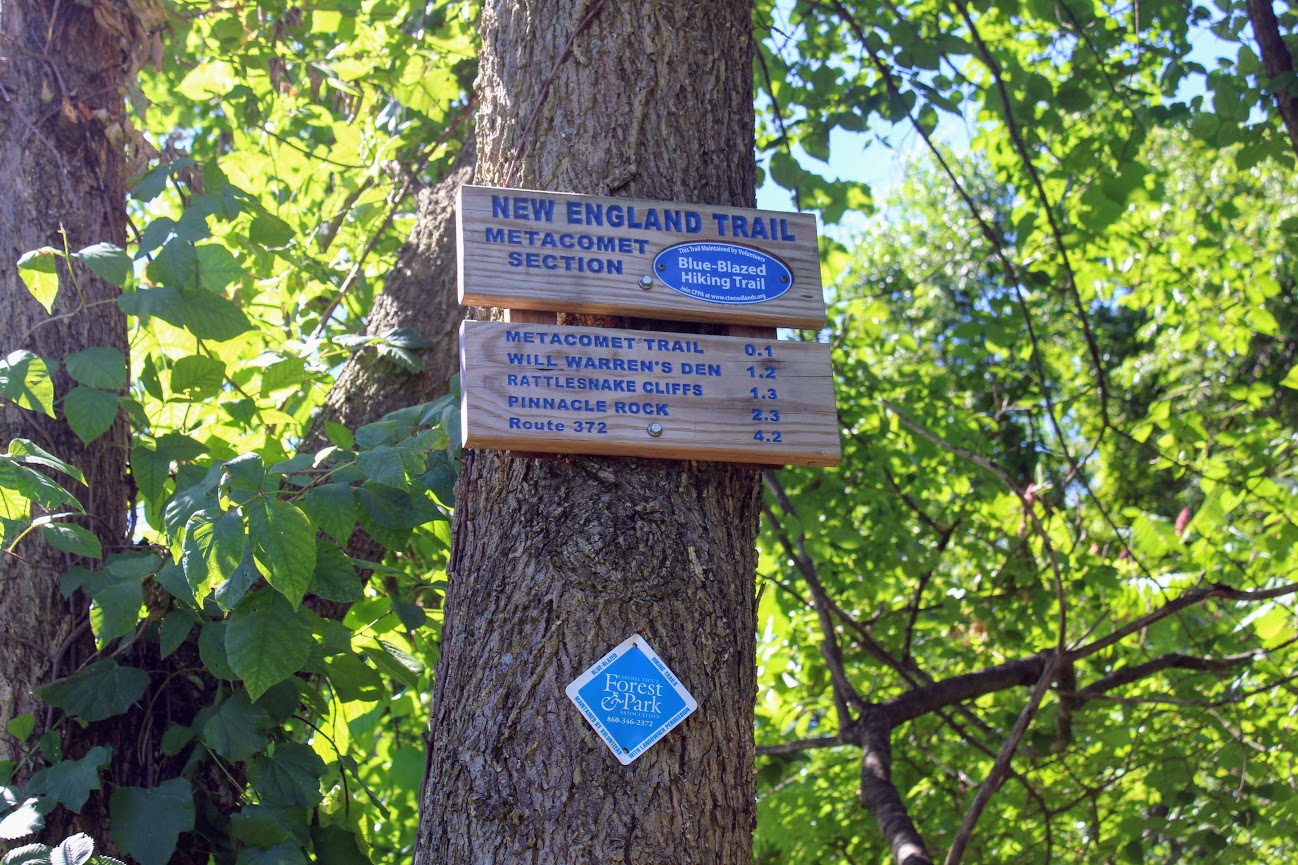
Start of trail
Once parked, we headed on the trail to our left toward the Rattlesnake Cliffs. The trail starts out flat then begins to switchback up the side of the mountain. After a half mile in, the trail will ascend uphill and the terrain is rockier. We passed lots of large rock boulders as we got closer to the cliffs. This particular trail was very well-marked. We eventually came across the boulder rock cave known as Will Warren’s Den, which I later found out was a historical site.
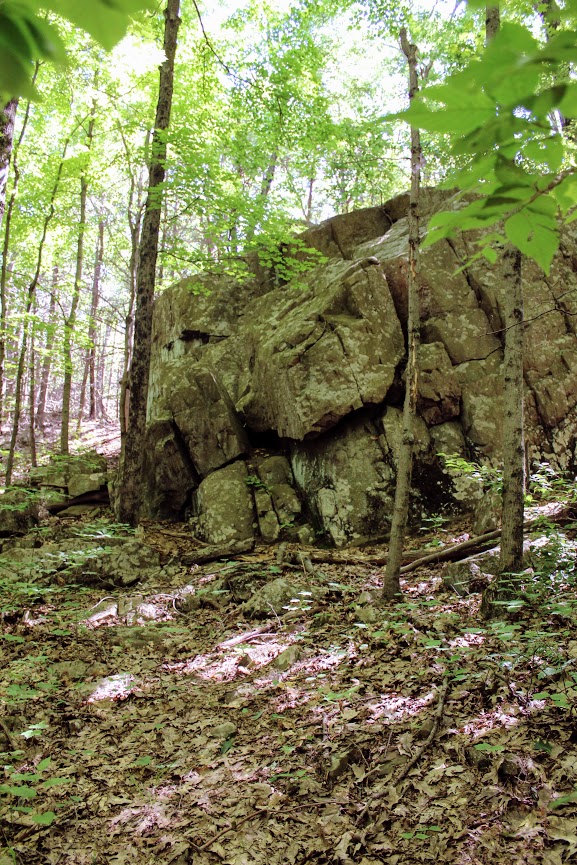
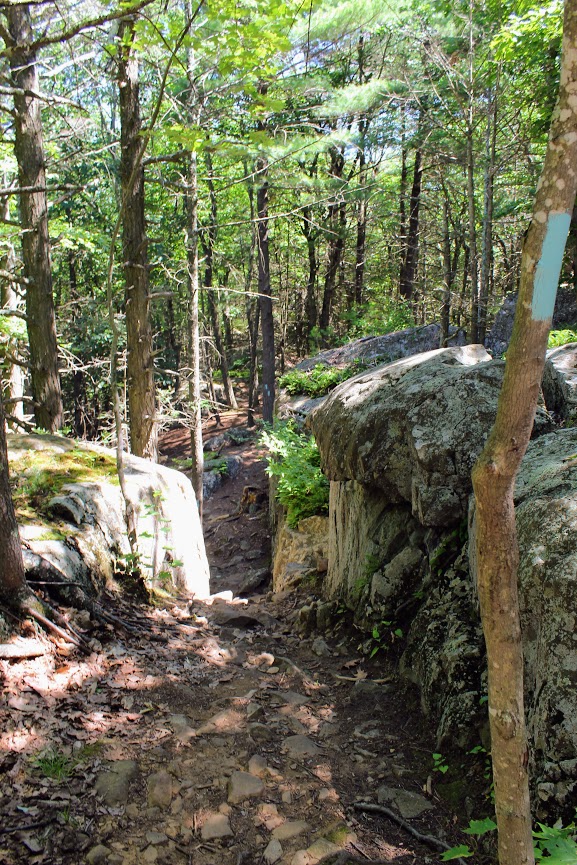
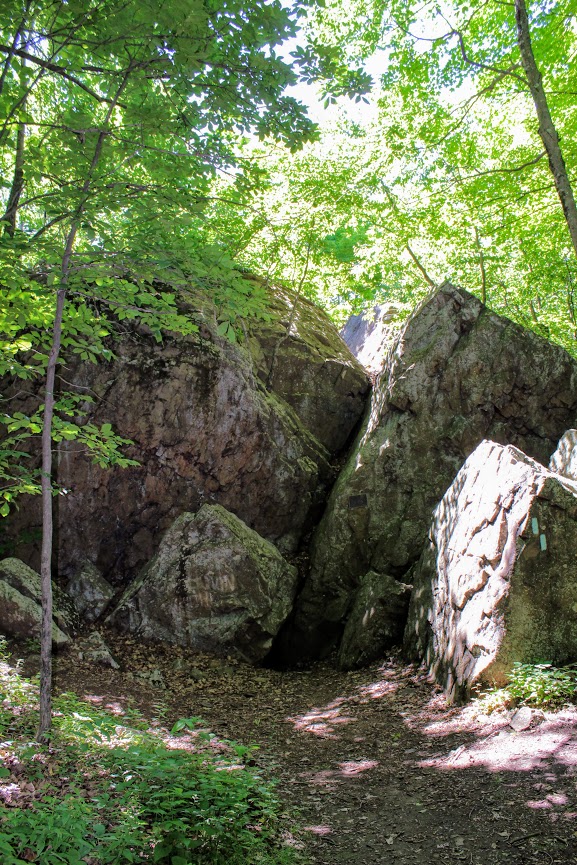
Not long after this, we reached the Rattlesnake Cliffs. Wow, what a spectacular view. I was absolutely stunned. On our left, we could see as far as the city of Hartford. And the sky was clear, so we could visibly see the biggest buildings in downtown Hartford. On our right, we could see the East and West Peak at Hubbard Park in Meriden and the Pinnacle Rock in Plainville. Great views all around. How did I not know this view existed? If this was all we did, I would have still ranked this hike very high on my list of CT hikes.

Views from Rattlesnake Cliffs.

hartford views to the left from the cliffs.

On your RIght from the cliffs.....

PANO VIEW FROM RATTLESNAKE MOUNTAIN CLIFFS.
We hopped back on the blue trail down Pinnacle Rock and started making a steep descent. We witnessed other hikers take a wrong turn here by going straight down. We were able to stay on track. We continued hiking along the bottom of Rattlesnake Mountain and noticed a small tunnel formed by the rocks. We decided to climb through and found ourselves blue markers on the other side. Note, this is how you to get to Pinnacle Rock. There is a quite a bit of climbing on and over rocks for this section.
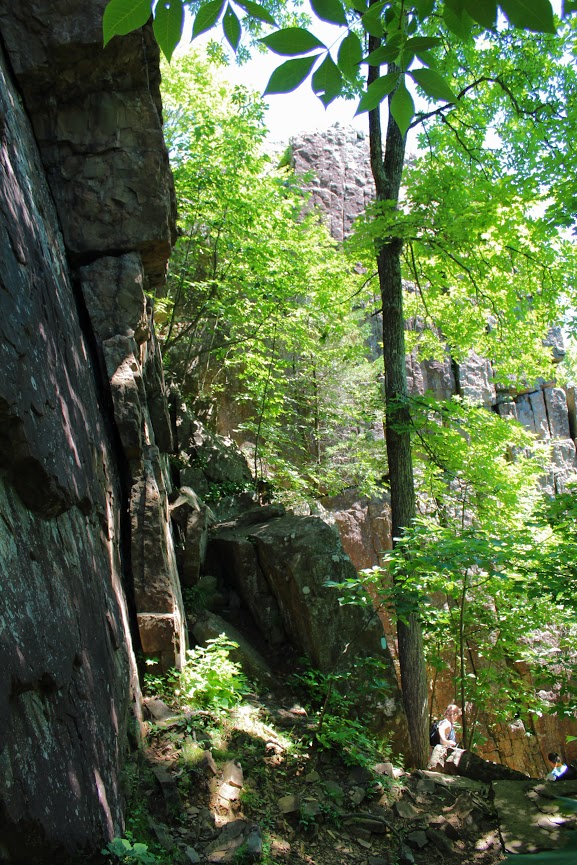
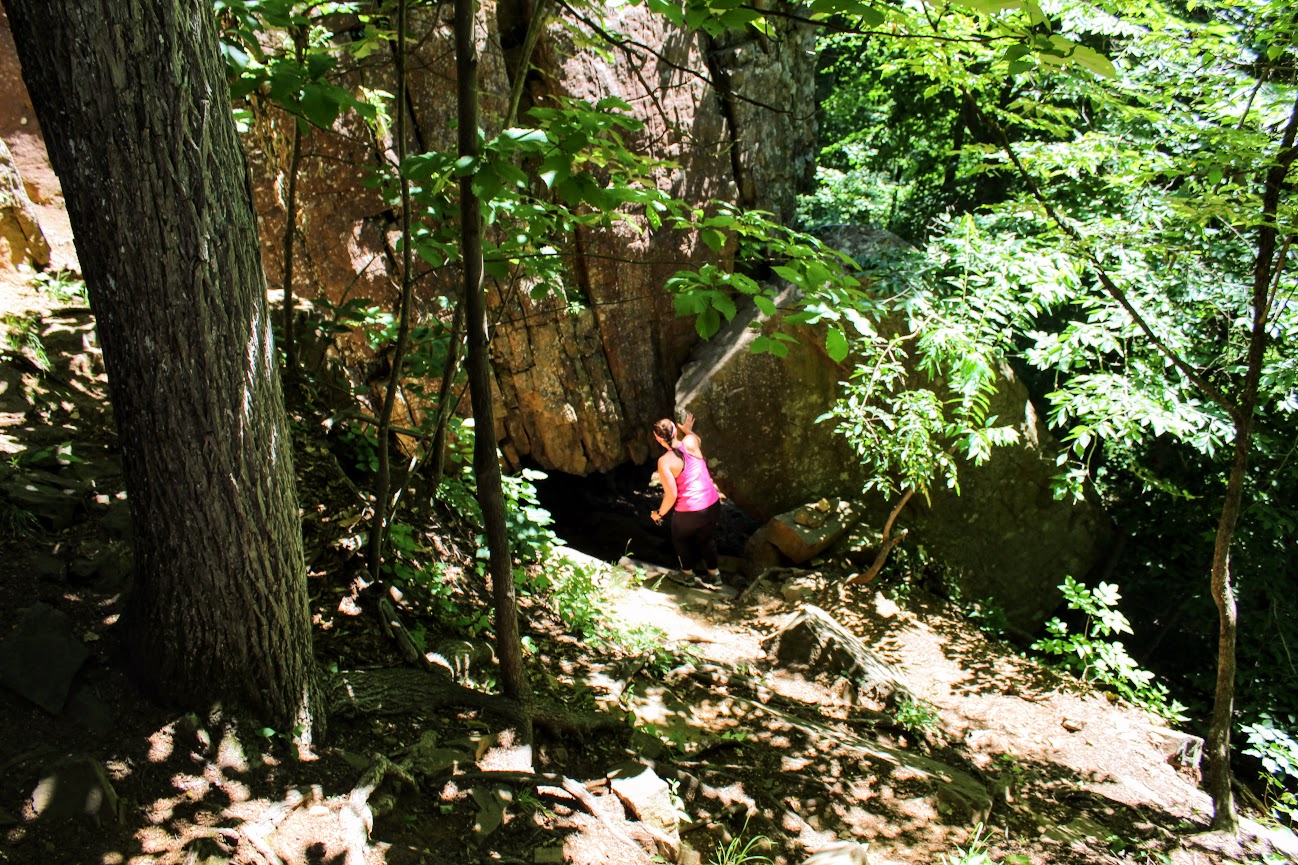
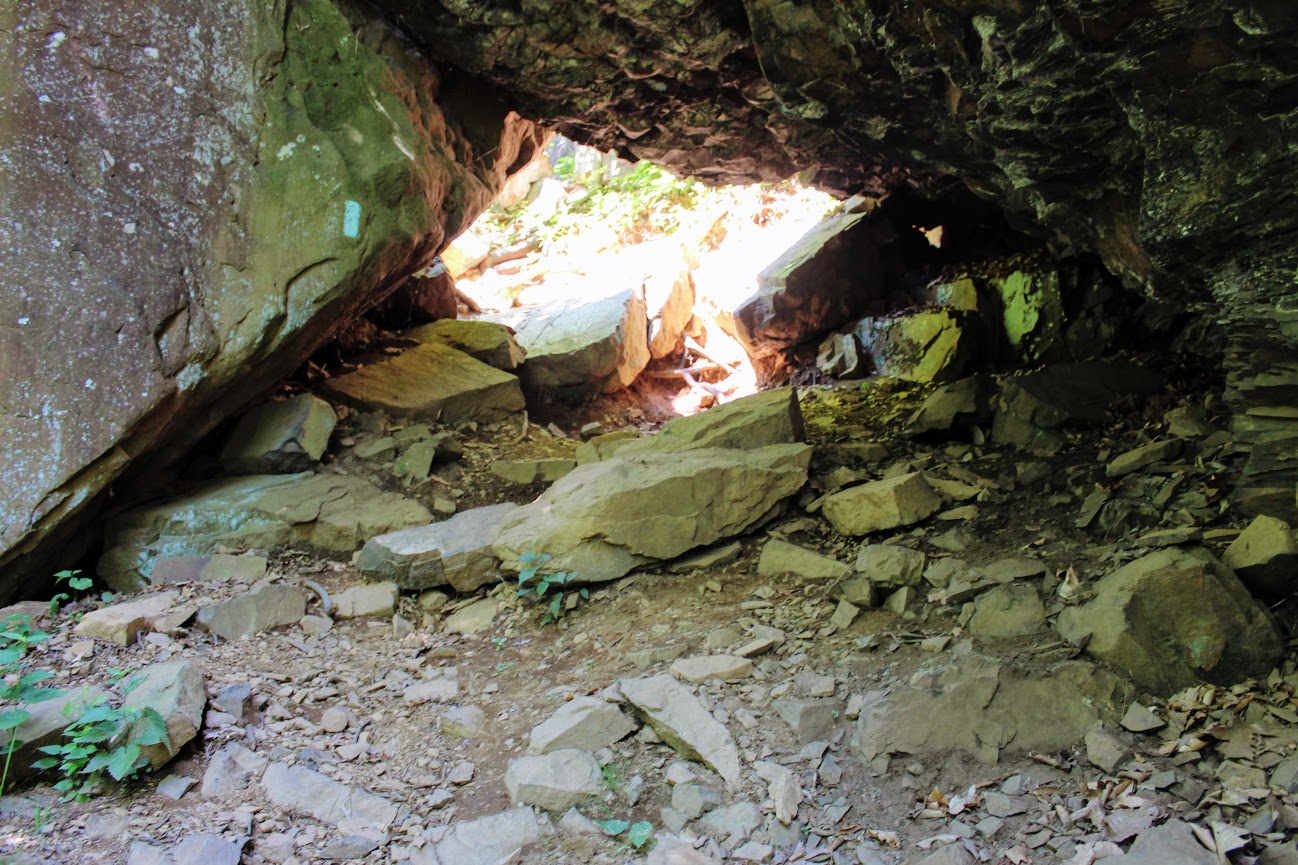
And, this trail is not as well-marked. There were areas we lost the blue markers. Sometimes the blue marker was faded on rocks and we didn’t notice until we got closer. If you do not come across blue after 5 min or so, I suggest turning around.

If you can't find blue markers, they may be on the rocks.
We reached the bottom and crossed an area under power lines that led us climbing up to the other side. We reached a dirt paved road and we saw a tree marked with blue and red. This took us to the final section before we reached Pinnacle Rock. You will be going uphill and start climbing the rock on your right to the peak of Pinnacle Rock.
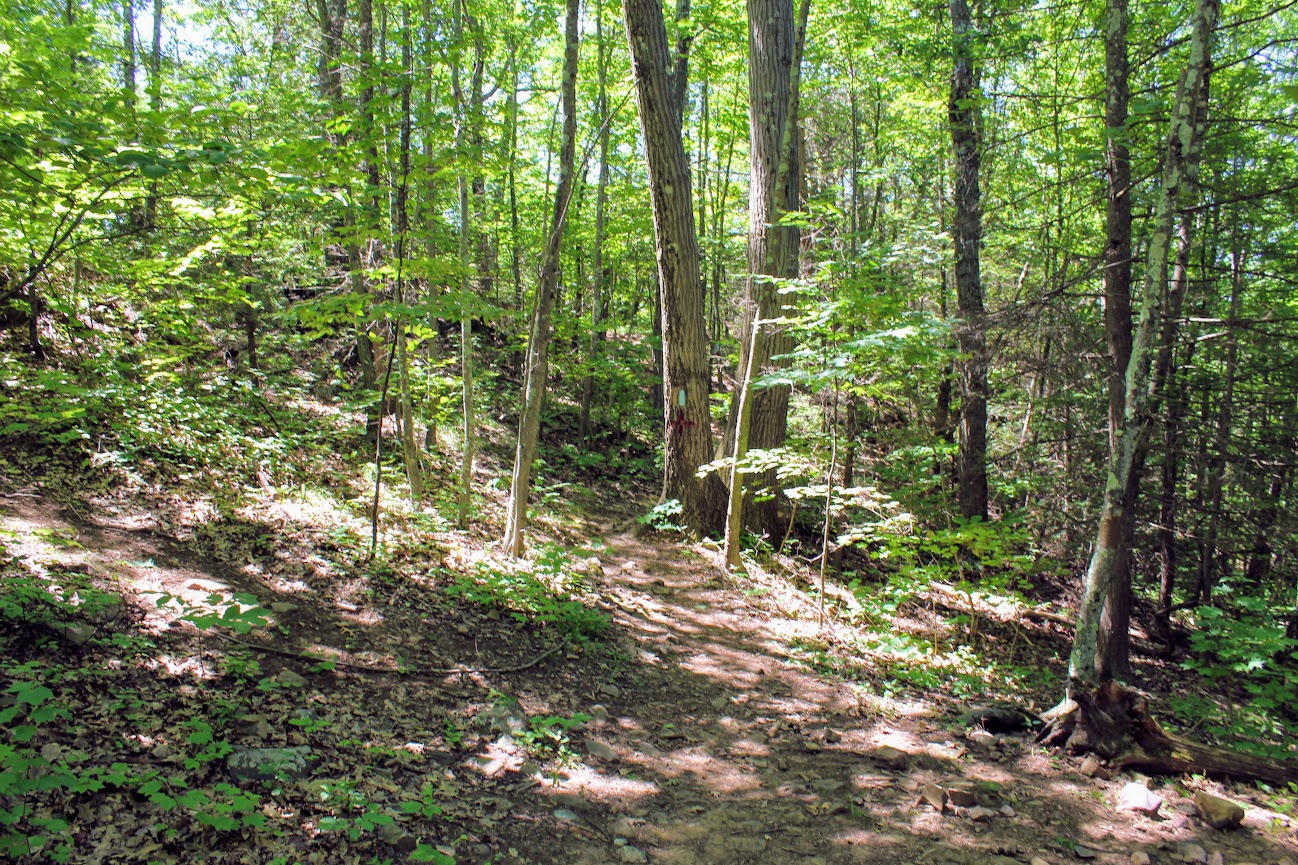
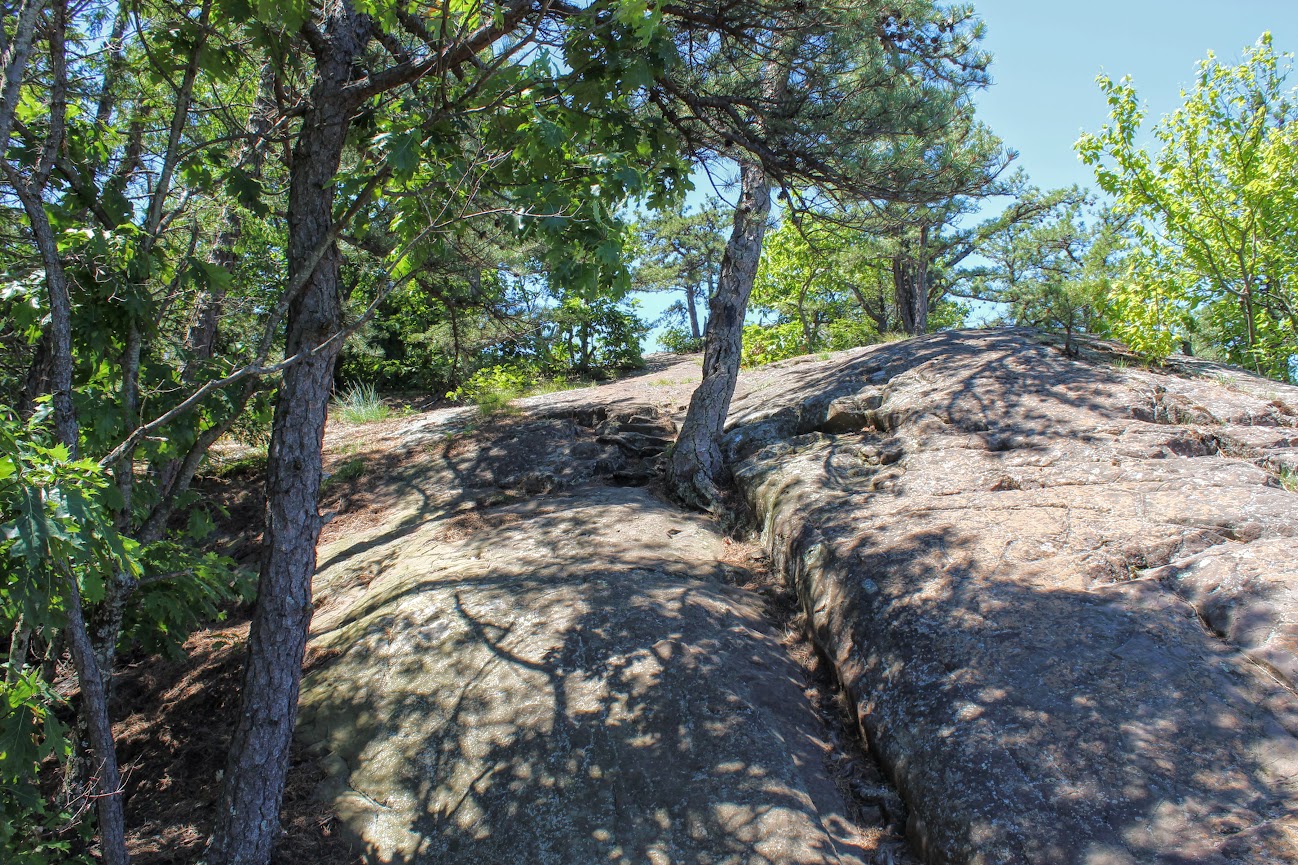
The view of Pinnacle Rock is nice. But Rattlesnake Mountain has a higher wow factor. The view from Pinnacle Rock is not as appealing as you will see mostly homes. This is a big rock climber’s paradise and I did see a few people doing so. I will hike all day. But climbing isn’t for me.
RECOMMENDED POSTS
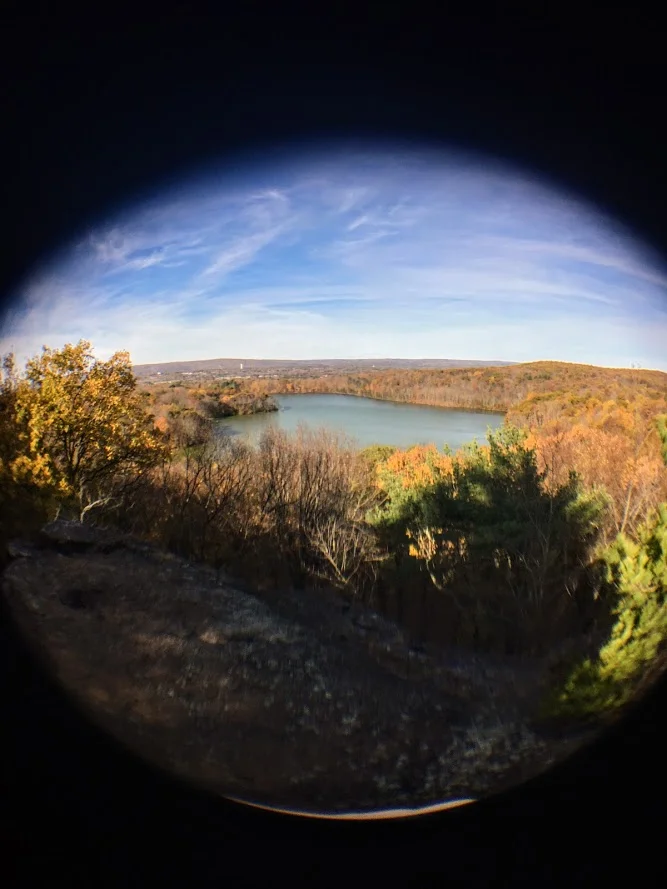
RECENT POSTS
See where I’ve been recently on Instagram, follow @HIKINGFORDONUTS

Crazy guy climbing up pinnacle rock.

VIew from the pinnacle Rock summit.

Top of pinnacle Rock with railings and rock seating to enjoy the views.
We headed back the same way we came. Took another peek from the Rattlesnake Cliffs before we headed back to the car. Such a great view. That is one of best views in CT. I was very impressed by this hike. This is easily one of my favorites now. It is very challenging. I would say it’s a moderate hike. Lots of different terrain and some climbing. Round trip is 4.6 miles but I feel like it’s closer to 5 miles. Definitely suggest hiking boots and a pack for this one. This took us about 3 hours. This is one New Englanders should add to their hiking list!
The review:
Rattlesnake MT to Pinnancle rock (farmington, CT), ~4.6m: 4.5 out of 5.
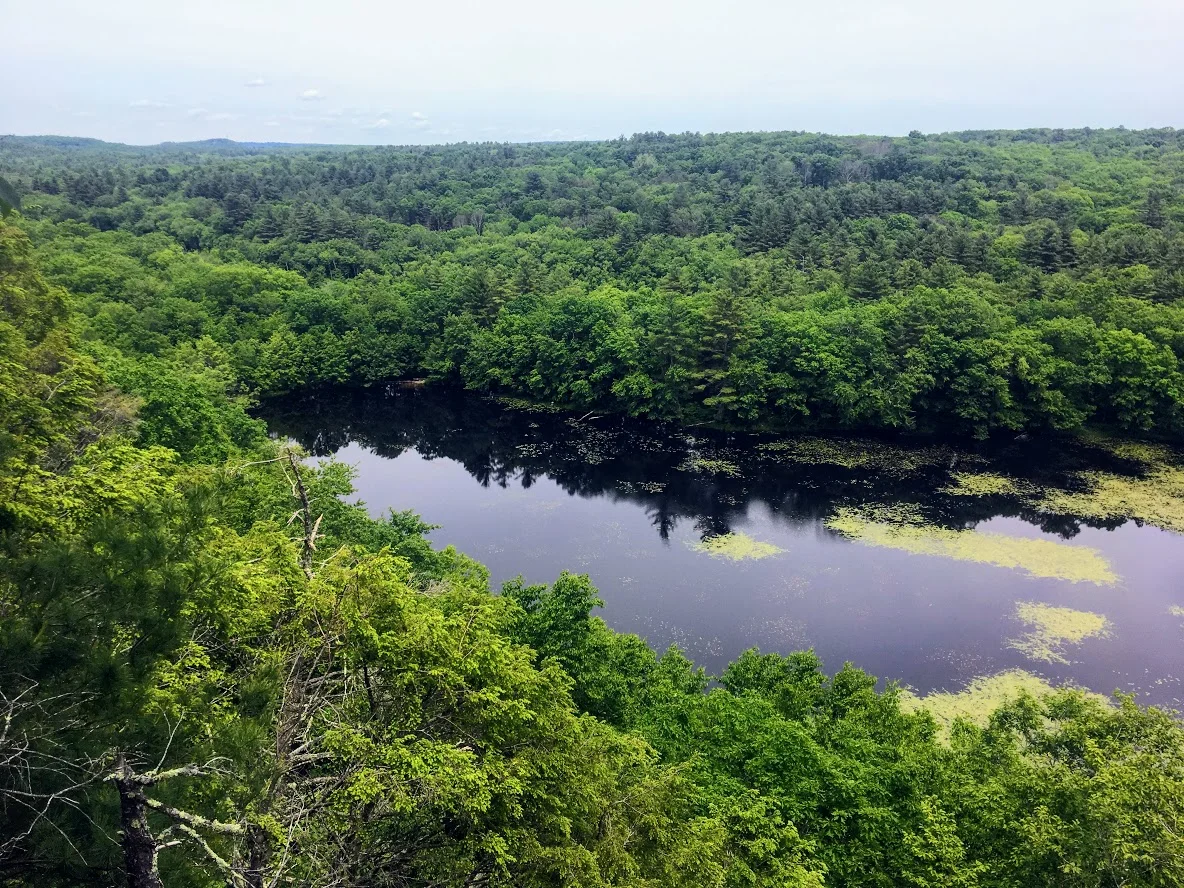
Old Furnace State Park, Killingly, CT
Old Furnace State Park is located in Killingly near Rhode Island. This is a great park for hiking, biking, and fishing. Exploring new areas is always fun, even if you get lost on the trails. Check out the blog to make sure you stay on the trails!


Scrolling through the list of the 2018 Sky’s Limit Hiking Challenge in Connecticut, I wanted to explore unknown parts of the state that would be new to me. I haven’t spent much time in the Windham County area, neighboring Rhode Island. I really had no idea where I was going and there was not too much info on the park online. But, I convinced my girlfriend to drive over an hour with a promise of beers and off we went.
Old Furnace State Park is located in Killingly, CT. You will find the park entrance off Route 6 via Route 395. Ross Pond State Park is fairly close so my GPS took me there instead. If yours does the same, just keep going past that until you can take a left onto South Frontage Road and the park will be there on your left. The blue-blazed trail of this park runs about 3 miles. This particular hiking challenge calls for 2 miles round trip until you reach the overlook from the cliffs at 200 feet over Half Hill Pond. With this view you get a great look of valley stretching into Rhode Island.

We finally found the parking lot and noticed there was mountain biking event going on. Apparently, this is a big mountain biking trail. I didn’t expect to see anyone. The hiking trail starts at the parking lot. I used the trail located at ct.gov here . The path instantaneously takes you into the woods.

As we began, we crossed a small brook that led us to crossing a small footbridge.


The trail was fairly wide open until we reached an unmarked section ducking through a brush of bushes. We found ourselves questioning our direction. Eventually, a blue marker did appear.


From here the ascent started to get steep. About a mile into the hike, we saw the path break into two. Unfortunately, we kept going straight and that was not correct and saw some brown marked trails.


Thus, we circled back and took the path to the left which was the ridge along the pond. And, finally we found ourselves at the cliffs overlooking Half Hill Pond. The pond was completely filled with water lilies.


We stopped here because the trail was pretty buggy and I didn’t think the rest of the trail would offer much. But if you want to continue, this will lead you down to the parking lot and boat ramp at Ross Pond to Squaw Rock Road where you turn around and come back. If you are not from the area, the directions to the park could be difficult and the trail itself has areas that should be marked better. The hike itself was not hard. I would rate it easy. I would bring bug spray and pay very close attention for the blue markers. Looks like a good area to fish and maybe kayak as well. I’m sure this is a nice spot for locals but one time is probably enough for me.
The Review
Old Furnace State Park, Blue Trail, Killingly, CT (~2m): 2.5 out of 5.

HIKING FOR DONUTS
A blog for the outdoors foodie enthusiast
Hi, I’m Mark. I live in Connecticut. I take new trips every chance I get. A good trip has a great hike, great food, and something fun to do. My goal is to search out new trips and share them to inspire others to try something new and exciting.
If you are looking for posts in a particular place, search by city or state here.
EXPLORE OTHER POSTS IN THE ARCHIVE
Archive
RECOMMENDED POSTS
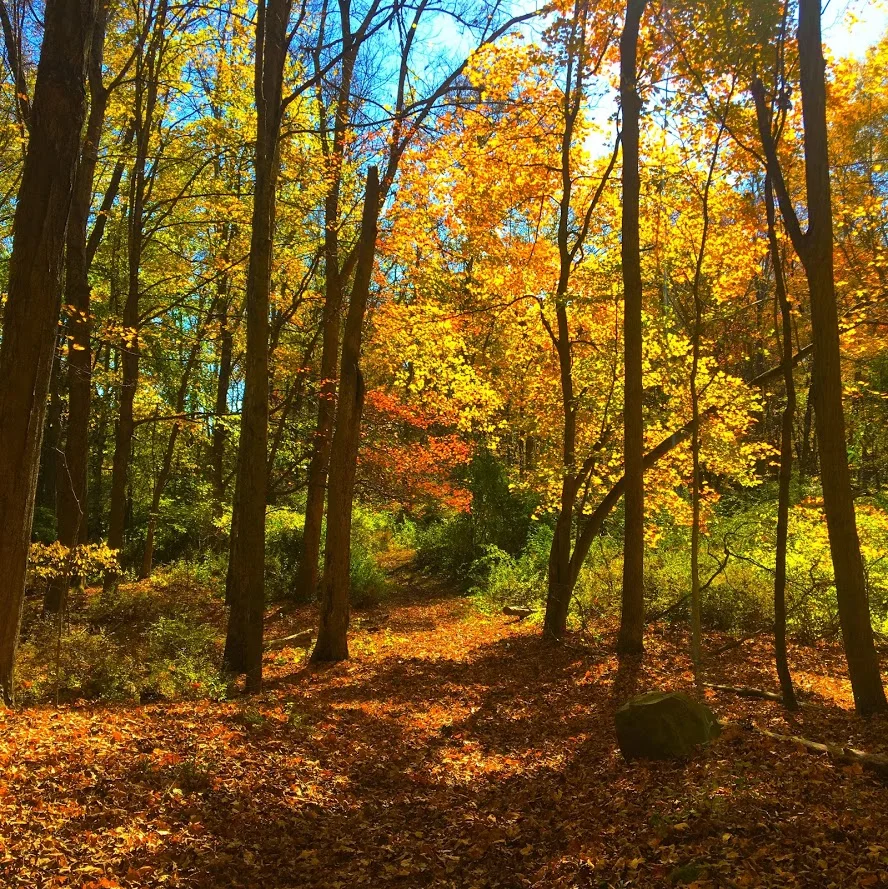
MOST RECENT POSTS
See where I have been recently on Instagram. Follow @HIKINGFORDONUTS
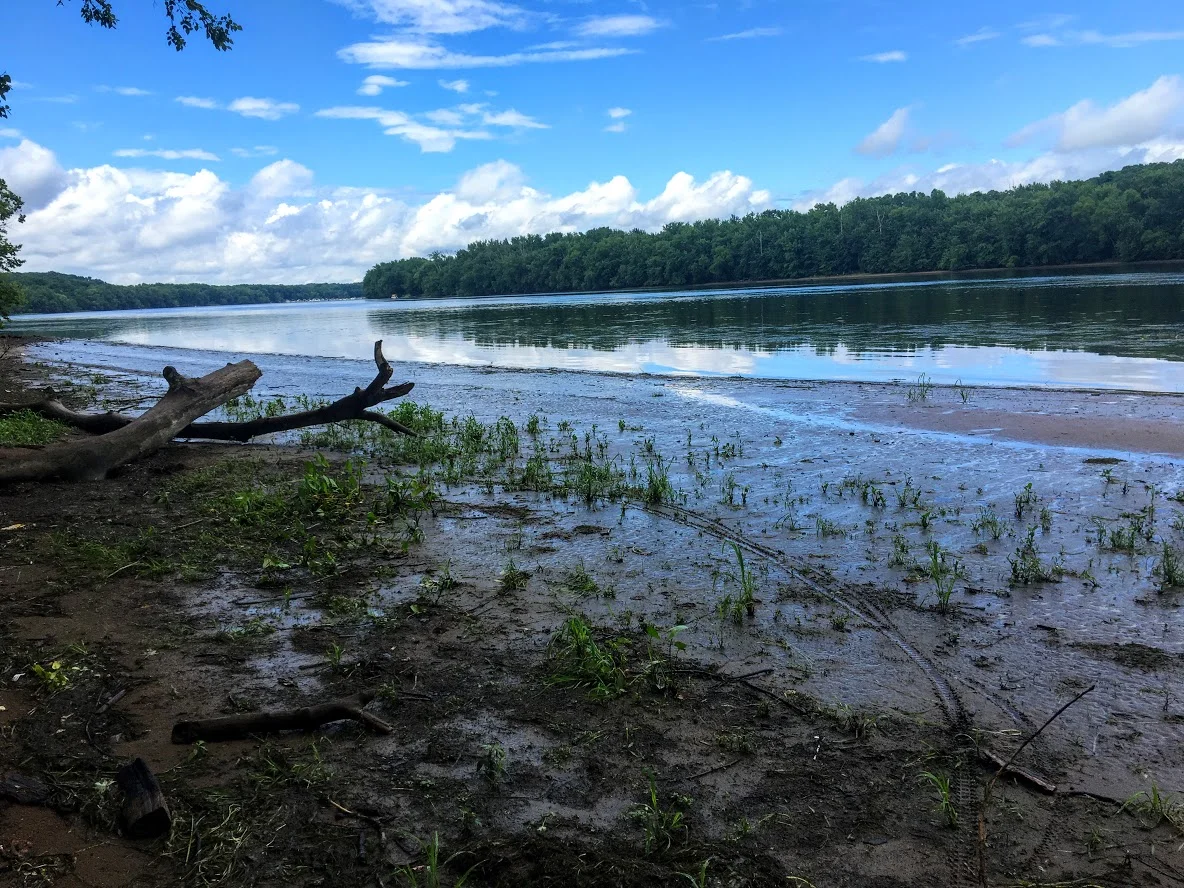
River Highlands State Park, Cromwell, CT
This is the first hiking trail review on the Connecticut hiking challenge trails. Check out the blog to learn more about the challenge!
Trail Description: A view 150 feet up of the Connecticut River can be seen from the White Blazed Trail in the River Highlands State Park. In addition, there is water front with picnic tables to enjoy.
Trail Info:
Where: River Highlands State Park, Cromwell, CT Distance 1.5 miles (1 hr) Difficulty: Easy Trail Type: Loop Features: Views, River, Water
How to get there:
Directions in detail can be found here,https://www.ct.gov/deep/cwp/view.asp?a=2716&q=434748&deepNav_GID=1650.
River Highlands State Park, Field Rd, Cromwell, CT 06416
Hiking Tips
Good beginner hike or weekday hike after work.
Super buggy area. Bring bug spray.

The Hike
Finding good hikes in Connecticut is becoming less a challenge. And, that is a good thing. Most people just dismiss how much is truly out there. Recently my friend told me there is a hiking challenge in CT. I can’t believe I haven’t come across this. Of course, I googled and found Sky’s the Limit Hiking Challenge by the CT Department of Electric & Environment Protection (DEEP). They list 14 lesser known trails to encourage more hiking in CT state parks. There are rules and info here. You can win some prizes too. I think it is a great idea. I haven’t heard of most of the trails. I smell some new blog material. I am definitely on-board and will be joining in on the fun.
With that said, here in my very first hike of the Sky’s the Limit challenge. A rare weekday hike but if it is 90 degrees in May in CT, you get outside. Nichole and I went to River Highlands State Park in Cromwell, CT. This was an easier and quick hike. The hike offers views of the Connecticut River from 150 feet above the water. I would use this link for the trail maps. Directions can be found on the CT DEEP link above.


The park consists of multiple color trails. You can go multiple different directions. The biggest loop will take you about 2 miles but you can connect to many different trails and adventure as much as you want. The trails are very well marked and the terrain is pretty level. Maybe one or 2 short, steep sections. We chose the white trail from the parking lot. This takes you directly to the high bluffs overlooking the Connecticut River.

More river views.
From there we took the yellow trail down to the camping site. Typically, you can go to the bottom and walk out to get more views of the river. However, due to all the rain we had recently, the water was really high. Trees and picnic tables were covered. It is probably best to do this hike in the summer. Luckily, I did this a few years ago when the water was low.


After trying to snap some good IG pics, we continued to follow the yellow trail out to the parking lot. There are quite a bit of small bridges to cross over. And, this particular area is swampy and gets very buggy. Tons of mosquitoes. I suggest Deep Woods spray for this hike.


We did do some adventuring off the trails mentioned but it shouldn’t be more than 1.5 miles if you use the white to yellow marked trails. Barely took us an hour. This is a very good beginner hike. You don’t need boots but it is a wetlands area so it can be very muddy. It’s a good, quick hike for those locally.

HIKING FOR DONUTS
A blog for the outdoors foodie enthusiast
Hi, I’m Mark. I live in Connecticut. I take new trips every chance I get. A good trip has a great hike, great food, and something fun to do. My goal is to search out new trips and share them to inspire others to try something new and exciting.
If you are looking for posts in a particular place, search by city or state here.
EXPLORE OTHER POSTS IN THE ARCHIVE
Archive
RECOMMENDED POSTS
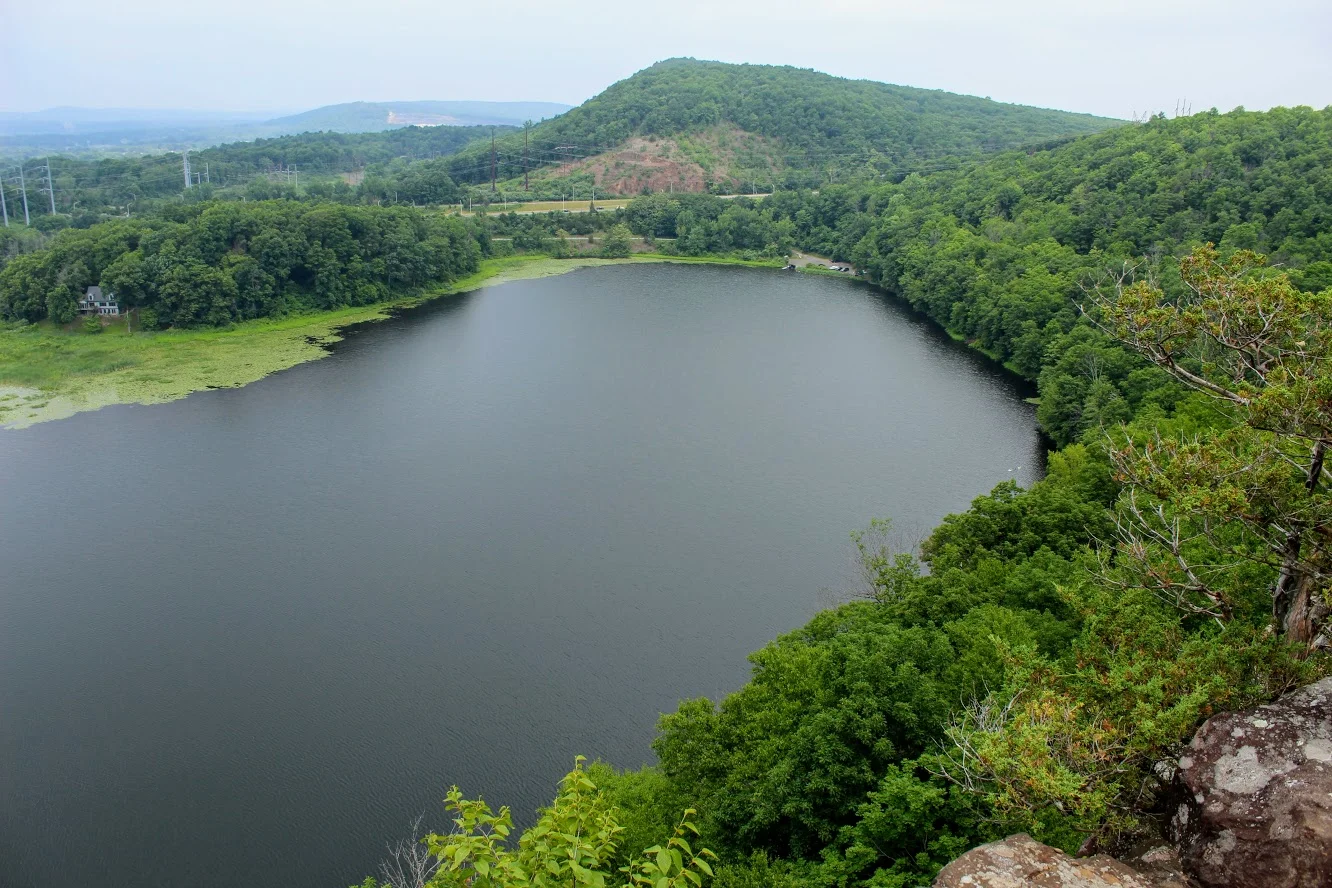
MOST RECENT POSTS
See where I have been recently on Instagram. Follow @HIKINGFORDONUTS
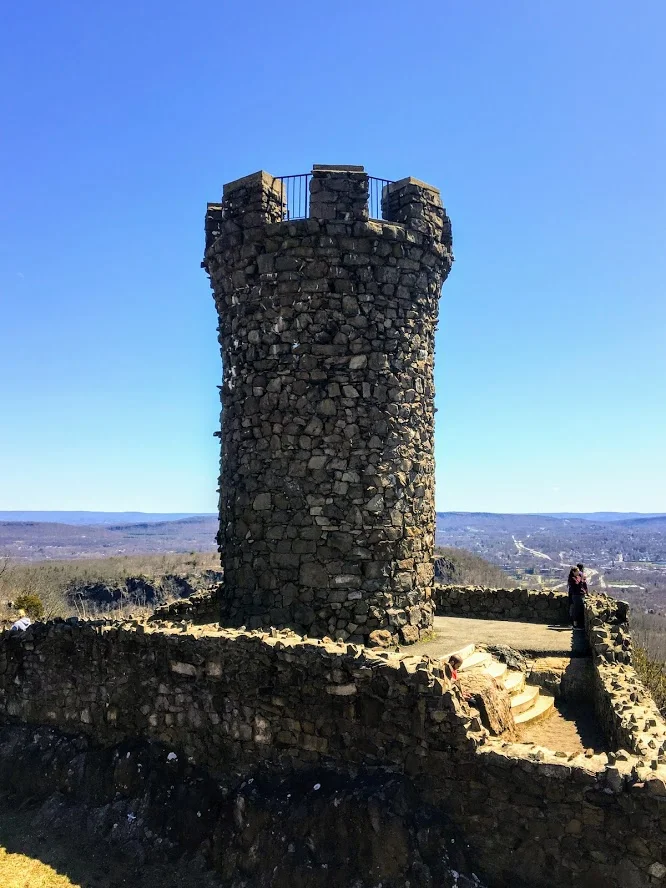
Castle Craig and East Slope Trail, Meriden, CT
Castle Craig is a popular destination in Meriden, CT. There are awesome views from the top. Hiking the East Slope Trail, check out my review!
Spring is finally here to stay. Another beautiful weekend for outdoors. This weekend’s hike was an oldie but goodie. I have hiked up to Castle Craig a few times in the past. The hiking trails are pretty good and there are excellent views at the top. Also, there is an actual castle/tower, which can be climbed via stairs to the top inside the tower. Castle Craig is located in Hubbard Park in Meriden, CT. The park itself is fairly nice, covered with gorgeous daffodils and a large pond with fountains. There are various trails that take you up to the Castle Craig tower. This particular blog will be on the East Peak using the white/red/blue trails. The trail map I used can be found here.
Upon arriving at Hubbard Park, we drove straight until we saw a small lot to our left where the trail head starts.

From here we followed the white blazed trail through the walking tunnel over I-691.
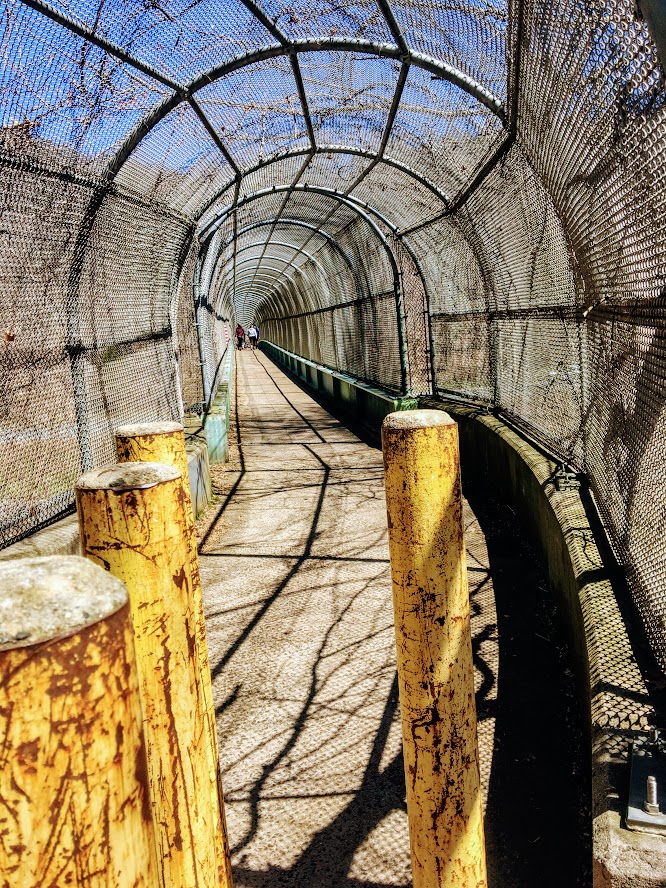
Shortly after, we reached the small foot bridge that passes over a creek.

Continuing on the white trail led us to the Beehive Spring landmark.

From here we continued straight on the red blazed trail for a short distance until we saw the first blue blazed trail. This part of the hike got pretty steep.

The end of the steep ascend took us to the paved road. You have options here. Use the paved road up to the peak or continue along the blue trail to see overlooks of the town and cross the parking lot. We just went up the road.
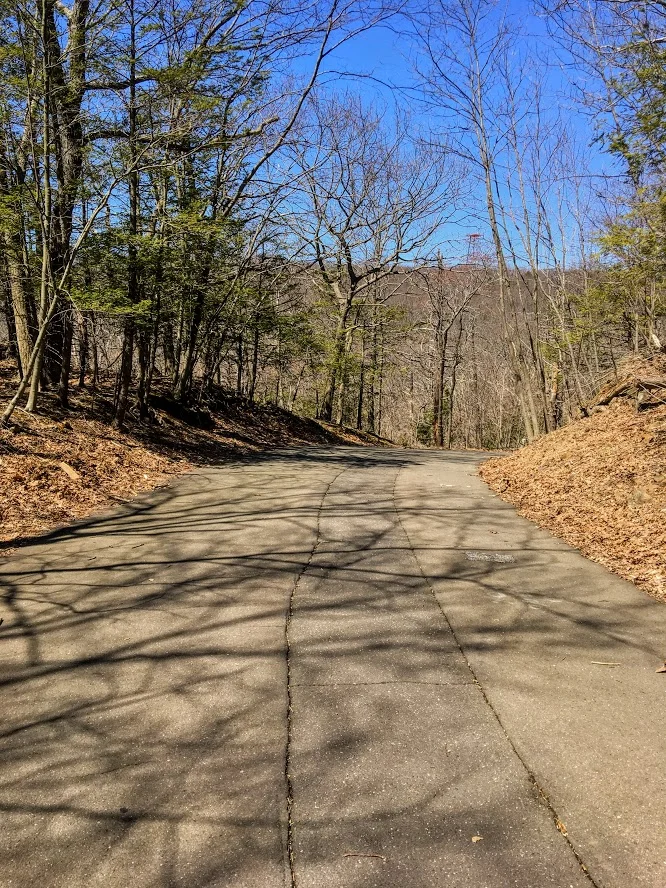
At the end of the road, we reached our destination of the East Peak. Castle Craig tower sits atop the East Peak at 976 feet. The skies were absolutely clear and the views were spectacular. We reached the top to only find a few people but within minutes the peak began to fill out, which is typical.


After making more donut eating boomerang videos, climbing the stairs to the top of the tower, and taking as many pics as possible, we made our descend down the East Peak following the white trail. The downhill is steep at first but then becomes flat. I will say, I was disappointed to find a ton of broken glass at this section of the hike. This is a good hike. And, many families include young children and dogs frequently travel the trails. Take care of the trails! Who would smash bottles?!???! Not cool.

Eventually, the white trail led us down carriage road to the Halfway House.
We passed this landmark and continued to follow the white trail to Merimere Reservoir. Again, the skies were clear and got another great view. We continued alongside of the reservoir until we reached the pave road. We took a right walking down the paved road and took another right on the next road, Notch Road. Passing under 691, this lead us back to where we parked.


Hubbard Park is a great area. The park is generally very populated. On nice days, the hiking trails can be crowded. We had pretty good timing on our hike but did get overwhelmed once we reached the peak. I would suggest doing this during the week, after work if possible. If not, this is still worth the hike when crowded. The Castle Craig tower is unique and the views are fulfilling. I would rate this hike moderate for the average hiker. If you are not use to steep uphill, you may need some breaks. Like most Connecticut hikes, gym shoes are probably ok but hiking boots are best. This hike took my group about just over 2 hours and was 3.5 miles based on the way we took. I have done this hike 4x so far. Definitely recommend for a good Connecticut hike.

HIKING FOR DONUTS
A blog for the outdoors foodie enthusiast
Hi, I’m Mark. I live in Connecticut. I take new trips every chance I get. A good trip has a great hike, great food, and something fun to do. My goal is to search out new trips and share them to inspire others to try something new and exciting.
If you are looking for posts in a particular place, search by city or state here.
EXPLORE OTHER POSTS IN THE ARCHIVE
Archive
RECOMMENDED POSTS
MOST RECENT POSTS
See where I have been recently on Instagram. Follow @HIKINGFORDONUTS

Hiking the Rockies: Hallett Peak
If you want to try a challenging hike in Colorado, this post is for you. Check out my Hallett Peak hike and advice not getting lost like me!
In the summer of 2013, I decided to take my first trip to Colorado. I was looking for a new destination to explore and adventure. As far as in the U.S., Colorado was at the top of my list. My buddy Corey devised a plan as per usual, which was all it took for me to say yes. We had never been there and the Rocky Mountains were calling our names.
Three months later we landed in Denver and got right on the hiking trails. At the time, we were younger and in better shape so the altitude didn’t affect us too much. With that said, my conditioning was tested on a challenging, mammoth hike, which at the time was highest elevation I had ever been. And, that trail was Hallett Peak.

Hallett Peak lies along the Continental Divide, the point at which water on the western slope flows towards the Pacific Ocean, and water on the eastern slope flows towards the Atlantic Ocean. Hallet Peak stands at 12,713 feet tall. The highest mountain I have hiked up to this point was Mount Washburn in Yellowstone a few months earlier at over 7,000 feet.
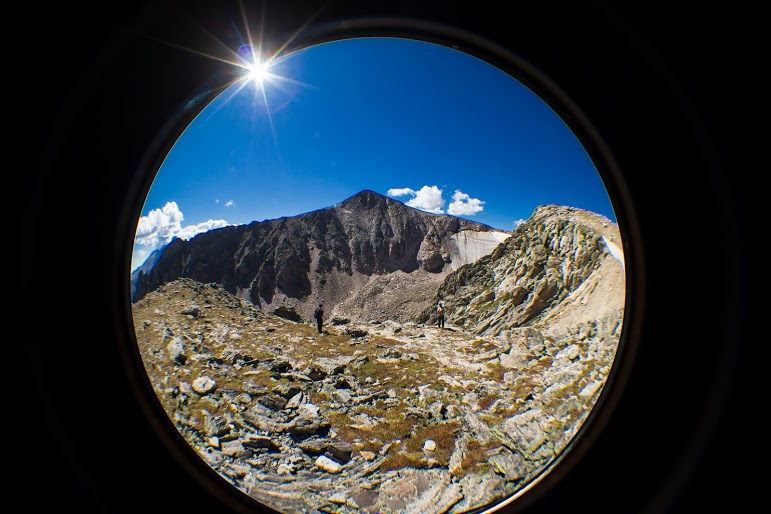

The hike begins at the Bear Lake Trailhead, and then follows the signs toward Flattop Peak. Most of the hike is above tree line as it switchbacks up the side of Flattop Mountain. The trail had some steep uphill moments. The altitude was starting to get to me as we got higher. I had to stop every so often and catch my breathe. This gave us a chance to see wildlife, mostly little critters, and the abundant wildflowers along the way. Once you arrive at the summit you must identify the unnamed trail leading south toward Hallet Peak. Be careful, as we got lost and added an additional two miles by missing the trail. Although, the views were amazing so adding more to the hike was a bonus. Around the top of the of Tyndall Glacier, the last half mile of the hike involves ascending up the slippery, rocky slopes toward the summit by connecting short trails marked by cairns. We reached the top as storm clouds began to appear.

Love me some cairns.


Before we headed back to beat any possible storms, we ate lunch and drank some well-deserved beers. The total round trip for this trail is 10.3 miles. With our detour, we trekked just over 12 miles. This trail was absolutely awesome with remarkable views. The trail was really, really tough but I would do it all over again. I definitely felt like I was on top of the Rockies. John Denver was not full of……


HIKING FOR DONUTS
A blog for the outdoors foodie enthusiast
Hi, I’m Mark. I live in Connecticut. I take new trips every chance I get. A good trip has a great hike, great food, and something fun to do. My goal is to search out new trips and share them to inspire others to try something new and exciting.
If you are looking for posts in a particular place, search by city or state here.
EXPLORE OTHER POSTS IN THE ARCHIVE
Archive
RECOMMENDED POSTS
MOST RECENT POSTS
See where I have been recently on Instagram. Follow @HIKINGFORDONUTS

How to spend a weekend in Burlington, VT: Food & Breweries
Burlington, VT is a great long weekend destination. Lots of food and breweries in walking distance. Check out my blog post on the best food and drink spots in Burlington, VT.
My first trip to Burlington, VT was a few years ago. I couldn't believe I hadn't made a trip to this great city. There are lots of breweries, food, and outdoor activities. You could walk pretty much everywhere. In the summer, there are farmers markets and food trucks. I really enjoyed my stay but it was short. My girlfriend, Nichole, had never been and I thought it was a great weekend trip idea. Also, I have been wanting to stay at Hotel Vermont and they have a sweet black friday deal. And, it is a perfect location to walk around and Lake Champlain is across the street. Hotel Vermont was only a mile or two from everywhere we went, it was a great central location to stay. If you read the blog, you know we really get after it when we travel to new cities. And, Burlington was no different. We went to as many breweries as possible and ate our faces off. I did all the work for you! Here is a list of the best places to eat and drink in Burlington. If I missed any, please comment. I will be back.
The Food
Farmhouse Tap & Grill was the first meal we had in Burlington. This was the typical fancier local restaurant. It is always super busy. We had to wait over an hour for a table, given it was a Friday night. They have a great beer menu. The food is actually pretty good, especially the burgers. However, it is a bit pricey to me. There is a big farm to table presence in Burlington and that drives the price up.


The Swingin' Pinwheel Café Bakery was the surprise of the weekend. Do not pass up this breakfast when you walk by. The hostess was hilarious and friendly. The menu has so many good options. It is a smaller spot so be mindful. The decor definitely had that western and cowboy feel. They are known for their Wafflini, which is a waffle made with pastry dough and pressed like a panini, and they have multiple types. We had to get one and it was phenomenal. We started with a popover and ate it so fast, I didn't even get a picture!


Red Onion was recommended to me by someone from the area. They told me, the sandwiches sound weird but go with it. It was quite an interesting little spot on Church Street (main area for shops/restaurants). I ordered the Red Onion sandwich, which consisted of turkey, vt cheddar, red onion, granny smith apple slices, and sun-dried tomato mayo on honey oat bread. The bread was like an inch thick! Nichole got the spinach melt. This consisted of a TON of fresh baby spinach, mushrooms, red onions, sharp cheddar, and garlic mayo on honey oat. They were both delicious. If you need a quick bite, I definitely would suggest the Red Onion.

There is surprisingly a fair amount of Mexican dishes and restaurants in Burlington. For that reason we were craving Mexican and chose El Cortijo Taqueria Y Cantina as it was the closest with the best ratings. And, they were a sister company of the Farmhouse Tap & Grill. This is a very small location. Luckily, we got seated right away but the dinner crowd hit and the front of the restaurant was overly crowded and flowed near the tables. It was a bit uncomfortable eating with people on top of you waiting to be called. And, the food was just ok. Nichole enjoyed her margarita but the rest was less memorable.
And you know we hit up Ben & Jerry's for dessert.

Monarch and the Milkweed was another great breakfast find. This was a quaint, trendy shop in the town center that fits maybe 15-20 people. One of the reasons I chose there was because they make donuts, mini but I don't discriminate. The donuts were ehh but the breakfast was awesome. I had the fried chicken sandwich with gruyère cheese, red onions, and some aoli that reminded me of Big Mac sauce. Nichole had the pancake stack and they were really good and cooked perfectly.
Fortunately, on the way home, we made a surprising delicious stop, only 20 minutes outside of Burlington. We mentioned to some people we met along the way, we were going to Fiddlehead Brewing. Every person said you have to go to the pizza place next door, and that was Folino's Wood Fire Pizza. No one has to twist my arm to have some pizza. This place gets really packed from the Fiddlehead crowd. You will be seated by someone but you have to do everything else, get your own plates, order at the cashier, etc. Aside from that tidbit, the pizza was awesome. Maybe the best buffalo chicken pizza I have ever had. Everything just worked. Make this part of your to-do list.
The Breweries
On the way up from CT, our first beer stop was at Burlington Beer Company. This was only 20 minutes or so outside of Burlington. This was in a cool industrial location. The inside was cool and trendy. They had old school video game systems. They offer a lengthy list of beers, including IPAs, Porters, and Stouts. The beer was good. A little hoppier for my taste but I see why they are popular. They fit into the craft beer scene perfectly.
Switchback Brewery was first on the list of our brewery crawl and the furthest, 2 mile walk but it actually wasn't bad. I have been before and really like their beers. Their Connector IPA is my favorite. The inside is pretty nice and feels inviting. And, the world's largest filing cabinet is on the way! Seriously, it exists.


Queen City Brewery was our favorite brewery. I don't recall seeing it last time I was here. It was tucked away behind a local printing business. It is close to Zero Gravity. They had a big wall of beers and there was an old truck on the the very top of the bar once inside. They had 13 beers to choose from and I liked most of them. My favorite was a tripel Belgian named Monk of Underhill. This isn't a place if you want hoppy beers. They had mostly porters, stouts, and lagers. I am not even a porter guy and I enjoyed their version of that. The bartender was really nice and it was just a good atmosphere.


This isn't a brewery but a cidery counts. Citizen Cider is one of my favorite ciders. Last time I came here, I had a blast. They had quite a bit of options as usual to try out. I really like what they do with their ciders. They aren' t just sweet and one taste. Definitely a staple to visit when in Burlington.


Ah, the new popular guy. Foam Brewery wasn't opened last time I was here. Since then, I have heard a lot about this brewery from friends. We made our way there as the last stop and the location is great. It is right off the water. In warmer weather, it must be even more busy than it was. However, they do not have flights of beers as an option and the beer was pricier than other breweries. And, the beer was super hoppy...almost too much. Again, that is not for me. I preferred other breweries.
The weekend of breweries was not quite over yet. The last stop on the ride home was Fiddlehead Brewery. I had their beers before and really enjoyed them. I had to stop in and check it out. At this location in Shelburne, VT, you can only buy beer that is canned, sample what they have available that day and get growlers. It is very small and can get crowded quick. We went as it opened and the lot quickly filled up and cars were coming and going. I liked what they had on tap and I ended up getting a growler and buying cans. We did make a few other stops for beverages.
Vermont Pub & Brewery was pretty average. It is really big and they have basic food options to please the generic eater. Seems like the place all tourists go when other places are busy. And, the beer wasn't great. They are a bit behind the other breweries in the beer department. The other bar we did go to was Archives. This was a bar filled with arcade games and a pretty good beer, cocktails, and wine menu. If you are into old video games like pacman, street fighter, pin ball, and other oldies, this is the spot for you.
Bonus: A Winery?
Not only did Fiddlehead Brewery have an awesome pizza spot next door but there was also a Winery across the street! By far, the happiest Nichole was all weekend as she likes wine way more than beer. Of course, we kept the ball rollin' at Shelburne Winery and did a tasting. This consisted of 10 wines and they were not shy with the pours. I also liked they gave a list of the wine with a marker so you could keep track of what you liked and they had a funny comment & description about each wine. I do not like wine that much but I did like a few of the white wines and a red that had chocolate in it. Nichole ended up buying two bottles. This was a great way to the end the trip. Beer, wine, & pizza. We accomplished a lot and I think we did a good job finding some good go to spots. I hope you enjoyed reading and will try out some of my suggestions. Cheers to beers & delicious food!


HIKING FOR DONUTS
A blog for the outdoors foodie enthusiast
Hi, I’m Mark. I live in Connecticut. I take new trips every chance I get. A good trip has a great hike, great food, and something fun to do. My goal is to search out new trips and share them to inspire others to try something new and exciting.
If you are looking for posts in a particular place, search by city or state here.
EXPLORE OTHER POSTS IN THE ARCHIVE
Archive
RECOMMENDED POSTS

MOST RECENT POSTS
See where I have been recently on Instagram. Follow @HIKINGFORDONUTS